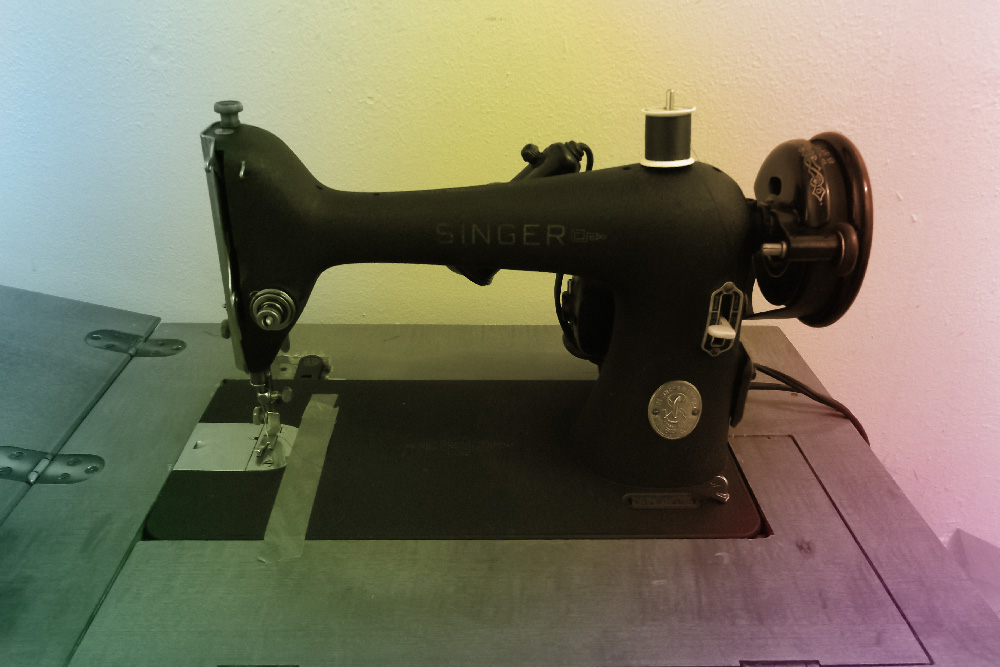
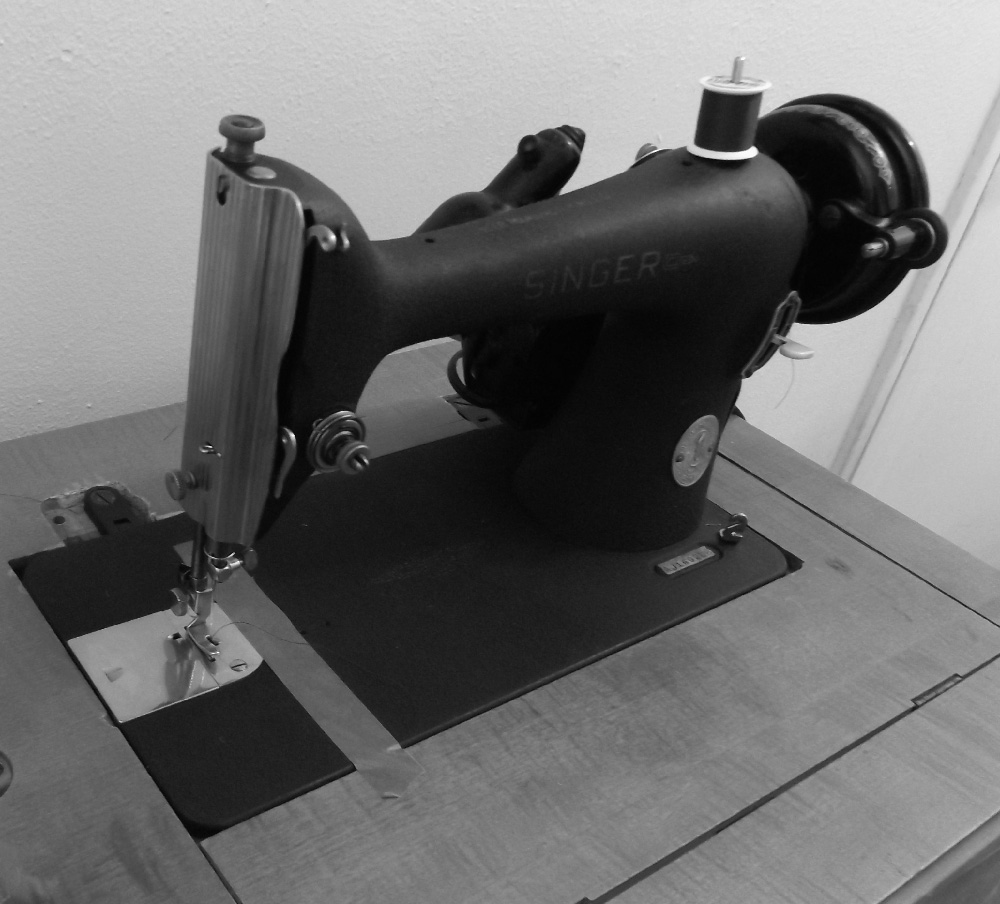
I recently worked on a Singer Model 99K sewing machine and so I thought I’d share a little about how I went about servicing and repairing the machine to bring it back into working condition. I’ll begin with explaining how the machine came into my hands for service.
My mother teaches sewing professionally. She teaches students of all skill levels from novices who have never sewn before to master designers that work with the top international models in the industry. http://www.bizzyhandz.com/wordpress
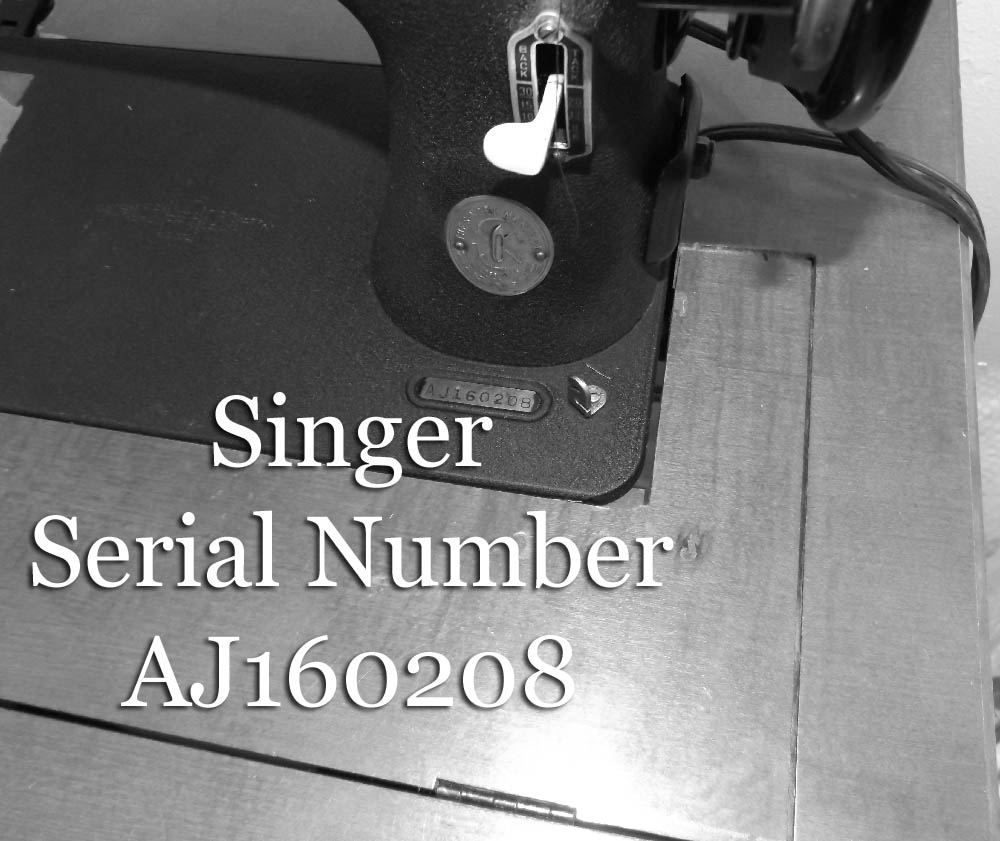
Although she has a number of sewing machines she uses she told me that one of her older machines was inoperable and needed some work. It was a Singer sewing machine built into a small table. The table lid opens expanding the working surface and once the door in the front is open the machine can be flipped out from its resting position which is normally upside down and inside the table. After doing research it was determined based upon the design and serial number that it is a Singer Model 99K.
 Originally the machine belonged to my great-grandmother with whom my mother lived for much of her childhood and from whom my mother learned to sew. My great-grandmother did not use store bought patterns. Instead she made her own from brown paper bags. She also used brown paper bags to make envelopes for personal correspondence.
At some point during my mother’s childhood my great-grandmother obtained a new machine for herself and decided to move the Singer Model 99K into my mother’s room for her use. The natural approach to sewing which my great-grandmother had taught my mother allowed my mother to make dresses for herself at a young age without a store-bought pattern and the traditional training helped prepare her for a successful career as a teacher in the art of sewing and clothing design.
After my mother married and started a life of her own the Singer Model 99K remained with my great-grandmother and did so until she died. Her house, and the property inside, remained the property of her husband until his death at which time it passed to another relative. Many years after the heir asked my mother if she wanted the machine and another one like it that was still inside the home. My mother took both of the machines giving the second one to one of her sisters.
When I began my examination of the machine it appeared in good condition overall. The hinges of the table top appeared in perfect condition, but the hinges which allow the machine to swing upward were loose, but the holes in the wood were not stripped at all so I was able to tighten them without a problem.
 The wheel of the machine rotated freely and it moved the action of the sewing apparatus correctly so I knew I would not have any trouble there.
The rod on the top of the machine which holds the spindle of thread appeared to be bent a bit, but not enough to cause a problem and so I figured that bending it back again was an unnecessary risk.
The plate over the bobbin case was in the plastic tray of the door attached to the inside of the door and not in its correct place on the machine. It appeared that the leaf spring which allows the plate to stay in place and upon which it slides over its dove-tailed groves was adjusted too tightly to give correct tension to retain the plate. To solve this the previous owner had simply tightened the screw and let the plate sit flush by force of gravity. The only trouble with that solution is that the plate had to be removed before putting the machine back into its resting position inside the table. I corrected the problem by removing the screw and spring and making a paper spacer to go underneath them out of some paper towels which pushed upward on the spring a bit giving it proper tension once the screw was re-tightened. This changed the profile of the spring so that it had the right profile to engage the dove-tail slots of the plate as required. For some models you can remove the plate by sliding it simply to the left, but here I had to do it another way. Because of the cabinet design I found that it is better to remove the plate by sliding it left first a bit then lifting the right side a bit and sliding it out by moving it towards the needle passing it underneath the lifted foot and raised needle. The manual shows that regardless of how it was removed it should be replaced by passing it underneath the foot from the right towards the left.
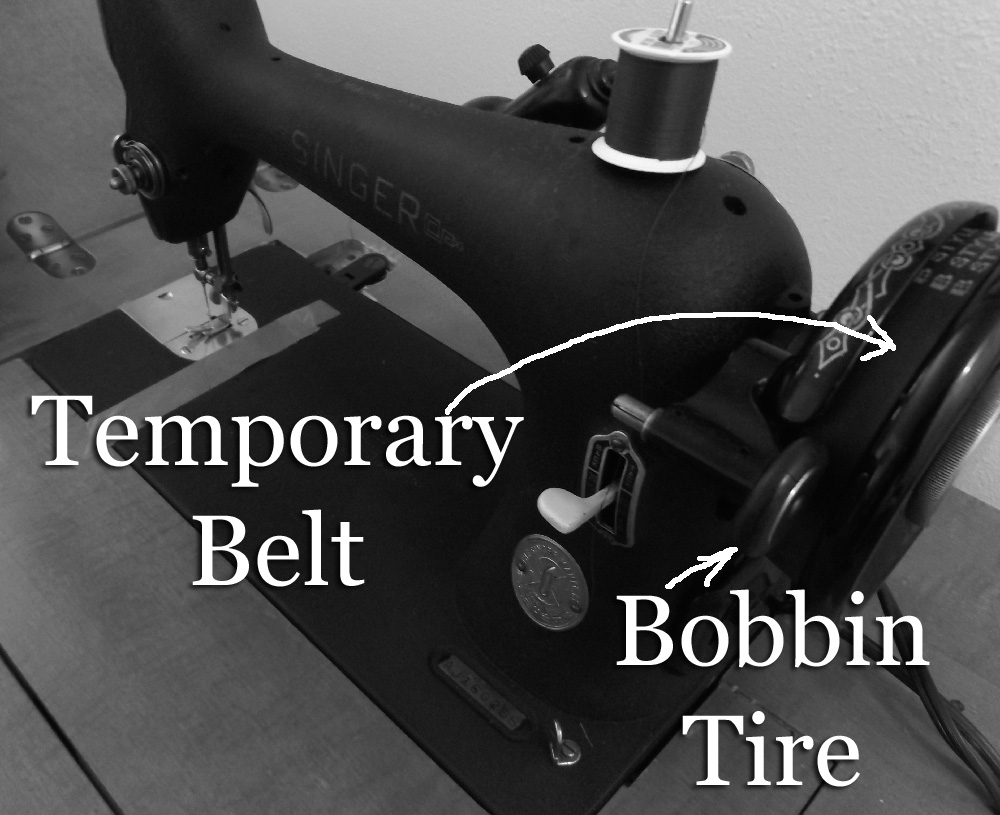
The belt which connects the motor to the wheel was missing and the rubber tire for the bobbin winder was cracked. However the tire was still soft and working well enough. I did a little research and found that the original belt should be fifteen inches long and while earlier models appear to have originally used a flat belt the wheels on this edition appear to have used a round or perhaps a slightly v shaped belt. Fabric stores used to stock replacement belts, but most do not anymore and machine repair shops often charge far too much for replacement parts and often sell used parts as though they are new so I looked around the internet and I found out that I could order a new Singer brand belt and bobbin tire as a set and so I did. (http://www.amazon.com/gp/product/B003WMFH1K)
Until they arrived however I placed a flat belt on the machine from a vacuum cleaner. The temporary belt was seventeen inches long and a type B. It wasn’t correct at all, but I found that it could go around the outside diameter of the wheels instead of sitting in the grove so it worked well enough to test and work with the machine for the three days until the other one that I had ordered arrived. Once the correct one arrived it fit perfectly and I just had to adjust the tension a bit. The tension on the drive belt can be adjusted by loosing the mounting screw for the motor. The correct adjustment should be just until there is some tension, but not actually tight.
The bobbin tire just rolls off of its wheel by pressing it with your thumb and then a new one can be rolled back onto the wheel. The new one is slightly smaller both in terms of inside diameter and thickness, but this makes no difference as the bobbin tire engages the main drive belt by swinging the arm of the bobbin winder downward so the size of the tire is not at all critical. That is a very good design. Some other models had a very complex threaded system which would be easily damaged and hard to repair. The rubber tire is not as elaborate but no less elegant as simplicity and efficiency is as much a part of elegance as sophistication and decoration. You should make sure that the bobbin tire is disengaged from the drive belt when you are sewing so that it will not spin to lessen danger to the user who could get something caught between the spinning parts or around them and to reduce wear on the tire.
There was a bit of surface rust on some of the external parts, but no pitting except on one of the knobs which appeared to have some of its chrome missing. I just cleaned the surfaces up with oil that was allowed to sit for a few hours and some vigorous rubbing with a paper towel and that removed the surface rust extremely well. The internal parts showed no rust at all, but the machine was bone dry so all of the moving parts were throughly oiled and worked and re-oiled several times. The resting parts were given a light coat of oil as well to prevent rusting. Instead of simply using the oiling ports to apply the oil I opened the machine up and applied the oil with a small straw that came with the oil. The type of oil that I used was Break Free CLP (http://www.amazon.com/Break-Free-Cleaner-Lubricant-Preservative-Squeeze/dp/B0050GW7KU) which is an excellent product I use often as it has a low odor and lubricates and cleans the parts simultaneously. You can order it online or get it from auto repair shops, gunshops, and sporting goods. It comes in a few size bottle or as a spray. I do not use spray products as I know they will end up in my lungs so I usually buy the four ounce bottle which includes a little straw for precision application. Break Free CLP is a bit expensive, but it is well worth the cost. It is something like a very light motor oil and it has many useful applications. For general application I feel it is a much better product than WD-40 which stinks and which I have found to be poor at lubricating and preventing rust.
In most cases for an entirely non-toxic solution where you need lubrication or rust prevention you can accomplish this for a very low cast using mineral oil or and lard if a cutting action is needed for machine work. Most of the time mineral oil is a good alternative to something like Break Free CLP, but for sewing machines it would be a bad choice because mineral oil is a bit sticky and sewing machines produce a lot of lint which would stick to the parts gumming up the works. For sewing machines the oil should be light.
Grease should avoided as well for the same reason as avoiding mineral oil, but after studying the design of the machine I would say that there are a couple of places that grease would be helpful. They would include the wearing surface of the arm shaft (the main shaft that runs horizontally inside the middle of body of the machine called the horizontal arm) where it rubs against the feed connecting rod (the forked object that runs vertically into the body of the machine). This part has a lot of wear on it and grease could be helpful. It can be accessed by the removable plate at the rear of the machine above the motor (called arm side cover).
The other place I saw where grease could be helpful is the coil spring within the upper sewing action assembly which wraps around the shaft on which you attach the sewing foot (the foot is properly called the press bar and the shaft is called the presser bar and the spring is called the presser bar spring). In machine service coil springs like these are often greased because they suffer a lot of wear as the shaft moves against them and the grease stays put much better than thin oil when placed on coil springs. However in both of these cases I opted for the Break Free CLP to keep the lint problem at bay.
The bobbin was missing, but the bobbin case was in place so I placed a plastic bobbin in the machine and found that it worked fine once I made a another adjustment that was unrelated to the bobbin itself (discussed later). The only problem with plastic bobbins is sometimes they can crack when placed on the bobbin winder. So I ordered replacement metal bobbins type 66. (http://www.amazon.com/gp/product/B002G3YNBG – these did not fit!)
Type 66 are supposed to work better than type 99 because the 66s are domed on top to provide for a smoother pass of the thread over the top of them. However when the one I ordered arrived they did not even nearly fit. They were too tall and the outside diameter was far too large and the tops were not domed. I tried bending down the edges to decrease the outside diameter and did so significantly and they were still far too large. I guess I’ll use the plastic bobbins for the time being.
I noticed that the machine originally was equipped with a knee pedal which can be accessed by opening the door on the front of the table. The pedal remained in place, but the machine was now equipped with a foot pedal which, according the documentation I was able to obtain, appears to be the correct type for that model of machine. My mother says she does not remember using the knee pedal, but instead she remembers the foot pedal and so the alteration must have been done early in the machine’s life. My mother had no desire to return to the knee pedal system so nothing was changed regarding that.
I checked the cables of the motor and pedal carefully for cracks and decay and found them in very good condition. I tested the motor and pedal and found that they worked fine. The motor appears to be original and when I connected the temporary belt (the one I pulled off a vacuum cleaner) the machine seemed to be working.
When doing research I read that a piece of felt should be present within the bobbin area just to the right of the bobbin button (which when depressed lifts the bobbin out of the bobbin case), but no felt was present and so I cut a new piece and placed it there.
I do not know much about the design so I don’t know much about the felt and since the machine was in working condition and no rust was visible and the timing seemed correct I did not fully disassemble the lower thread mechanism to examine it, but it appeared to my eyes that the felt presses against a spring providing pressure to the spring so that the spring can press on another part keeping two parts from touching, but as I said I did not examine the mechanism carefully. The felt bears against the spring as the felt is wedged between the spring and a rotating part (called the oscillating or rotating hook). The felt (called the felt bearing) acts as a bearing allowing the moving part of the mechanism to rotate freely while still providing pressure against the spring. I have worked on other kinds of machines before but this is the first sewing machine I have worked on and I have never seen a felt bearing before and so I learned something new about machine design by working on the Singer Model 99K. Felt bearings seem to be a good solution to the problem of providing pressure between a fixed or mostly fixed part and a moving part.
I removed the bobbin case (which is tricky to get out, but requires no tools or pressure) and lightly stoned the surface over which the lever that must be lifted to remove the bobbin must pass. The surface had been roughly cut and passing the level over it was making a scraping sound so I knew that stoning this surface a bit would be an improvement that would make the lever last much longer.
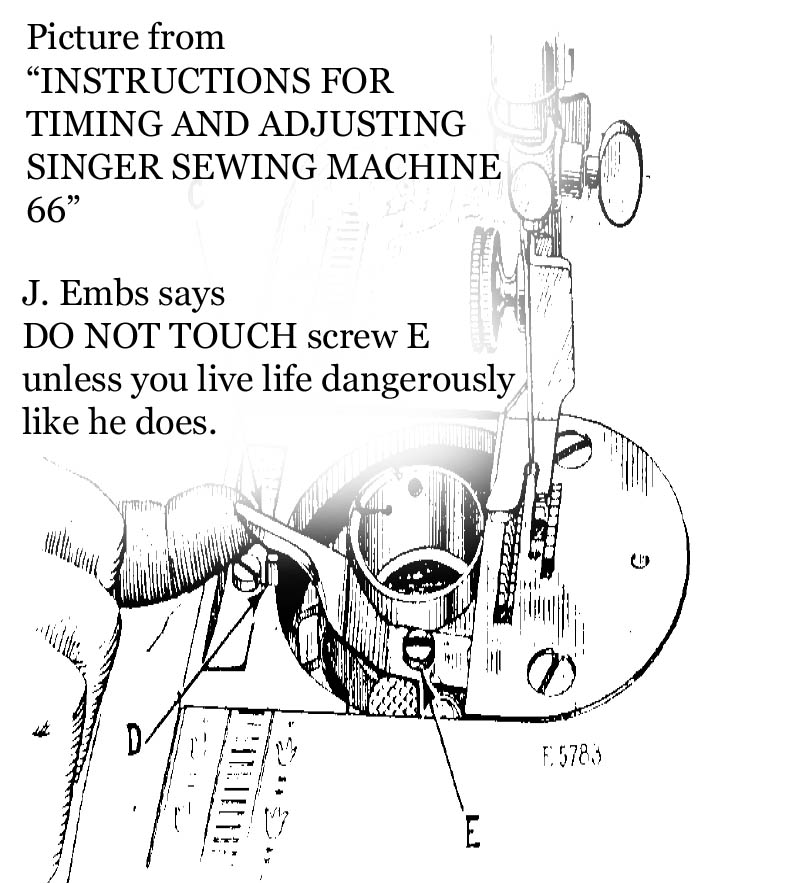
Before testing the machine with a bobbin I threaded the top thread and found that the machine was having trouble passing the top thread underneath the bobbin case. I slightly rotated the adjustment screw within the bobbin case. The manual said that this screw must never be touched, but I live for danger and I figured it would solve the problem and it did. Later I found a service manual and found that I was correct about this screw. The manual says, “Under no circumstances must the Screw (E, Fig. 3) be loosened. The loosening of this screw will change the clearance for the thread between the bobbin case and bobbin case position bracket).” And of course that was exactly the thing I wanted to adjust. How much did I turn it? Well I turned it so little I couldn’t tell I had turned it. That’s how much. I retested the top thread action to see if the thread would pass over the top of the bobbin, around it, and underneath it and now it seemed there was enough space for the thread to pass underneath the bobbin as required.
I placed a plastic bobbin in the machine and tested everything and the machine was in working condition again. I wiped off the excess oil from all of the parts that touch thread and the external parts so that no oil would get on any material and cleaned the external parts with a light wash of soap and water on a moist paper towel drying it immediately afterwards. The machine was good to go.
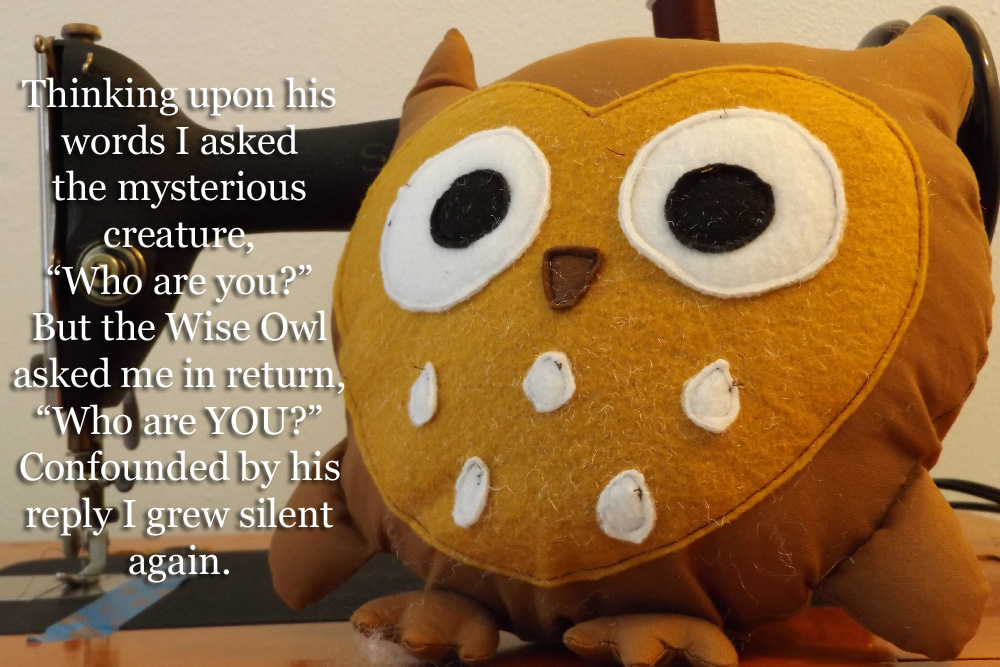
I then asked my mother to teach me how to sew and within three days made the owl plush toy you see here from a purchased pattern. I tried a cushion first and had some success although the shape was not perfectly round and I tried to sew some pants and had some trouble, but they were not the right size anyway as the pattern runs at least one size too big (later I did two pairs of pants in my size that worked out fine), but the plush toy was a success and I had no trouble with him. The whole project only took a few hours and turned out fine. It would have been better if I had ironed the material before cutting, but everything went together fine.

The Owl’s Question
The process of making the owl was to cut the body, hands, and wings, from folded cotton material to make two pieces for each. I gave the body a small seam allowance as one was not included in the design of the pattern. My allowance was much smaller than what was recommended, but it still worked out fine. The face and related parts were cut from felt.
The hands and wings were sewn together leaving an opening and turned inside out and stuffed. The parts of the face were laid onto the face and sewn down with the standard applique technique and then the face as a whole piece was sewn by way of applique to the body. I walked the sewing action by manually turning the wheel for all of the applique to make sure I did not mess up the face.
The front of the body was placed onto the the back of the body face down and the feet and wings placed between the two and hidden inside between the two layers. The whole thing was pinned together making sure that the edges of the feet and wings were pinned to the edges of the body exactly all the way around them so that the edges of the hands and wing would not protrude or recede out or inside the edge of the body when the body was squished down.
The entire body was sewn all the way around, but I left maybe a two and a half inch opening at the top of the head for turning the body inside out and stuffing the creature, which I did next.
I then used a ladder stitch to close the hole at the top of the owl’s head and the creature was finished.
My Question
The machine works and the owl is wise and he made a good gift for someone so not only did I fix the machine, but I learned to sew in the process. My mother is a very good teacher. As I said I already made two pairs of pants that are very nice. They have an elastic waistband and elastic cuffs for the legs.
I hope this article helped you understand how to repair and maintain these fantastic sewing machines that were made when America still had a manufacturing base before the communists seized and destroyed the means of production putting hundreds of millions of Americans out of work permanently. Our great-great, great, and simply grand, parents invested in the future for us when they manufactured, purchased, and worked on these old machines. They knew the machines that if they cared for them the machines would outlive them and be passed down through many generations. We owe them a lot as they sacrificed for the future. Manufacturers and consumers today could learn a lot from the makers and customers of the past who scorned obsolescence, frivolity, disposability, and chose to only make and buy machines of superb quality and durability. We will not use the phones and I-Pads and cars made today fifty years from now. They will not endure that long. But we will still use the sewing machines made from the beginning of to middle of the twentieth century. This machine was born in nineteen-forty-nine and she’s still kicking it like a cancan dancer and rocking it like a Rockette.
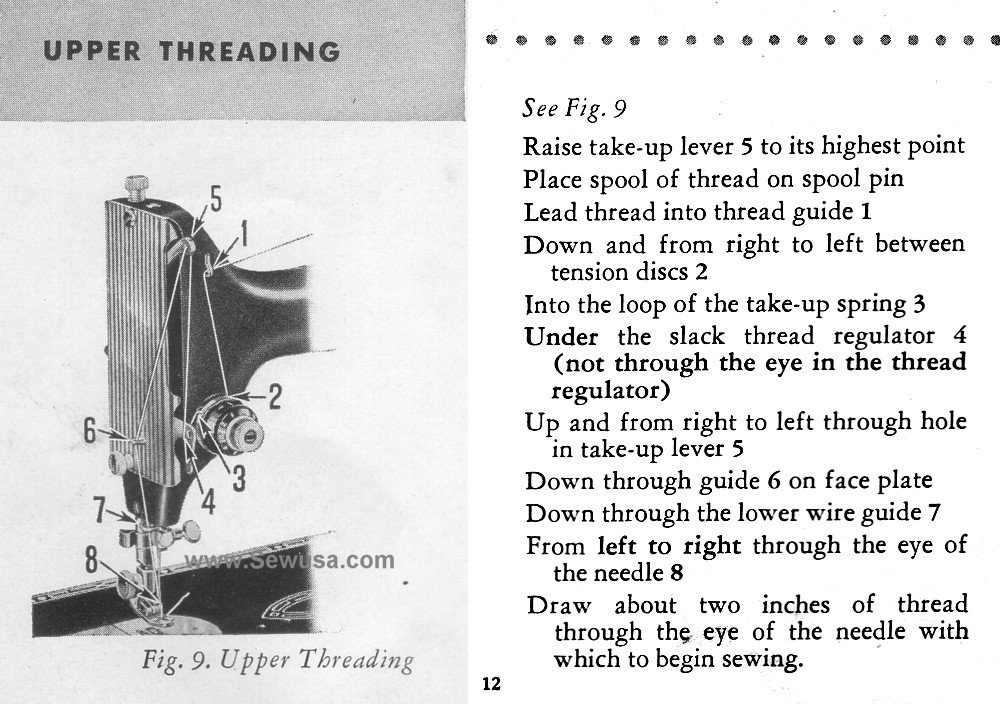
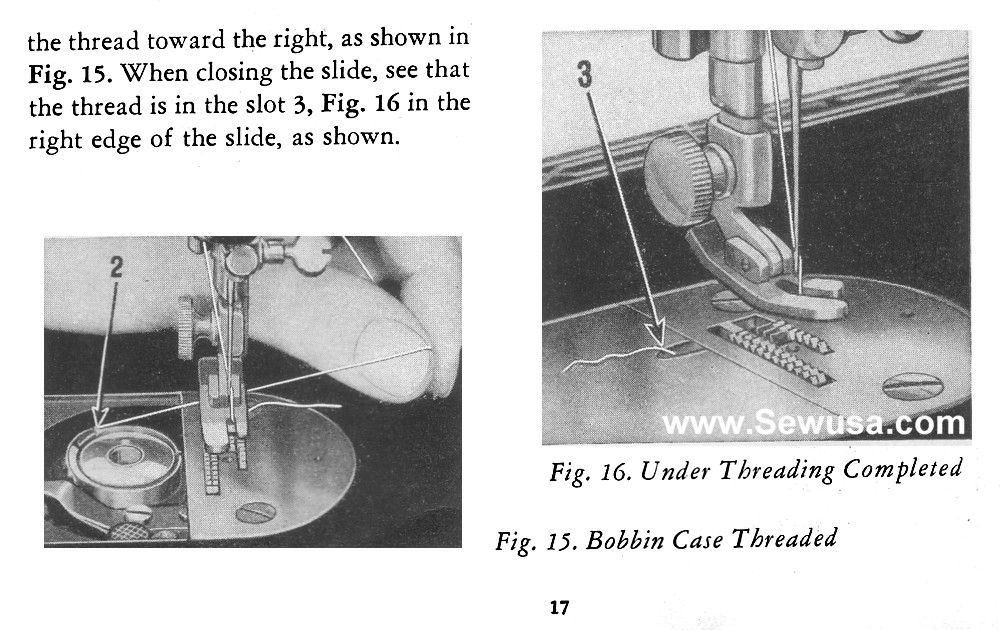
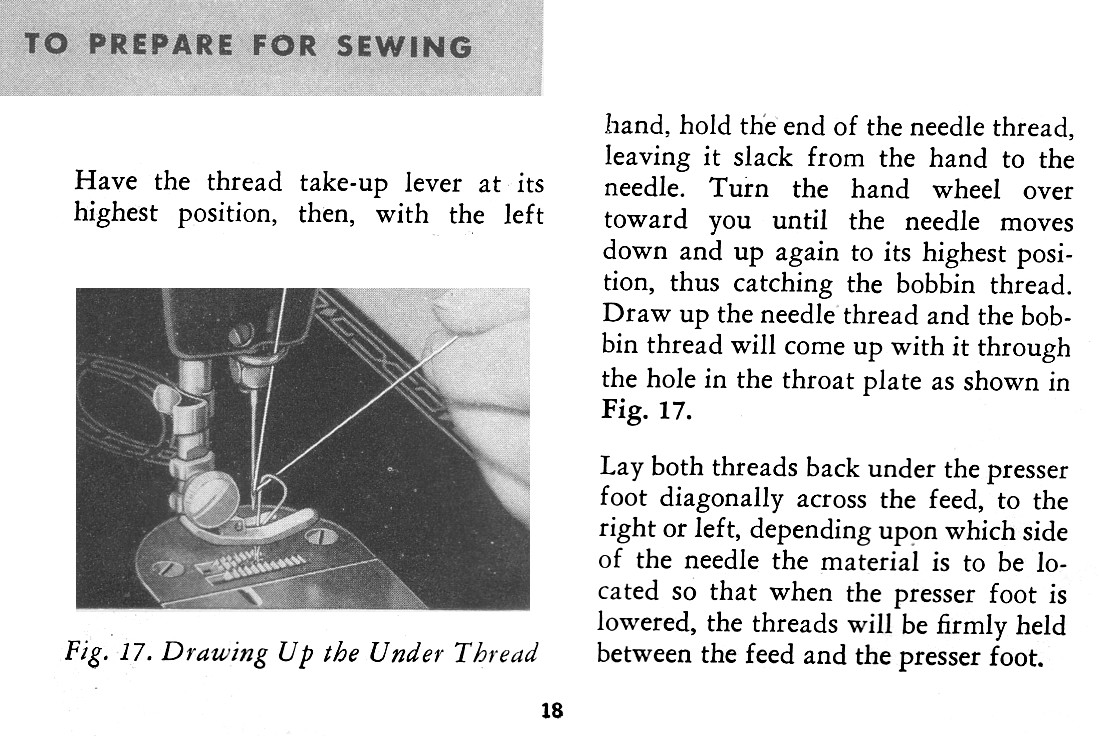
Some additional information about how to thread the machine is below: