
I got some new pillows today. I needed to make pillow cases for them. I took some measurements off another case I had and drew up this pattern and instructions. My finished product is in the first picture. I cut the length a little short so I adjusted the length of the side fold so the finished product was still 30 inches in length and it fit my pillow great. I hope this pattern and instruction helps you too. Is drafting a pattern for a pillowcase in Rhinoceros a little man-ish? A little bit? Good. Cause that’s what I did. I’m a man.

1 Piece Pillowcase Pattern
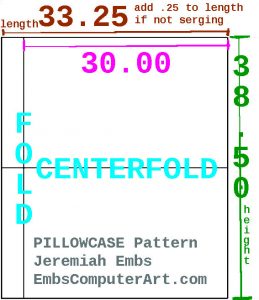
Materials Needed: A piece of material measuring 33.25 in. length x 38.50 in height (add 0.25 – 0.50 around if not serging).
Finished Size : approximately 30 inches long x 19.25 inches high.
Instructions:
1: Cut out the material for case from whatever material you’ve chosen. Face the correct side that you eventually want to face outward in the finished product (the side with the fancy print on it or nicer surface that you want to see in the finished product down against the table).
2. Grab the left side and fold it towards the right about 1/2 inches. Pin and sew down.
3: Again grab the left side and fold over about 3.0 – 3.25 in. of the left side towards the right side to make a fold. For a longer pillow case than a finished length of about 30 inches fold less of the material during this step.
4. Now pin the folded material in place to secure the fold and iron down if necessary and/or baste it in preparation for the next step.
5: Sew the right most edge of the fold which is now closer to the middle of the case so that you make the fold permanent (or just temporarily baste it before the next step if you do not want to see the stitching later). The seam allowance can be about 1/4 (0.25 inches) or more.
6: Fold the pillow case in half along center fold line backwards so the 38.50 inch vertical measurement becomes 19.25 inches. The correct side (the side with the print you want to see in the final product) should be hidden inside so that it is still not visible.
7. Fold down raw edge on top by about 1/4 (0.25 inches) to 1/2 inches. Do the same to the right side. This folding will help prevent fraying but is not necessary if you have a serger. Folding it down twice and sewing it down in between each time will prevent a raw edge from remaining, but in my case I just folded it down once, sewed it once and then sewed about 1/16th of an inch from the stitch again to give it a line to check the fray to. That was a crude, but fast solution.
8: Sew pillow case together around the now folded edges on the right side and top only. Leave the left side open.
9: Turn pillow case inside out and you are done.