
Note: This writing of this article still in progress – it contains random personal notes, not final recommendations and isn’t correctly formatted or checked for accuracy.
Notes on changing fep film: The vat has six parts. The vat itself into which larger screws are inserted to hold the two part ring assembly in place, the ring which is in two parts, the fep film, and the various hex screws of two sizes, large and small. The larger hex screw wrench sizes are 3/32nds and the smaller 5/64ths. You’ll want to remove all the screws and clean the vat and parts well. After cleaning exposing it to sunlight will help make it safe to work with for the rest of the process. Throw away the old fep film and place one valve ring on the table with the flat side facing up. Fold two tissue papers into fourths and place them in the center as a spacer. Place the fep film on top. Place the second valve ring on top of that with the flat part facing down and puncture the fep film through one of the smaller holes that it used to bind the two rings together with a sewing pin a few times and use insert a screw tightening it enough that the rings and fep film won’t move. Continue from side to side until the whole fep assembly is secure. Place the assembly into the vat and loosen the fep assembly screws a bit at a time until you can press fit the assembly into the vat creating tension on the fep film, but not so much as to strip out the screw holes of the vat when inserting the larger screws. Insert the first larger screw and tighten about half way. Press the fep assembly ring down and see how much tension is on it for the screw of the opposite end. If needed loosen the small screws more. Insert second screw and tighten about half way. Continue until all the larger screws are in place. If the fep film is too loose at any point tighten the smaller screws. If too tight loosen them. Make CERTAIN the large screws are below the edge of the vat so they don’t scratch your screen when returning and removing the vat from the printer. If needed finely sand the screw heads to remove burrs or high spots or use a fine whetstone as I did.
General Tips for Success in 3d resin printing:
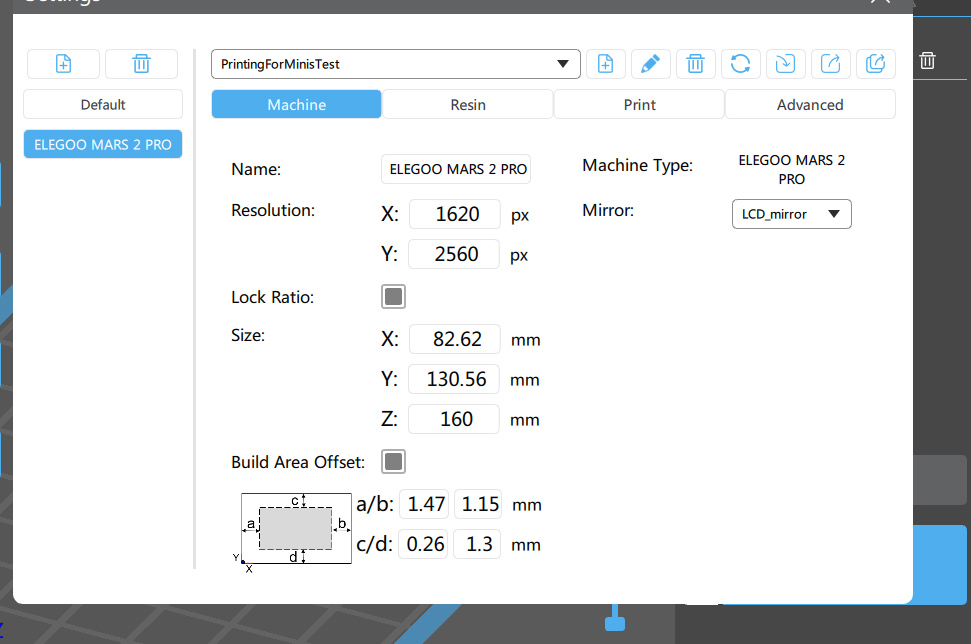
Elegoo Mars 2 Pro Chitubox Settings – Resolution X/Y 1620×2560 px, Lock Ratio, Size X/Y/Z 82.62×130.56×160 mm, Build Area Offset a/b/c/d 1.47×1.15×0.26×1.3 mm, Mirror LCD_mirror. If I understand it correctly the Build Area Offset is not necessary, but is an extra safety measure to avoid putting things too close to the edge where they may not print correctly.
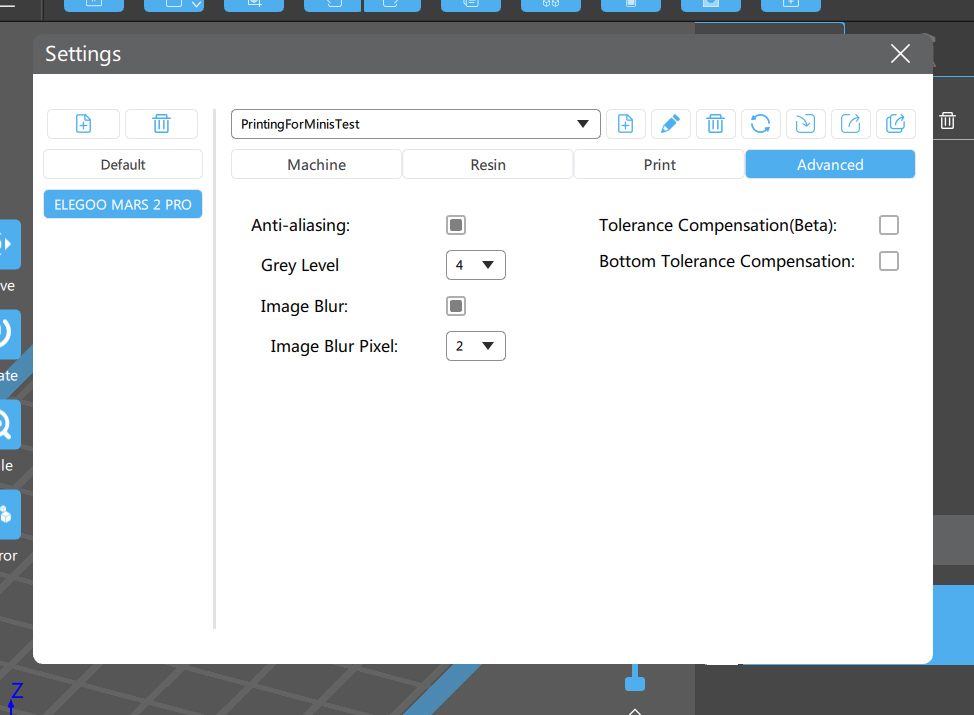
Advanced Settings – Anti-aliasing, Grey Level 4, Image Blur, Image Blur Pixel 2, No Tolerance Compensation or Bottom Tolerance Compensation.
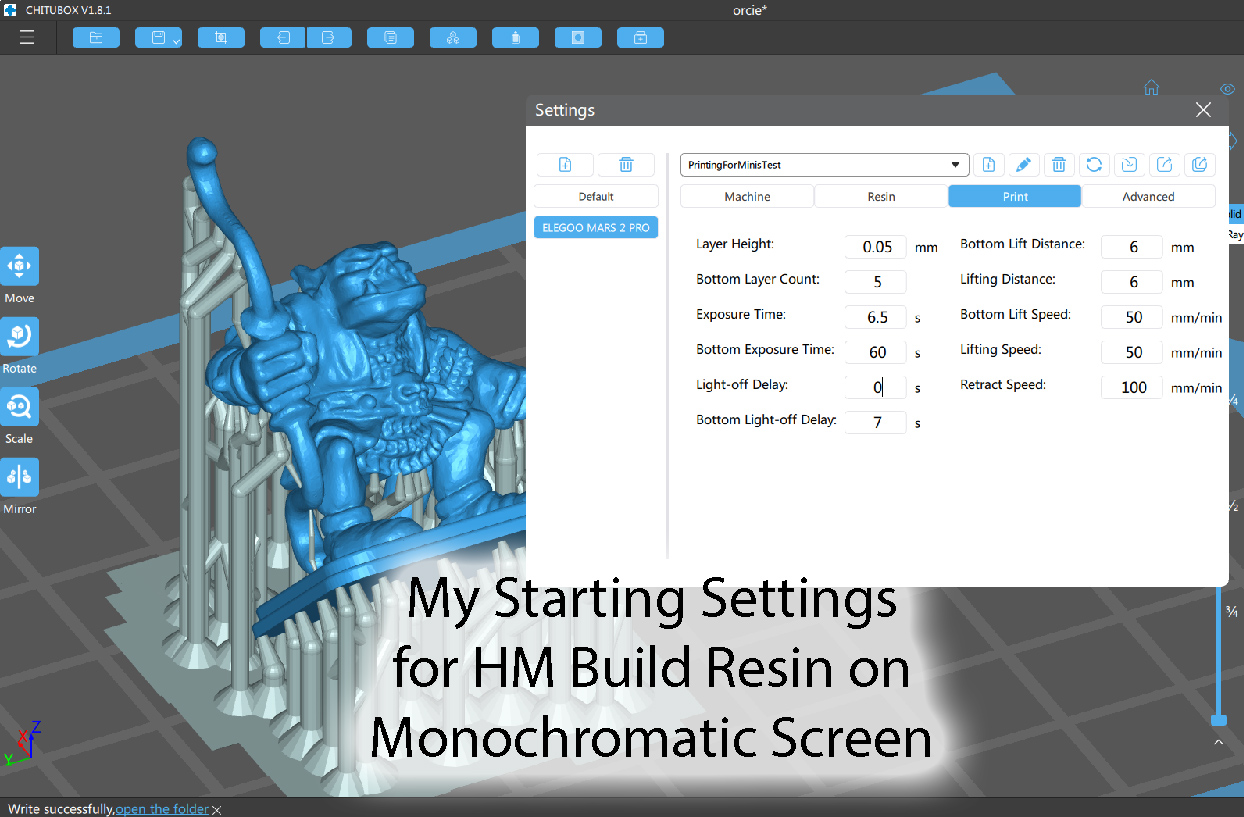
These are the settings I used to START my testing of Matter Hacker’s HM Build resin on my Elegoo Mars 2 Pro with a monochromatic screen. I’ve been edging the exposure times down a bit at a time to find the optimal setting to extend screen and UV light life and to get the best resolution. I started at 6.5 seconds which was far more than needed apparently and I have gotten successful prints at 2.3 seconds per layer with layer height of .035 with the yellow translucent resin which seems to be very good stuff. The plate however DOES need to be roughly sanded for this stuff. It doesn’t like to stick to the build plate at all. Even though it’s based on different chemistry I have found other resins can be mixed into it at portions of around 1/20th so far in my testing, but I have to use this stuff only as I have a very bad reaction to other types of resins.
Cure times for Matter Hacker’s HM Build Resin of Elegoo Mars 2 Pro that have been successful for the translucent yellow include a layer height of .04 mm and a standard layer cure time now 2.8 seconds or for .035 layer thickness I’ve used 2.3 seconds. And I’ve found 2.2 or 2.3 or .03 layer thickness gives me great results on the mars 2 pro and on my new Mars 5 I’ve had good results with 2.4 for .03 layer thickness but my littlefigures seem a little brittle at that setting so i might try to edge it down.
But remember I arrive at these numbers by edging them down continually until I find the optimal for any particular layer thickness and resin opacity.
One reason I really like matter hackers build resin is it is transparent making it easier to cure. To make grey figures I use the grey in small quantities in the clear or another color to tint the grey.
For example on my mars 2 pro I’ve had successful prints at 2 seconds per normal layer with 35 seconds bottom layer for a .03 mm per layer print, but the supports were a little soft and the object was fairly small so I think a little more than 2 is better since I had one failure with that setting, so I’m thinking 2.3 might be the ideal for the yellow resin for small objects, but 2.5 if I’ve used a significant amount of grey resin in my mix.
The reason grey resin changes things is that the coloration comes from pigments rather than dyes. Pigments block light.
So if I used 100 percent grey resin I might even need 3 seconds per layer. I would probably need the same if using white or black resin, since those colors will block the light.
But clear resin, and their other colors they, which are colored with transparent dyes, allow for a shorter layer exposure time and I really like that.
I also like being able to see into the bottom of my vat once it has well settled as i can with the clear resin. With the clear resin I can see debris and failed print remnants in the vat and I can see where the edge of that sheet is, which is created and left at the bottom of the vat, which has to be removed after a tank cleaning cycle. Seeing the edge makes it much easier to remove.
The thinner the supports the long cure times you need too so you have to keep that in mind. I usually use 5 bottom layers and a bottom exposure time of 35 or 40 (started at 50 and have been edging this down to find optimal) seconds, light off delay 7 seconds and a bottom light off delay of 8, lifting and bottom lifting distance 5mm, bottom lift speed 60mm/min, regular lifting speed 80, and retract speed of 180. This setting seems to work pretty well as a thinner layer height prevents layer separation and encourages good build plate adhesion, but might be a little slow for larger objects. The grey resin may require a little more exposure as it’s much more opaque but I must say the yellow resin is EXCELLENT so far.
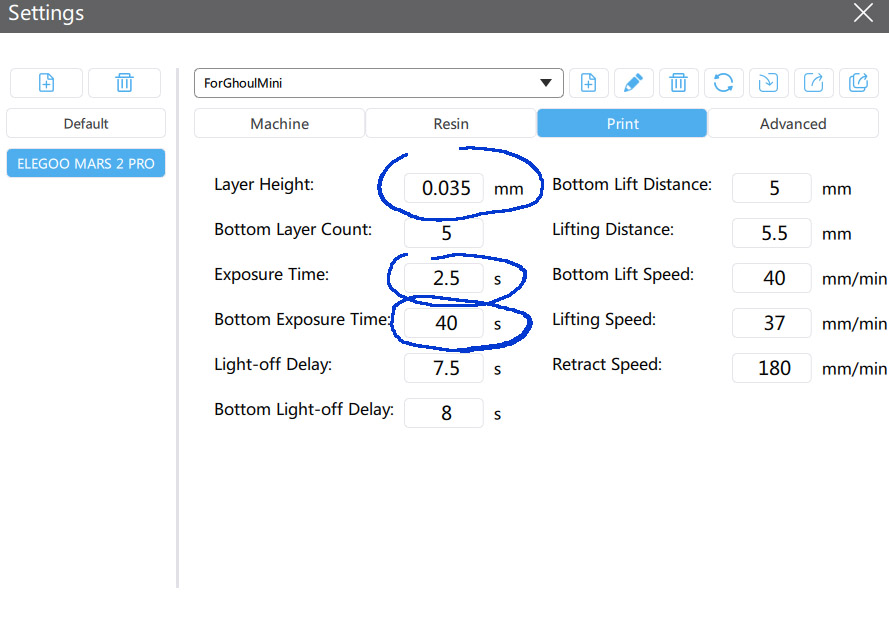
Here are the settings I’ve been using to print minis lately with Matter Hackers MH Build Yellow Resin. With a well sanded build plate and Crisco lubricated fep film in warm weather these settings work fine for me even without thinning the resin. You can see the exposure times are significantly less than what I started my testing with and work well for the minis, but these settings may not work for heavier objects. You should always balance the layer height and the exposure time and the bottom exposure time taking into consideration the weight and cross section of the object. A slower lifting speed and greater lifting distance can help the object peel off the fep film more easily and a slower retract speed can help prevent the supports from bending as much as it descends back into the tank of resin. The light off delays help to prevent overheating. I can’t see any reason you would need more than 5 bottom layers unless the object is especially heavy.

The artist Fabio Rizzo has a MyMiniFactory account from which he sells really great alternative HeroQuest models. He provides this excellent barbarian model as a free sample. It comes pre-supported so I just dropped the file into chitubox and I used the same settings that I had also used to print a ghoul from another artist. The settings I used are shown in the previous picture above. The model printed out flawlessly although it took over 6 hours. Models with swords usually take a while. Here’s a link to the model. Link to Free Barbarian Sample
For objects more than maybe 10 or 15 mm in diameter, in other words objects larger than a dungeons and dragons miniature, you should increase your cure times to get good plate and layer adhesion. 45 seconds bottom exposure time and 3 seconds for each layer is a good starting point for testing a layer height of .04 mm with a bottom lift distance of 5, lifting distance of 5.5, bottom lift speed 40, lifting speed 35, retract speed 180, bottom layer count 4, light off delay 7, bottom light off delay 8. Now after the first 25 percent of the model is done printing you can decrease the exposure time by a small amount, maybe .2 or .4 seconds. That’s because the lower layers and the bottom layers both being over exposed and now piled on top of each other provide some stiffness to the model and models generally taper towards a top so a slightly soft layer past a certain point is less likely to flex at the corners when peeling off the fep film and so is less likely to separate from the previous layer. A chitubox option to gradually decrease exposure times as the print job progresses within customizable preset range would dramatically improve print times. If they don’t already have this option in slicing programs they need it. It could be a game changer.
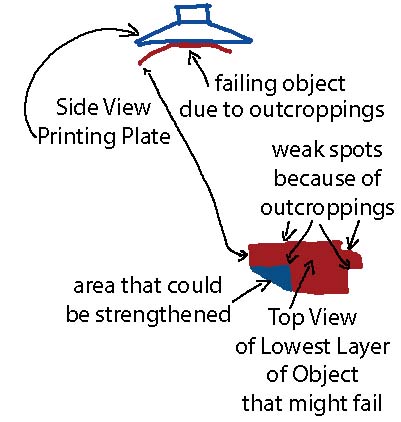
Now if an object is fairly small it’s fairly forgiving as to the cure time because very little force is needed to peel it from the fep film, but if the object is large in diameter the profile of it creates a larger shadow shape for the lowest layers and it will be much harder to pull it off the fep film.
And if the object you are printing is heavy you’ll need more cure time especially in the lower layers, not just in what we call the bottom layers, but in all lower layers, simply because the weight of the object is trying to pull it off the printing plate.
Also you’ll need more cure time if the projected profile of the object and the supports which creates the shape for the lowest layers (the shadow shape as I call it) is less square or perfectly round so any outcropping makes a weak spot as in my illustration below. With a good object orientation we can minimize these, but often we can’t eliminate them all together. Miniatures have arms and so outcroppings are sometimes difficult to avoid. By adding supports, even if the supports are only built with the base of a support, we can fill in weak areas adjacent to the outcroppings adding stiffness to them. This will help prevent the bowing of the object at the outer edges that results in a failure.
General Tips for Success in 3d resin printing:
#1 Fixing Problems with Build Plate Adhesion: The very best tip I can offer is to scratch your build plate with sand paper. Sanding as such isn’t the goal here unless your build plate is bowed or has a high spot that needs correcting which could be corrected by sanding with fine sandpaper until the plate is square to the platform overall and then the plate could be re-scratched as I will be explaining, but rather the goal here is to simply scratch the build plate with the sandpaper to create a rough surface. So it’s sort of the opposite of the purpose of why we would normally sand something. Normally when you sand something you are trying to make it smooth. In this case you are trying to make it rough. You are mechanically etching it.
My first resun printer, the Elegoo Mars 2 Pro came with a build plate that was sandblasted which was enough texture for resins with better layer adhesion due to epoxy content, but those better adhesive resins are especially toxic and even the Elegoo plant-based “Eco-Resin” causes my tongue to swell which is a great indication of the stuff being poisonous I would say, so I can’t use them.
Instead I MUST use Matter Hacker’s MH Resin, which is very low toxicity by comparison at least, but that doesn’t mean it’s safe, since it’s still a hardening resin which contains a photo-sensitizer, and it still requires massive ventilation, nitrile gloves, and good clothing and aprons and all that, to provide barriers between it and your skin. You still need a face shield or goggles to prevent accidents that could damage your skin, face, and eyes, and a mask while pouring. And yet it’sway better, because I don’t seem to have any reaction to the fumes at all, and I can barely smell it. It just dmells slightly oily, like linseed oil, but less nutty. So I know the stuff is way safer and that’s the only thing I’ll ever use until another company makes a low-toxicity resin that is similar in some way.
The problem is the Matter Hacker’s stuff doesn’t stick to the build plate like at all and has very poor layer adhesion even to itself. Now on the plus side, is that when it does harden, it seems to be strong enough for minis, though it’s brittle, and it achieves adequate resolution for minis, so it is useful, but to adhere to the. Uild plate it requires a very rough one.
My Elegoo mars 5 has a lazer etched surface which I scrub with a rough toothbrush and alcohol before and after each print to refreshen, and so far I’ve only had one failure while using the matter hackers mh build resin on it, and that was probably a layer exposure time setting issue since I was testing things. But on my mars 2 pro I’vehad many failures. Far less now that I’mmore experiencedand know how to tram and gap my build plate more perfectly as I explain i. This article, but the secret to working with the stuff does seems tto be a rough build plate.
To make things more simple matter hackers sells a sheet of surface material to stick onto the surface of your build plate. And it really helps with adhesion issues. You can get it from their website.
They call it layer lock, but it’s just garolite with adhesive backing. Garolite is just fiberglass weave embedded in a layer of resin. It’s used also in FDM printing for high temperature materials like nylon that don’t stick well to glass.
Matter Hackers must have their supplier cut their garolite sheets only once or twice a year, because they’re regularly out of stock of their layerlock products, and their website regularly says that they expect more to be back in stock in January of the next year, and during that time I am able to get it.
Recently after obtaining a new resin printer (the mars 5 ultra) I needed a new sheet of layerlock, or thought I would need one, before i tested the new laser etched surface and found it to be very good as long as it is scrubbed with a toothbrush and alcohol between prints. But being in the middle of the year they were out of stock, so I took the initiative to discover, by way of research, and ordering a few different kinds of garolite as samples for comparison, exactly what kind of garolite they are using (there are many kinds). the idea was I figured I could easily make my own layerlock, when matter hackers was out of stock, to solve the supplupy problem.
Comparisons indicate that they they are either using CE (cotton canvas epoxy) or the stronger LE (linen canvas epoxy) phenolic type of garolite. the sheets appear to be around .31″ thickness.
The particular variety of garolite seems to be the kind which is listed as micarta. That’s interesting since micarta is a common “paper” type epoxy resin material formed into blocks or sheets by stacking and compressing under heat.
Micarta has been used by knife smiths, for making the handles for their knives, for quite a few generations now. It’s available in sheets and blocks of different colors and thicknesses.
But in the thickness I wanted, I found it available through a 3d printing surface material supplier; who has an amazon storefront.
For less than thirty dollars I was able to order six sheets, in one foot squares. It took a while to receive it, but the sheets were well packed and they arrived without damage.
I also had to order an adhesive backing; and knowing that Matter Hackers uses quality backings from 3M I searched a bit and found a suitable adhesive backing. Like the micarta it came in larger sized sheets than I needed, but not as large as the micarta sheets, and was available through yet another 3d printing supplier with an Amazon storefront.
Now I can make my own layerlock type surface when it’s out of stock. I wouldn’t recommend cutting the micarta to size with anything like a bandsaw, because epoxy resin dust is toxic. But its thin enough that it should cut easily enough when placed on a self healing mat, after which it can be sliced, by multiple, gentle and cautious passes, of a newly bladed utility knife, guided over the surface, by the edge of a metal ruler, while taking great care to keep the non-dominant hand safely away, or by making use of a metal mesh cutting glove, to protect yourself.
I ordered some to test and here are my observations and notes: Firstly it’s pretty expensive. Nine dollars a sheet. And that’s a problem because Matter Hackers free shipping threshold is over that and is hard to achieve unless you order a couple more items. They also sell a three pack, but even that doesn’t quite achieve the threshold. So I ordered one sheet to test and blue and pink resin to get the free shipping. The stuff is thin enough to fit in an envelope though even with the included sandpaper and I think they should offer that shipping option for people who want to try a single sheet.
As always they shipped the item quickly in a good box and it arrived in good condition; but the sheet of layerlock arrives curved instead of flat. That’s annoying since it makes it harder to apply straight, but I figure that warpage is from the surface tension as the resin dries during manufacturing and not because of how it is shipped because this stuff rebounds like crazy if you try to flatten it. The adhesive is really strong so it doesn’t cause a problem once applied, but it makes it hard to apply it to the build plate. One thing to note though: It’s supposed to the screen of the screen which is smaller than the build plate and vat so that’s normal if you are wondering.
You apply it is to the build plate thusly: Remove the build plate and then the vat from your printer. Clean the build plate really well with alcohol and a toothbrush. If your build plate is smooth you have to sand it first to help the adhesive stick. Then you lay the layerlock sheet on the screen of the printer with the red textured surface facing against the screen and the protective sticker which covers the adhesive facing up. You should tape it in place along one edge and a little closer to the center to keep it flat. Then lift the protective sticker from the other side and cut it with scissors so it doesn’t get in the way again.
Put your build plate back in place and tighten it use the controls on the printer to lower it in place a bit at a time. When you get close to the screen only nudge it down .01mm at a time so you don’t break your screen. When the sticker and build plate come into contact go .01mm more to smoosh it just a bit to get the adhesive to stick to the build plate and cut the tape. Lift the build plate again maybe 30mm and hold it in place with your thumb and remove the rest of the sticker from the layerlock and stick it against the build plate. Remove the build plate and smooth out the layer lock and apply pressure with your plastic spatula as you smooth it out.
Before you use the layer lock though you have to sand it. You can sand it before you apply it to the build plate, but I don’t think it matters honestly and that makes it more likely you’ll scratch your screen so I’d rather do it after and it’s just easier to sand it after you apply it to the build plate in my opinion though you have to be a little more careful around the edges. I tried scoring the layerlock with a small sharp knife in a grid pattern using a metal ruler before I applied it to the build plate and before I sanded it, but it was tough to break through the first layer of the resin and I don’t think it made much difference since it still needed to be sanded, but after sanding it might help to do something like that. I however came up with a faster version of that same idea. After sanding I used the sharp corner of the metal scraper to scratch back and forth quickly to roughen up the surface even more. The instructional video on the website says you only need to lightly scuff the layerlock with the included sandpaper. They lie. Sand the heck out of it okay?
Then I cleaned the whole thing with a toothbrush and mean green and then alcohol to remove all the debris that could scratch the screen or fep film. You could use soapy water and the garden hose to be extra safe.
Now you can return the build plate to the printer and loosen the side bolts on your build plate and level like normal with a sheet of paper but there’s something important to note: Because the layer lock is smaller than the size of the build plate it will feel like there is more tension on your paper than there actually is because it squishes and traps the paper between the layer lock and protective tape that most people have around their printer’s screen so nudge up only a bit when setting your Z height. Maybe 0.1mm is probably right, but you can use 0.2mm if you feel like it, but you probably won’t need more than that. It’ll probably feel like the paper is trapped still. That’s because it is. There’s simply more tension on the paper using the layerlock or any stick on surface smaller than the printing plate than with a flat printing plate.
You can clean the layerlock with a toothbrush and alcohol or mean green and then alcohol, but you aren’t supposed to submerge it in alcohol or the adhesive backing might weaken.
So what’s the verdict? Does layerlock work? Yes it does. In fact my last print was very difficult to remove. As long as you remember to sand it heavily and you set your Z height gap not as loosely and clean it between sessions and sand occasionally and scratch it occasionally the stuff will work really well. But you’ll still need to lubricate your fep film. It’s working so well for me right now that I’m thinking of turning down my lower layer exposure time from 40 to 35 since I don’t think 40 is necessary now.
But can you use MH Build Epoxy Free Resin without Layer Lock? Yes. I have done so successfully many times. My original printing plate seemed to be working fine with this resin after I sanded it to a rough finish even without the layerlock stuff. I tried many many many things before sanding my built plate. Only a couple improved my chances of success and none did so consistently.
I believe part of the problem is this resin as it sits or is exposed to a little sunlight in the room develops a slight film on it of partially cured resin more easily than other types I’ve tried and that it builds up on the build plate pretty quickly. I’ve found a few drops of 90% isopropyl alcohol helps thin it and that seems to help, but that’s not ideal as it causes the stuff to separate and too much can break down the resin all together. I’d only recommend that in cold weather or you notice quite a lot of film developing on the surface for some reason.
Either way the film I’ve seen it develop creates a barrier on the build plate very quickly and makes this stuff even more difficult to work with, but using a tooth brush and alcohol or Mean Green on the plate helps to reveal the textured surface again. Doing that every print isn’t very practical though I don’t mind doing it maybe every second or third print but even doing that every print didn’t make this stuff stick well enough.
This resin doesn’t have great layer and the layers separate easily causing a print failure even when you can get it to attach to the build plate, but this is mostly because it’s difficult to get a good initial adhesion to the build plate. Subsequent layer adhesion is largely a function of the first layer being secure to the build plate so that each subsequent layer has a good flat foundation on which to build. So if we can improve our build plate adhesion we can also improve layer adhesion at the same time. And we can do this by sanding.
To scratch my build plate with sandpaper I detached it from the printer and washed it extremely well with Mean Green and a toothbrush all over multiple times and rinsed it with the garden hose gently very careful to not get any liquid in my eyes. Then I patted it dry on paper towels. One tip I can give you is to pat, do not rub or lint will stick to your build plate. You could also use an old t-shirt instead to minimize lint. Then I used so a flat piece of borosilicate glass I had from my FDM printer and placed it on the flat surface of my stove top which seems to be about the flattest surface in my house. Any flat table will do. Both under this and on top of this you can place a sheet of paper to protect the flat surface you placed the glass on and to protect the glass against scratches, but if you have a piece of glass you dedicate to this you’ll be less fearful than I was of accidentally scratching the glass. Now I placed sandpaper on the glass rough side up. First using 220 grit wet/dry sandpaper and laying the build plate on it and moving it gently over the sandpaper for a few strokes at a time using only its own weight as pressure to move it smoothly along not leaving the paper at any time. My paper was narrow so I could only go side to side, but that was fine. I checked it often looking to see when most of the surface appeared about evenly scratched, but trying to not change the surface any way other than that. I wasn’t trying to make any corrections to the flatness of the plate, but instead just trying to even out the rough surface. I wiped on a cotton cloth every few strokes. It took about forty light strokes going both directions until it looked good enough. Now I used a rougher piece of sandpaper paper which didn’t seem to be marked, but was maybe 120-140 grit though some people recommend 80 grit. Whatever, I used what I had. This I used for maybe 15 strokes to really roughen things up. Then I did another ten or so with the 220 to remove burrs and then I picked up the sandpaper and turning the plate upward so I could see what I was doing I used the edge of the paper to purposely scratch the plate with a light fast motion in an X pattern and then again diagonally. I didn’t do this much, maybe ten strokes in each direction. Now I applied dish washing liquid to the surface and I took the plate outside again and hosed it off really well to remove all the debris that could scratch my FEP. It’s never a safe to wash your resin printer stuff in the sink by the way. The stuff is poisonous. So when cleaning any part use use the hose and let the water go onto the dirt instead of the gutter so it absorbs quickly and animals won’t drink it and only use light water pressure to prevent spray getting into your eyes and on your clothes. I can’t tell you how much sanding and scratching the plate helped. It made all the difference. I also switched the settings for the Matter Hacker’s MH Build Resin to use 60 seconds bottom layer exposure time of 5 bottom layers with a 6.7 regular layer exposure time and will back that down as I do tests. If you have another resin you find works well for you and you still want to use the Matter Hacker’s stuff to minimize odors you can use 1/20th of the resin you were using with the rest being the Matter’s Hacker’s stuff and it should help harden the resin more efficiently and make it stick to the build plate better also. But I can’t use any of the other brands because I am sensitive to them and I don’t recommend anybody do either. Regular resin is super toxic and the fumes are majorly hazardous. I wasn’t sure if the Matter Hacker’s stuff though was compatible with other resins and so I did that experiment with the Elegoo Eco-Resin and found it worked very well giving a super super hard resin in the end that had a slight metallic sound when tapping it and I think it would be perfect for minis, but the Eco-Resin is not safe so I will not use it. I do recall from my experiments using only Eco-Resin that it was also difficult to get to stick to the build plate and that sometimes it would warp a bit, but it was not nearly as difficult as the Matter Hacker’s Build resin. Apparently though they work well together hardening each other quite well at least at the 6.5 layer exposure time I was using. In fact it was a bit difficult to get it off the build plate. Most people I’ve seen on youtube are far too rough in trying to remove their pieces by the way. Let the part drip completely dry with the cover of the printer still on and try the plastic spatula first. Find the highest corner protruding off the plate and use the center of the spatula against it. Apply gentle and even pressure for a long time rather than a sudden violent action. If that doesn’t work and the part still sticks do the same thing using the metal spatula. If that doesn’t work apply the pressure but using the thumb of your other hand against the spatula sweep your spatula with an arcing motion. This will cut into that corner a bit working the spatula underneath the corner and once that has been achieved let the spatula rest underneath until the part pops off. If the part is large you may have to do this to multiple corners. For FDM printing the answer is simpler. The part is tough so you can strike it. There you can hold metal blade of the spatula in your hand and using the handle of the spatula to strike with you can strike the base of the part sideways with a tapping motion a bit at a time on all sides until the part pops off the glass or textured surface. This will not work well for resin parts however as they are brittle, but works great for FDM parts as they are tough and flex a bit which struck causing them to separate from the surface of the build platform.
Now back to resin printing:
#2 Another important tip is that resin can harden near the inside corners of the vat so that the printing plate doesn’t descend far enough to make good contact with the fep film during the first layer. Check those corners occasionally scraping them with the soft plastic spatula (not the metal one) to make sure no hardened resin is building up there. Even a little buildup will prevent the printing plate from descending correctly. If the resin has a lot of colorant in it this might happen more since sediment will build up somewhere in the vat and harden.
Mr Doohickey, a youtube user, offered a good tip about sanding in the comment section of one video writing, “… Another very common flaw is that the plate is warped. To test, draw a grid with a sharpie on the plate. Get a sheet of fine (600 grit or finer) wet and dry paper, soak it, lay on FLAT surface and polish plate with gentle circular motion. Keep even pressure. Check after a few passes. If sharpie wears off unevenly, then the plate is warped. Rinse, repeat until all sharpie lines gone. Plate is now flat.”
#3 FEP film can stick to the printer screen making it almost impossible for the FEP to lift releasing the model. Some models of printers will be more susceptible to this problem because of the shape of the seal around the screen, but it can also happen if your FEP film is too loose or too tight across the bottom of your vat or if you’ve recently cleaned it or the screen with alcohol. Any moisture between the FEP and the screen can cause suction and cleaning it with alcohol as you must can cause excess dryness on the FEP. While you can sometimes adjust for this by not over-tightening the screws of the brackets that hold the vat in place inside the printer this causes other problems including a possible strike by the printing plate on the side of the vat. I try to keep my screws snug to prevent other issues. (My printing plate is just a little big and will strike the left bottom corner of the vat if I don’t rotate the printing plate slightly when leveling and if I don’t keep the vat all the way to the front and ever so slightly rotated to compensate. I could use sand paper or a file to shorten that corner a bit, but it’s just not worth the effort right now.) So obviously the best solution is to lessen or tighten the tension on your FEP film by adjusting the smaller screws under the vat just a bit all the way around leaving the corners more or less alone. That’s a good solution but you can only get so much play in this way without the vat leaking or the FEP tearing at screw holes and a protruding screw can scratch your screen (your screws should be stoned and polished however to prevent that). Another solution is to place a piece of tape at the edges of where the vat sits to lift it a bit. This might work, but now you run the risk of the printing plate stretching and tearing the FEP film at the corners after wearing it down over time.
Now the correct way to fix it is what I did: Ideally some sort of dry lubricant can be used between the vat and the screen like talcum powder but any excess will scatter the light too much and any liquid or grease would create more suction. When considering this option I looked around the internet to see if somebody had tried something like that and I found a youtuber with the channel name of HDY using baking powder which he grabbed out of his cabinet. He said he opted for that instead of baking soda as it’s less abrasive. That was wise, but but it still contains some baking soda so I went one step farther and used corn starch only as that’s the main ingredient of baking powder and I know it’s a good non-abrasive dry lubricant.
Instead of brushing it on as he did I put a very little bit on a brush and tapped the upper part of the handle of the brush against the side of the printer make it snow onto the screen as a fine powder. I then wiped off the excess with a nose tissue in a feathering motion not applying any pressure to avoid scratching until no more could be seen and repeated the application and wiping to make sure the coating was even. I also applied some to the bottom of the FEP in the same way, but you must empty the vat to do this so you don’t spill it or you must do it blindly from underneath or use a mirror to see the bottom of the FEP. DO NOT lift the vat over your head to see what you are doing. Resin in your eyes will blind you permanently and any in your mouth is deadly toxic. A rule of safety in the shop should be the vat is never lifted higher than 4 inches off a table. Ideally a commercial manufacturer could make a special dry lubricant for us that would be especially non-abrasive because even the corn starch leaves microscratches. The dry variety of FEP lubricant might work like people use on their FEP film inside the vat, but I don’t know for sure. It might create some suction and even worse I’ve read some spray cans of the stuff will dissolve paint so that is a HUGE warning sign it shouldn’t be used on your screen. I’ve never used it so I don’t know how wet it remains. I’ll have to buy some for inside the vat anyway to try it instead of the crisco I’ve been using so I’ll see then, but my recommendation is to NOT use it for the bottom of the FEP since damaging your screen can happen so easily and the screen is so expensive to replace. They make FEP powder too so I might try that instead for the bottom of the FEP.
While the vat was out and clean I realized the top of the FEP film was very dry and sticky and the tension was a little high so I loosened the screws to lessen the tension a bit and I applied more crisco vegetable shortening to the top of the FEP inside the vat. You don’t want to apply it to the bottom side though which goes against the screen, just the inside the vat onto the FEP part near the center, only the surface that faces upward. A very thin layer applied with a gloved finger works wonderfully, but I have noticed a smell come off the crisco as soon as the resin touches it so obviously it’s breaking down the crisco a bit reacting somehow. I suspect having too much crisco could make the resin not stick to the build plate if it’s mixing in that much, but it could be that I’m partly smelling the fresh resin itself. It’s hard to say.
Now my Matter Hackers HM Build resin, which is odorless, is working for me again. Here’s the video where the youtuber applies the powder. I use corn starch, but he deserves credit for this. I was scared to try anything that might scratch my screen or scatter the light from the machine, but in this video the guy explains so little is needed you can’t even see it and using corn starch eliminated my fear of scratching the screen. https://www.youtube.com/watch?v=IcbWUjJgMhA&lc
#4 If your resin is a little thick or if it’s cold and has thickened up it creates suction making the model stick to the FEP instead of the printing plate. In that case adding a few drops or squirts of alcohol to the vat of resin and mixing it in with a soft spatula will thin it. This seems to help with Matter Hacker’s HM Build resin. Adding too much doesn’t seem to hurt anything really, but the water in the alcohol separates a little and I suspect it might make the resin more brittle as you are in fact thinning the resin. Higher grade alcohol has less water so water separate would be less of an issue if using that.
_________________
Misc. Previous notes (this section will probably be eliminated in final article verison
Matter Hackers HM Build Resin Settings tested as successful so far on Elegoo Mars 2 Pro (monochromatic screen) with a roughly sanded build plate – this section will undergo major revision as I find the ideal settings for this resin:
Layer Height 0.05 mm and 6 mm seem to work but .03 will probably work better but if using the .03 then use a layer cure time of around 4.6 seconds or less according to my tests so far.
Bottom Layer Count 5
Exposure Time for normal layers, well 3.25 seems to work, I’ve had success with 2 also, but I was having some trouble so I’ve bumped it up to 3.25, but the best results I’ve had so far were at 6.5 seconds exposure for a normal layer and 60 for bottom layers if the layer height is somewhere between .05mm and .07mm, but I will decrease the 6.5 second cure time until I find the ideal for this resin as I feel that’s too high to preserve screen life even on a monochromatic screen and at that high of a level detail is being lost of course. I’ll keep experimenting. If using a low layer height like .03 you can start testing at 4.6 seconds and work your way down from there as I’ve had success with those settings.
Bottom Exposure Time 50 s
Light Off Delay: 0 works but I like having some because I’m using a longer than normal exposure so like 10 s
Bottom Light Off Delay 0 works but I like having some because I’m using a longer than normal exposure so like 7-10 s
Bottom Lift Distance 6 mm I might be able to get away with less, but I was having trouble so went with 6.
Lifting Distance 6 mm I might be able to get away with less, but I was having trouble so went with 6.
Bottom Lift Speed 50 mm/min
Lifting Speed 50 mm/min
Retract Speed 100 mm/min
Advanced Settings : Not all printers will have these
Anti-aliasing On
Grey Level 4
Image Blur On
Image Blur Pixel 2
Tolerance Compensation and Bottom Tolerance Compensation Off
____
Article body (this section will be rewritten later)
Review and Notes on Matter Hacker’s MH Build Resin (incomplete article – work in progress): I’ve been printing with filament for a few years now so I decided to try resin printing. It’s quite different and I don’t recommend it for anyone who doesn’t have a dedicated space. And I mean DEDICATED. The space can not be attached to the rest of their house. The space must be equipped with extremely powerful air filtration systems that can capture ALL the fumes. And you can not allow any of the resin to contaminate other things in your house.
Resin is supposedly safe once cured, so the fact you are working with a liquid is a manageable problem that can be overcome, but the problem is that the fumes of almost all of the commercially viable resins are massively TOXIC. Very toxic. I mean scarring your lungs and making you dizzy and faint kind of toxic.
From what I can tell the chemicals are basically light sensitive epoxy resins with turpentine like thinners in them. In other words the resins will destroy your entire respiratory system and are toxic to breathe and are toxic to touch and are toxic to clean up and anything they touch becomes toxic including the rags you use to clean things up with. The cleaning issue can be overcome, but the fumes?
I tried four different brands before I found something I could use. This process was expensive and very painful but necessary as part of my research and development. I want make minis after all. And my business will expand in that direction so I need to spend money to make it.
So where did I begin? Well I bought a Elegoo Mars 2 Pro hoping the rubber seal and built-in filter it has would help. It didn’t. But read on:
I read that water washable resins are much easier to clean up and have less odor so first I tried Creality Water Washable Rapid Resin in Grey. https://www.amazon.com/dp/B08VRP8ZNL It came in a metal container. The color was great and it did work. The print stuck to the build plate very easily and the detail was very good. However immediately I knew the resin was going to be a major problem when I opened it.
The volatile chemicals in it damaged my lungs and throat. And this was while operating the printer in a dedicated space that doesn’t share the vent system with the house and in which a door and window was open blocked only by security fencing and in which a powerful blower fan was expelling the air and I only ran the printer for two hours before I had to shut it off and clean everything. It was horrible!
And this was in the Elegoo Mars 2 Pro resin printer which has a seal around the uv blocking lid and which has a charcoal air filter in it (I’ll write an article article about that at a later date since how they designed the filtration system is highly problematic although my printer was better in that regard than the earlier releases of it were).
The smell and toxins from the stuff was so bad that in just a couple of hours of running time and almost no exposure I was still dealing with the effects of the resin coughing up yellow phlegm and having difficulty breathing a week later. This stuff is horrific. But it is water washable. That part is true. But it is entirely unusable and dangerous.
Next I tried a resin specifically advertised as super low odor. It was the Eryone Standard Rapid Resin Super Low Odor in red orange. https://www.amazon.com/dp/B08GYXT31P
The color on the picture says Beige, but the bottle said Red Orange when I got it, but either way I really liked the color. Good for flesh.
It was easy to see the details and the prints were very good. All the problems I had with the print were due to my side of things, however AGAIN the odor was terrible and smelled exactly the same but less powerful. So less odor, not odorless. Completely unusable.
It was obvious that the same chemicals were present, but now the resin wasn’t even water washable so cleanup was much harder, but honestly the parts cured in less time outside than the parts made with the other resin did and they had far less odor when finished curing. There was a lot less off-gassing, but still I wouldn’t allow it to sit in my house until that off-gassing was entirely finished. I can’t understand how anybody uses resin or allows the parts to sit in their house or even in their garage until the off-gassing stops. It took a week for the odor of the first model I made from the first resin I tried to fade even though I cured it in very hot sun, but this one only took a couple of days. So it was an improvement, but still useless.
So I can say for sure it was less odor than the Creality stuff; probably about half of the foul potency, but still absolutely wretched and the same burning in my lungs. It just took twice as long to get to the same level of pain.
So once again it only took a while running the machine even with major ventilation even while being in a completely separate part of the house not attached to it by venting for the volatile chemicals to damage my respiratory system and I found out I couldn’t use it. The color was great. The resin is dangerous poison.
Then I read resins made from soy, so-called Eco Resins are low odor so I tried AnyCubic ECO UV Resin with Low Odor in Macaroon blue. (https://www.amazon.com/dp/B07X2VTCVV)
The color wasn’t great, but it was okay and I only got that color because I could get next day delivery.
There was a little warpage in my model’s base, but there are ways to solve that and it could have been my error as I was pretty inexperienced at this point though I did notice the model felt softer after it was finished curing. This isn’t undesirable necessarily, but it could cause some trouble if the softness of it makes it hard to stick to plate, but the print was a success so I kept the model and painted it later. The smell was different and less potent than any of them I had tried so far. It still bothered me a lot and was still impossible to use but I got one successful print out of it before realizing I could use that either. It was by far the lowest odor I had tried so far but it was still burning my lungs and so was also eliminated also.
So while a better resin the volatile chemicals are still there. Epoxy smell still present. I was thinking maybe all resins were like this. Just that you pay more for better ones, but that they all were deadly and so unusable. I was starting to feel like I had been tricked and that’s exactly what these resin printer and resin manufacturers ARE DOING TO PEOPLE. They are tricking them into thinking if you take proper precautions you can use this stuff. YOU CAN NOT.
Dare I try again? I had spent around $100 dollars already on resins if I counted my shipping in with the cost and I couldn’t use any of them.
When doing more research I happed upon Matter Hacker’s MH Build resin which again claimed to be low odor. I was leary of course. I didn’t want to be tricked again. But what was different that caught my eye is that it said it contained no epoxy. https://www.matterhackers.com/store/c/mh-build-series-resin
Now I don’t know much about the chemicals in uv resin, but the others did smell like a super strong epoxy. So I thought it might be worth a chance to try something that said it had no epoxy especially since my 3d printer cost me $300 and almost another $100 in resin and I still couldn’t use it. So I was willing to try at least one more resin.
I’m so glad I did.
What is weird about this stuff though is it comes in bags and you have to buy an empty bottle for any excess you have to save after emptying the vat. I think a small funnel might work, but since the bag isn’t stable I wouldn’t risk pouring it back in. That’s an accident waiting to happen and I’d prefer to not be burned by a photosensitive chemical the would embed plastic under my skin so I’m not fooling around with trying to pour resin back into a little hole. Luckily they sell empty plastic bottles that block UV light off their website that are just like those used by a lot of other companies. Not as durable as the metal cans from Creality, but lightweight and good enough. They have wide mouths so it’s easy to pour the resin back into the bottle.
Matter Hackers puts their product in a bag to save production cost which makes the resin cheaper for the consumer. It’s surprising to see a company that actually passes savings onto consumers today, but by looking at the price of this stuff it appears that they do. So not only is the cost of a single bag reasonable, but in the long run you also save a lot of money when ordering subsequently to the first purchase, but you’ll need an empty bottle for your first order. That was fine as the total cost of the order for one pouch of clear resin, a bottle, and shipping was less than $40 which is what I figured a good resin would cost me. I ordered the clear resin since I read that clear resins have less odor and are usually less difficult to work with.
The shipping cost was very low and it arrived in two days! Very fast shipping. I was impressed already. I was worried the bag would be pierced, but it came in a box that was strong so that was good. But knowing how horrible delivery companies are they should probably ship it inside an expunged propane tank cut that’s been cut open and welded shut again. I can’t seem to get even a bag of feather-stuff pillows or polyester fiber-fill sent to me without the items been broken in half.
So I think Matter Hackers could improve their safety a bit by shipping their bags in the center of a heavily reinforced box or something, but the box they had was pretty strong, stronger than most boxes I get, and it was sufficient and everything arrived in perfect condition including the box. :)
I braced myself and dared to smell it still dealing with the effects of the other resins. And I must say the resin has virtually no odor at all. It doesn’t burn my lungs.
I had cleaned my machine extremely well all over even inside the cover. I used soap and water and alcohol many days before I did my test because I had to get rid of the old poison, but still some of that foul odor remained internally. I could smell it when trying to run the machine, but I could also tell the new stuff from Matter Hackers that I was trying had no real odor of its own except an oily smell.
It’s a little thick smelling and it does make the air a little heavy still requiring massive ventilation to be safe and to facilitate easy breathing. And I still would NEVER allow the printer to run in my house, however my printer is actually usable now because of this miracle resin.
It smells like a linseed or safflower oil but maybe a little stronger than those, but with less of a nutty smell than linseed. Basically odorless, but you can tell you’ve sniffed an oil because it’s a little heavy. It does smell stronger if you over-expose the layers in which case it smells like a plastic part inside of an electronic machine that has gotten too hot which is why its best to run your printer in a non-attached part of your house that doesn’t share the same ventilation system. And the odor of the stuff even straight from the bag gets heavier if the weather is hot, but for the most part I can barely smell it at all.
The comparison to painting oils might be appropriate. As I said I ordered the clear because I read clear resins have less odor and I did like the idea of printing in clear resin for the novelty if for no other reason. The model is a bit yellow at first but clarifies when curing in the sun like linseed oil does. And it’s thick like linseed oil unlike the other resins which were very thin. This thickness created a problem as you’ll see, but not one that can not be overcome.
The odor of the others was probably at least partly due to a thinner. I suspect besides styrene they also contain a mineral spirits of some sort or so-called odorless mineral spirits. I can’t say whether the Matter Hackers stuff contains a thinner or styrene, but it’s thicker. Perhaps too thick.
So having no real idea if the Matter Hackers MH Build resin might be based on something like safflower or linseed oil only noting that the smell and properties are similar I had at least a working theory and a comparison that helped me understand how to work with it anyway and that helped me figure out a way to modify the stuff.
It made me wonder though because safflower oil is very clear and is used to make white oil paint because it yellows less, so it’s quite possible some natural polymerizing oil like that is being used to make these kinds of resins and that the process of polymerization and curing is just being sped up with the photo-sensitizing chemical. So I thought maybe similar chemistry is being used in the 3d printer resins as what is used in oil paint. After all there are water soluble oil paints now just like how there are water soluble uv resins now and there are soy based oil paints just like how there are soy based eco-resins.
The difference in the smells between the different brands of resin I had tried before the MH Build resin was also a lot like the difference in smells between different odorless mineral spirits used in painting. For example Daley Rowney odorless mineral spirits for painting smells really bad whereas Gamsol is more refined and smells better. They refine the product to slow the evaporation rate to reduce odor. I can’t really use either when painting because both bother me a lot, but Gamsol is significantly better. Daler Rowney smells a lot like the enamel thinner that modelers use which is made by Testors. It works, but it has a strong odor.
When problem solving a working theory is important even if the working theory is based on guesswork or is factually wrong. As long as the theory is useful it may help you solve the problem. The facts are not always known. Especially not when working with proprietary technology. And so when I had trouble getting the MH Build resin to stick to the build plate I got a few ideas on how to fix it and fix it I did as you’ll read.
I am pleased with the product and initially used it for three figures and many more since. The figures look good and have the level of detail I need and so it works for me. The strength is what I need for a miniature being just a bit flexible, but more or less ridged. It’s good stuff. Maybe it would be better if it wasn’t so brittle, but you can’t have everything. It’s good enough for what I need.
I did notice though that because it’s kind of thick and sticky it needs to be cleaned more thoroughly from the part and build plate, but that it pours off the vat easily enough (though to be fair I grease my vat). It’s not too hard to clean up with 91% isopropyl alcohol but the part should be cleaned before and after the supports are removed and it should be rubbed with a soft toothbrush to get it really clean and then air dried and then cleaned in fresh alcohol again.
I usually clean my models with Mean Green Super Strength Cleanser and Degreaser first and then with alcohol. I also use the stuff to clean the printing plate with a toothbrush and then again with alcohol. The Mean Green seems to have a detergent in it and it foams up a bit. It cleans things pretty well, but it needs rinsing. You could probably rinse in water, but the alcohol will clean the part a lot better and it evaporates faster. I usually use 70% alcohol. 90% is better, but it’s a waste of money. It’s not necessary. And it evaporates faster so it’s more dangerous.
To clean my models with a two step process I put some Mean Green in a pickle jar that has a lid and a perforated tray. I can drop my model into that and close the lid and swish the model around for a bit and then I lift the perforated tray up to retrieve the model. Then I break the supports off the model and brush it with a toothbrush loaded with a little Mean Green from the pickle jar and then he goes back into the jar for another quick swish to rinse and then I can rinse him in some alcohol from a spray bottle. I do this over a bucket to catch the runoff. Spraying the model isn’t really safe though as some of that alcohol and resin residue is getting into my lungs. A mask can help, but ideally I should have two pickle jars instead of a spray bottle so nothing is being sprayed, but right now I just have the one so that’s how I’ve been doing it. So I finish with alcohol and let the little guy dry completely before taking him outside into the sun to cure. Mean Green is a light green and I was using clear resin so I didn’t want to make the model green so for my first tests so I only used alcohol to clean my models, but if you are using colored resin the green color of the Mean Green shouldn’t affect the color of the model though you might want to test it if color is important to you.
Now I have no idea about the toxicity of the Matter Hackers HM Build resin so I still wear the nitrile gloves as they say you must and now I even have googles too and I don’t stay in the room with the printer and I have really good ventilation and will be building an even more powerful ventilation and filtration system to use while resin printing, but I must say I am thankful to God for this MH Build Odorless Resin as nothing else worked.
I also like the bags surprisingly. The spout is small and the bags are easy to pour from. Well that’s assuming you are smart enough to grab the bag by the edges instead of at the center which obviously would cause the resin to gush out. With the small spout you can control how much you put into the vat very easily. But you do need a bottle to pour the excess back into so that benefit isn’t always present, but another advantage of the bags over the stuff coming in a bottle is safe disposal. Normally bottles have to be emptied and then a uv flashlight shined inside to cure the resin before safe disposal, but with the bags you can just cut them open with a pair of dedicated scissors and expose the inside to the sun eliminating any uncured resin from making it’s way into the environment when tossing it into the trash. So you aren’t going to have a bunch of empty bottles lying around that you aren’t sure what to do with.
I don’t know if you can mix this kind of resin with other kinds. I suspect that would be problematic since the chemistry is different, but mixing different colored resin of the same type in the same bottle doesn’t hurt anything and that’s what I’ve been doing since I have clear and grey resin and I’ve just been pouring the excess into the same bottle mixing them freely. I know that mixing any number of colors together would make a grey colour eventually anyway so one bottle for your leftover resin is all that is necessary as the mix will let you save a perfectly suitable resin for printing minis which always look good in grey. But I have a few empty bottles from the company to segregate my colors if I want to now so it’s not a problem anyway.
However there IS a problem with the Matter Hackers MH Build resin. A major problem. The problem is the stuff doesn’t stick to the build plate hardly at all. A lot of failed prints is this stuff’s fatal flaw and the company knows it.
They send you tips to try to make it work for you and they sell a special surface for your build plate that is supposedly helpful, but people haven’t had much success with that either from what I’ve read.
I’ll try their special surface called LayerLock made of garolite which is a fiberglass weave. It’s back in stock for the size I need so I’ll be trying it soon. It’s a sticky backed pad that you can sand as needed and then wash well with soap and water and a toothbrush.
To get it to adhere to the build plate you lay the textured side on your printer’s screen with the peel-able backing side up. You then peel the backing off exposing the sticky surface to the build plate. You lower the print head .01 mm at a time until you can mash the pad just enough that the sticky side sticks to the build plate. And then raise the printing plate again and you loosen the print head screws so the print head can swivel and you level the print head as you normally would with a piece of paper to do the final mashing to hold the LayerLock pad in place. You don’t normally need a spacer to use LayerLocker on your resin printer unless you are already using the WhamBam system. The thickness is about 0.89mm.
I suspect that the people that have had trouble with this resin even after using the LayerLock just aren’t scoring the LayerLock enough and aren’t cleaning it well enough between uses. You can clean it with alcohol but the adhesive backing that holds it to the printing plate can be weakened with alcohol so soaking the entire printing plate isn’t good.
The good news though is that the adhesive is weak enough you can change pads occasionally and they are only 9 dollars a piece and they can be cleaned and resanded as often as necessary until they are worn and need to be replaced. They recommended sanding it after every couple of liters of resin, but that would depend on how well you clean it between uses with alcohol and a toothbrush. They say you should wear a respirator when sanding it since it is fiberglass and resin, but I think if you wet-sanded with the printing plate facing down against a table and the sandpaper facing up on the table that would be sufficient to keep the dust down.
To truly expose the fibers in the pad it probably needs an aggressive scratching with the tip of a knife or some light scoring with a razor blade or heavy sanding with very rough sandpaper and it apparently it comes with a little 220 grit sandpaper, but like I said I think people probably aren’t sanding it enough.
If you use sandpaper on it I highly recommend that you thoroughly wash it in soap and water under pressure from your garden hose and clean it with a toothbrush even bending it backwards if you haven’t applied it yet and cleaning it many times to remove all the sandpaper debris since any debris could scratch your fep film or worse it could scratch your screen. And then I’d recommend cleaning it again with alcohol to restore its tack. I think if you were to do that the stuff would work out well but I haven’t held the stuff yet, so I’ll see. I wanted to get some quite a while ago, but it was out of stock for my sized printer. But honestly with the sanded printing plate, cleaning it regularly with a toothbrush and alcohol, and making sure the printing plate is perfectly level has solved my problem with adhesion for everything except the heaviest of objects, but still I’d like to push my printer further with as little difficulty as possible and this garolite stuff might be the ticket. I also want to try garolite for my FDM printer.
The HM Build resin is a fairly new product so I figure they may modify it in the future if they can figure out a change that can make it stick better but still without having to add any chemical that would create an odor or make it more expensive to ship.
I found my own chemical solution which helps especially in cold weather by thinning it a bit with a couple drops of alcohol, but before I used a chemical solution thinning it I had to find mechanical solutions and though I’ll keep what exactly I did a secret it worked for me when nothing else did.
But before I explain thinning there is another tip which I’ll share which is really important about this stuff. It has to be mixed EXTREMELY well before pouring. It seems to have something in it that either evaporates if left in the tray or separates while in the bag and so you have to really knead and shake the bag well, very well, like a heck of a long time well and if you’ve allowed to sit in the tray you should add just a tad bit more fresh from the bag and mix it in with a soft spatula or by lowering the print head a few times into the vat before trying to print. That really does make a LOT of difference. I think whatever it is that settles or disappears from the mix has a slight yellow color that can be seen in the clear resin and when the resin sits the resin turns really clear. Perfectly clear resin isn’t a great sign. You want it just a bit yellow. I think the stuff that makes it stick is some kind of hardener or it might be the sensitizing agent. I’m not sure. It could just be air bubbles too from mixing it. The resin without the yellowness visible still responds to the light, but stays really soft and so you get more plate detachments. So I think whatever it is seems important and mixing the resin in the bag and adding some fresh and mixing that in seems to solve the problem.
Now sometimes the resin will thicken. You can thin the resin a bit with just a couple of drops of alcohol and that can help if the stuff is too thick and is creating too much suction. This might be especially good to do in cold weather. I’ve used the resin full strength though without thinning it quite a few times successfully. The company recommends increasing your lower-layer exposure settings as that will help with plate adhesion (I’ve had good success with 60 second and 55 on a not so well sanded build plate, but not every time. With smoother build plates I seem to have trouble going lower than that though the company says you may be able to do 40. But on a roughly sanded build plate I have had good success doing 40 seconds bottom layer exposure time, so it seems to me the roughness of the plate and not the exposure time is what is critical, but probably only to a point because resin not exposed long enough will stay soft before the final curing after the printing is done and you don’t want your lower layers to bend or flex at all as they will if they are too soft during the printing.
Increasing the bottom layer exposure time causes the lower layers to harden more and to expand more adding adhesion to the printing plate, but you can only rely on a higher number here so much as the resin will not necessarily expand much past a certain point. Overexposure can cause a lack of detail and brittleness and you can burn out your screen and you uv light if you overexpose.
So in my opinion just increasing your bottom layer exposure time much beyond 50 isn’t really a solution and honestly the stuff works fine between 40-50 if you do everything right with a roughly sanded plate. It’s just not an easy resin for beginners to work with. It prints really well, but it just doesn’t stick very well.
It will partially cure at a setting of 2 seconds per normal layer and 40 seconds bottom layer on my machine which has a monochromatic screen, but the results at those settings are pretty sporadic depending on the weight and cross section of the object. So I’m hovering around 40-50 second bottom layers exposure time and 2.5 to 2.8 for .03-.04 layer thickness for now.
This stuff seems to be somewhat sensitive to temperature. It thickens a bit in cold weather. As I mentioned a few drops of 90% alcohol can help with that, but I haven’t had any trouble printing at around 48-50 degrees in my work shop so it’s not super sensitive I don’t think, at least not so bad that’s it’s a problem. I would think temperature problems would start when approaching 30f because the metal of the printing plate would be contracted and even some lubricants for the gears of the machine might start having issues, but some testing would be interesting.
If the machine has issues different kinds of lubricants might help and that makes me wonder if people who have had issues printing at lower temperatures are not properly lubricating their machines. I don’t know, but that’s something they might not have considered. Some greases don’t do well in lower temperatures and some get runny in higher temperatures.
Now one very important note about this stuff. You have to set the gap of the build plate correctly to make this stuff stick The gap is VERY important with this stuff, because it doesn’t expand much under exposure to the light and it doesn’t stick very well to the build plate. It doesn’t expand much and it doesn’t harden much so you must have a very small gap and nothing more. I use stationary paper instead of regular paper to level my bed as it’s a little thicker and I figure it protects my screen more and I can’t set the z axis home position any higher than .01 mm more than what just using the paper starts me out with. If you don’t understand what I mean let’s talk about how 3d resin printers are leveled (trammed is the correct technical term actually).
Leveling Procedure – The basic procedure for leveling a 3d resin printer is to first make sure the room doesn’t have any sunlight in it that could cure any exposed resin still in the vat and to then don goggles and gloves and mask as your safety equipment. Make sure you have room to work and nothing is near your feet that you could trip over and that the table is clear of all extraneous objects, but that necessary objects are in reach.
Then remove the UV-light blocking cover from off the printer and sit it aside. Loosen the screw that holds the build plate in place. Remove the build plate and using a toothbrush and a bucket to catch the run-off clean the top, sides and bottom surface of the build plate really well with Mean Green or dish soap and then again with just alcohol or use just alcohol throughout the entire cleaning process. You then pat the build plate entirely dry on a disposable cloth or on paper towels. Do not rub as that will leave lint you can not see. Now return the printing plate to the printer making sure to tighten the screw that holds the build plate in place. The screw is pretty large you don’t have to over-tighten the screw, but the plate doesn’t always go all the way back into place so make sure it’s moved all the way back before tightening the screw.
Now you turn your attention to the vat. You may not need to clean the vat unless you had a failed print or are changing colors. But if you aren’t going to be using the printer within the next couple of days you probably should. Resin that remains covered by the UV-light blocking cover of the printer will stay good for quite a while unless in direct sunlight, but the resin that has sat for a day or more must be stirred with a soft silicone spatula just prior to use. If it has thickened a drop of alcohol can help, but too much will make the print brittle. Adding a little new resin and mixing it in will help reduce brittleness also.
Place a few pieces of nose-tissue paper on a table next to the printer and loosen the screws that hold the vat in place and carefully remove the vat and sit in on the tissue paper. The tissue paper will protect the FEP film of the vat. But be careful; the screen of the printer is now exposed and can be scratched so care must be taken until the vat is replaced. Now you can change gloves and clean the screen of the printer which you exposed with an alcohol swab. Wipe from the center outward until you are certain there is no lint, fingerprints, or resin on the screen. Check it for resin carefully. Some resin there can indicate a puncture of leak in your FEP film meaning it will need to be replaced. Make sure the black tape seal around the screen is in good condition or add some if your printer doesn’t have any. This will help protect your screen a lot. You can also add a cell-phone screen protector to it since these are just cell phone screens we use on 3d resin printers anyway. It’s a good idea to do so.
If you need to drain the vat place a filter over your bottle to catch any partly cured debris in the liquid and pour the resin into the bottle. There is usually a small spout shape at one of the corners of the vat to make pouring easier. Make sure you turn the vat entirely sideways fairly fast instead of pouring a bit at a time to reduce the chance of resin dripping down the side of the vat and underneath it onto the bottom of the vat and FEP film. If some gets on the bottom of the vat or FEP film you have to clean it as that resin will transfer to the screen of the printer. Clean it with alcohol and a piece of tissue paper. Do not use paper towel as it will scratch the FEP film. Now clean the rest of the vat with a piece of tissue paper and alcohol or Mean Green or some dish soap and water. Do not wash it in your sink or dish washer though. The stuff is toxic. Using a piece of tissue paper and the soft pad of your gloved finger you can push on the center of the FEP film to get some of the cleaner you are using up underneath the edges of the vat flushing it out better. If you accidentally take the vat into the sunlight before doing this you’ll get cured resin between the vat and the FEP film risking debris getting into your liquid resin the next time you print.
Now you must check the screws of your vat carefully. Make sure they are sufficiently recessed and that there are no burrs or sharp protrusions on them that could scratch your screen when replacing the vat. They don’t have to be evenly recessed and probably shouldn’t be since they are used to control the tension of the screen, but they just have to be a bit below the edge of the vat so as to not scratch the screen. If there are any burrs or protrusions on them or on the edge of the vat use a whet stone or very fine sanding paper to remove the burrs and clean the debris from sanding off with soap and water again and again. Make sure the bottom of the vat and the sides are completely dry when you replace the vat.
If you are going to re-level the printer, and you probably should if you removed the building plate and not just the vat, keep the vat on the table instead of replacing it while leveling. You can not level the printer while the vat is in it.
When replacing the vat re-tighten the screws that holds it in place. For some reason I often forget to tighten the screws and that can ruin your next print so I remind myself of that.
Now leveling is not complicated, but is difficult to explain. The print plate must be clean and vat must be removed, but does not need to be cleaned. And this is a good time to check your screen to make sure it is also clean. Using the wrench that came with your printer loosen the two screws that keep the printing plate from swiveling side to side and backwards and forwards. If you have a spring loaded plate you will hear a pop as the spring inside pushes the plate out. Either way loosen the screws until the plate swivels freely. Adjust it so that it’s square to the printing surface and squarely straight matching the rectangle of the printer’s screen; never allow it to be turned diagonal. If it is diagonal when the printing plate descends it will hit the brackets that hold the vat in place damaging the printer and motors. If such a thing starts to happen shut off the printer or unplug it immediately and assess for damage.
Now with the printing plate square turn the printer on if you haven’t already place a piece of paper onto your screen that is larger than your screen, but small enough to fit between the brackets which have the screws that hold the vat into place. It should be a little taller than the screen to give yourself a part to grab that hangs off the printer, but not so tall as to make it fall off the printer by its weight alone. Do not EVER hold the paper in place as your hand can be crushed by the descending printing plate. So if the paper is too large the paper will fall off of the printer removing the protection for your screen at the worst time, but that risk is better than the crushing of your hand. You can temporarily tape the paper in place by one corner or edge to reduce risk in both respects.
The kind of paper should preferably be thicker paper than printer paper like stationary paper since that will protect your screen better, but you can fold printer paper in half for the same effect. Don’t use a really cheap paper like construction paper as those kinds of paper could can scratch your screen and they leave lint behind.
Now using the controls of the printer go to the manual position controls which you can use to manually raise or lower the printing plate. There you will see an icon that looks like a house, but that shouldn’t be confused with the house you see in your standard controls which we will discuss in a bit. Press the home button. The printing plate will begin to descend. As it does watch the paper carefully. If it starts to move or fall hit the stop button on the interface of the machine and replace the paper. Do NOT – I repeat DO NOT place your hand on top of the paper to hold it in place as it will be crushed by the descending printing plate with a powerful force breaking your hand. If that were to happen cutting the power to the machine will prevent further crushing, but not release your hand. You have to use the controls of the machine to stop the crushing and to release your hand. This is one place safety features could be added. A physical button on the side of the machine to reverse the descent or rise of the printing plate overriding any other command would be most welcome.
The printing plate will descend crushing the paper rising a bit and settling again. That is normal. As long as the screws that control the swivel of the printing plate are sufficiently loose the plate will level itself against the paper which is against the screen. Rotate the plate as needed to make it square with the screen and less diagonal. Now placing you hand onto the plate so that it doesn’t move tighten the screws that prevent the swiveling of the printing plate. They don’t have to be super tight, but should be snug. If they are too loose touching the plate or running the machine may cause the plate to become non-level again.
Now you have a plate which is level, but you haven’t adjusted the printer for the right amount of gap between the plate AND the screen. The paper is simply acting as a temporary gap which is about the same thickness as the FEP film, but we need slightly more than that to create a space for the first layer of resin to cure. If the paper is very thick you may not need to make this adjustment, but in most cases you do. You’ll notice if you gently pull on the paper it does not move. This is normal, but we want to be able to move it slightly to prove there will be a slight gap between the FEP film and the printing plate when the first layer of our model between them.
So we go to the position controls of the printer and select the .01mm movement option and then press the up icon moving the printing plate upward by .01 mm. Not any more than that. The paper should move just a bit now if we pull on it. If the paper moves freely that is far too much gap. We want it to be able to be pulled just a bit, but not be able to be pushed back in very easily. Usually .01 mm is correct for that. If your paper was very thin though you may need a larger gap of .02 mm, but usually .01 mm is still correct. MH resin does not swell much when exposed to light and so requires a very tight gap of no more than .01 mm. This is one of the great secrets of working with it. It does not tolerate a large gap like some other resins do.
Now that we can move the paper just a bit we must tell the printer that we want the current position of the printing plate to be considered the zero position; the temporarily software defined home position. So now we must exit the manual position controls of the printer and go to the basic screen of the printer controls and press the set z home position icon which looks like a house also. It will ask you if you want to set the home position to the current position and you will confirm this.
The printer is now leveled, but because it’s all the way down you can’t replace the vat. So you must go back into the position controls, selection the 10mm option and press up about five or six times until you can insert the vat back into the printer and tighten the screws which hold it in place. Now the vat is ready to be filled again if necessary and you shouldn’t have much trouble getting the first layer to stick.
If your resin is a little thick and you are having trouble getting it to stick to the build plate you can modify it chemically but you may not need to if the gap is correct. Success depends on the thickness of the resin when printing and how clean the build plate is and the amount of texture on it and the size of the gap and the exposure setting. Some people add a warming pad to the inside of the printer if they live in a cold environment or they warm the resin up just prior to use with a hair dryer set on low as warm resin will flow like its thinner, but I don’t like those solutions as the heat source might cause a fire. I really don’t know much about the flammability or combustibility of these materials so I’d rather just thin it chemically with alcohol instead. But if you do however you must be especially careful to not use heat or flame around your resin as it WILL be more flammable and combustible until the alcohol completely evaporates. That’s just common sense.
I did notice that the models made with MH resin are a little sticky after curing and require a thorough washing and rinsing a couple of times. I have a feeling it’s because the resin is a little thick. I usually use mean green for the first wash since it has a soap of some kind in it and foams up some and I brush it lightly with a tooth brush and then rinse in alcohol. Mean green has some color to it so for clear resin use only alcohol and if you want your part to look more transparent use only a very soft toothbrush or none at all. I also noticed with the clear resin that it looks very yellow at first, but turns more clear and white when cured in the sun. In fact this is a good way of telling if your part is cured thoroughly. Some people report that with some resins if you over-cure them in the sun they turn more yellow. I think they may be curing on an especially hot day using foil to surround the object which can increase the temperature of the cure. If you live in a very hot place slightly cloudy days or curing partly in the shade might be better or you can surround the model with white paper instead of foil, but you might have to leave the part outside all day or even two days if it doesn’t get direct exposure. I find that partly curing it in the sun and then bringing it back inside and washing it again with alcohol and drying it thoroughly before taking it back outside for further curing works really well and eliminates a lot of yellowing and stickiness.
Here are the settings I’ve used so far with good results. I’m still experimenting though and want to increase the efficiency of the settings to reduce print times and to make my machine last longer:
Layer height .06 – This number is what primarily determines the time it takes to print as this controls the amount of layers the model will have. The length and width of the model doesn’t matter much in resin printing, but the height does. The shorter the model the faster the print. Having a larger layer height number will reduce the amount of layers the model has for any height, but increasing this number also decreases detail resulting in a rougher finish and what’s more problematic is that if the number is too high relative to the exposure level you will get layer separation. That’s because each time the printing plate moves upward it creates a gap into which the next layer of the model will form. If the printing exposure time for each layer is not sufficient to fill that gap with enough partly cured resin the layer will not join to the previous one or the bond will be too weak and the layers will separate.
For extremely detailed objects the number .03 is best, but the number .05 is standard for miniatures as that provides plenty of detail, but I have had some success printing at .07 also so far in my tests. For most things I’ve been using .06 for now with an exposure time of 3.5 but want to continue to reduce my exposure times to extend the life of my machine and will update this article with my findings as I do more tests.
Bottom Layer Count 7 – The bottom layers print solid and are exposed to more light making them thicker and harder to aid in plate adhesion and to prevent warping. You can try 10 bottom layer if you are really having trouble or if the model is very heavy, but even as few as 5 bottom layers will sometimes work and I think I’ve seen some settings as low as three, but that’s probably asking far too much from this odorless resin. So between 10 and 5 I split the difference and settled on 7 for testing. We want this number to be as low as we can get it because creating bottom layers burns out your lights and screen faster than making standard layers because of the extra exposure time when making them. But we want good plate adhesion and to prevent warping so we need at least 5 layers I’d say. We can extend the life of our lights and screen by having a larger light-off delay number also so if your bottom layer count of bottom layer exposure time is high make sure your bottom light-off delay time is also high.
Exposure Time 3.5 seconds – In my first round of testing I used 4 seconds since I was initially having problems with the resin, but this is unnecessarily high. I’m reducing this number slowly during testing. I had success with 3.5 so I’ll try 3 next time and then 2.5 and hopefully 2 which is the recommended setting for my printer with other resins.)
Bottom Exposure Time – 50 seconds seems to work for me. I started with 60 for testing, but now that I’ve chemically modified the resin I suspect 40 will work just fine which is what Matter Hackers recommends and again I split the difference for testings.
Light-off Delay – 10 seconds is what I’m using now and I initially tried 13 since my initial exposure time was high, but have been decreasing the number as I decrease the exposure time to increase the speed of the print. We have to give the machine more time to cool any time we use longer exposure times. A high number here also helps give the resin additional time to harden between layers and that prevents warping.
Bottom Light-off Delay 10 seconds – I initially tried 13 since my initial exposure time was high, but have been decreasing this as I decrease the exposure time. We have to give the machine some time to cool any time we use longer exposure times. A high number here also helps give the resin additional time to harden between layers and that prevents warping.
Bottom Lift Distance 5 or 6 mm – You should increase your lifting distance when printing wider objects and when using larger rafts. For small objects 5 seems to work and if you aren’t sure start with 6 and work towards 5 a bit at a time. If the object is really large don’t be afraid to go to 7 or even 8, but remember it takes longer to print with a higher number here, but the higher the number here means less chance the model will stick to the FEP film. But for reasons of efficiency you must balance the lift distance with the lift speed.
Lifting Distance 5mm or 6 mm – You should increase your lifting distance when printing wider objects and when using larger rafts. For small objects 5 seems to work and if you aren’t sure start with 6 and work towards 5 a bit at a time. If the object is really large don’t be afraid to go to 7 or even 8, but remember it takes longer to print with a higher number here, but the higher the number here means less chance the model will stick to the FEP film. But for reasons of efficiency you must balance the lift distance with the lift speed.
Bottom Lift Speed 12 mm/min – Increasing the lift speeds will speed up printing, but should be balanced with lifting distance. I’m guessing that it wouldn’t be wise to go above 20 even for smaller objects and not above 16 or so for medium sized objects, be conservative with this number and start at a lower number like 12. I’d rather wait a half hour more and have more successful prints than run my machine fast and have a lot of failures.
Lifting Speed 12 mm/min – Increasing the lift speeds will speed up printing, but should be balanced with lifting distance. I’m guessing that it wouldn’t be wise to go above 20 even for smaller objects and not above 16 or so for medium sized objects, be conservative with this number and start at a lower number like 12. I’d rather wait a half hour more and have more successful prints than run my machine fast and have a lot of failures.
Retract Speed 100 mm/min – This is a number that can be increased in most cases without many problems as it’s just the speed at which the printing plate descends back into the resin, but it’s good for it to not be too high as any small particles of partly cured resin that are in the vat should be given time to move to the side of the model so that they are not trapped between the model and the FEP as they can puncture the FEP film. Keeping this number low will help prevent that. Also if this number is too high air bubbles can form in the resin trapped underneath certain shapes. So don’t go crazy here. 100 mm per minute worked for me.
Advanced Settings (not all printers will have these settings)
Anti-aliasing ON, Grey Level 4, Image Blur ON, Image Blue Pixel 2, Tolerance Compensation OFF, Bottom Tolerance Compensation OFF
Additional Notes for Fixing the Plate Adhesion Problem: I suspect the problem of plate adhesion is mostly because the HD Build stuff is really thick and heavy and viscous making the supports fight the weight of the model and the suction being caused by moving upward out of the resin. So I’ll show you how to modify the viscosity. This is a chemical solution that seems to work. Because we clean our resin printers and vats out with alcohol and we clean our models with alcohol can be used as a thinner for resin. It does weaken the resin though making it more brittle, so we have to use it very sparingly. To add the alcohol I fill up the resin vat part way. Too much resin can cause suction problems, so I don’t fill the vat up more than maybe a fourth of the way. And then I use a spray bottle that hardly works or else I use dropper bottle to add a few drops of 70% isopropyl (rubbing) alcohol. Then I stir that in with a silicone spatula. This thins the resin and makes it lighter. I then place the cover back on the printer and I wait a little bit with the printer running to make use of the fan to help most of the alcohol to evaporate. So simple. I suspect that the reason they won’t do something like this at the factory is they couldn’t market it as odorless if there’s a slight odor from the alcohol and it would make it more volatile causing shipping and safety problems and because thinning it makes it more brittle. But this trick does seem to work.
Now we all know alcohol makes a resin a bit white and cloudy if left on the part before curing, so in theory this might make your clear resins a bit cloudy, but if you wait a bit before printing evaporation will take care of most of that. You could also experiment with different grades of alcohol and see if the purity makes a difference.
I also suspect that the crisco gets partly or entirely dissolved by the alcohol and mixes in too which might be helping thin the stuff a bit, but who knows? It seems to work so I’m happy. So that’s your chemical solution folks. Another difficult to use product fixed by my intelligence. ;)
Because the stuff doesn’t swell much when exposed to light you can’t have a large gap between the screen and the plate when you start printing. The actual distance between the screen and the printing plate should be close to 0.11 mm to .21 maximum (the thickness of a piece of paper plus an additional .01 mm of z axis home height adjustment). The thickness of stationary paper is somewhere between .1 mm and .2 mm so we’re in the right ballpark. If your paper is too thick or if use too high of a z axis home adjustment you may get a failure. If the paper is really thin or you just use a regular sheet of copier paper you may need a .02 mm z axis home height adjustment instead of a .01 mm adjustment. You want enough space for the first layer to form, but no more than that.
The stuff is really soft before it cures and it warps a lot contracting as it hardens, so increasing your light-off delay in your slicer as I did will probably help a lot giving the layer more time to harden before adding another one. Having extra bottom layers and a wide raft will also help a lot. I won’t explain how exactly I overcame these problems mechanically, but using a secret method I developed I DID overcome the problems I was having without thinning the resin and it works most of the time even if the resin is a little thick, but it’s a pain in the butt, so I recommend thinning it instead.
What I can say is that a very roughly sanded or deeply milled build plate would help a lot which is part of what the company recommends. The Elegoo Mars 2 Pro has a sand blasted type finish and even it has a lot of trouble with this stuff. Cleaning the build plate with alcohol and a toothbrush will help for sure! You need to clean out that old resin build up as best as you can and start with a nice clean surface again. Alcohol is expensive and the fumes hazardous although small amounts don’t seem to bother me much, but I try to use it only when necessary. I’ve had good results cleaning the build plate with Mean Green, but it should be patted dry (not rubbed as that will leave fuzzy stuff on the plate) and perhaps you should even sprayed with a little alcohol on it after patting it dry and drying it again before use. I don’t know about how chemically resistant cured resin is, but if a build plate has a lot of resin build up on it patting it with a 1/5th ammonia water mix or some windex might help since ammonia is used to etch oil paintings when one layer dries too slick for the next. Nail polish remover may also be a safer alternative. It’s worth a try to save a build plate, but if you use a chemical stripper like those two on the build plate make sure you don’t get any on the painted parts.
Lightweight models and parts seemed to do okay in my early tests, but medium sized models and parts no way. They ended up in the vat immediately and the problem got worse as the weather cooled and the resin thickened a bit more. So keeping your parts lightweight will help and having a large surface area for the lower layers will also help and making a model of a thin sheet that can act as a raft which you can place on the lowest layers against the build plate will help too. This can be done in chitubox using their standard rafts, but making your own raft that is much stronger is a trick that VOG (Vegetable Oil Guy) deserves credit for (https://www.youtube.com/c/VegOilGuy/videos).
But still there is more that can be done mechanically and it will work flawlessly, but I can say nothing. God gives some people brains as a gift and others have less intelligence and sharing that gift with others without getting something in return may be charitable but is done too often in the information age and in my opinion if you come up with something truly innovative and simply give it away you are despising your birthright. The only exception I believe is when information could save lives or souls.
But one thing that will help any resin is extra lubricant on the FEP film and that’s no secret. What I used was a bit innovative, but it’s not enough of an invention to keep a secret. Most people use 3-in-one FETP oil. That’s probably fine, but it’s very liquid and not non-toxic and I wanted something sticky that would stay where I put it.
Greasing the vat with the ever so-thin coat of Crisco Vegetable Shortening applied with a gloved finger will work.
The Crisco is non-toxic although the resin is NOT and there will almost certainly be some cross contamination so take precautions to separate some of your Crisco in another container and mark it for resin printing only. You only need to separate a spoonful probably for hundreds of prints.
The funny thing is I don’t cook with Crisco anyway because it’s a GMO product, but I do use it in a lot of operations around the shop as it’s a good sticky grease that is non-toxic and easy to clean up. It’s very underutilized as a lubricant in my opinion. It’s not great for use in high temperature applications because it can catch fire and it does melt, but it’s been used by black powder shooters and gunsmiths and machinists since time immemorial. Think of it as a lard substitute. If they made a non GMO version I’d even cook with it. I don’t care that it’s “hydrogenated.” I care about sterilization caused by GMO corn. Anyway…
How I apply Crisco Vegetable Shortening to the Vat/Pan: Yes boys; we’re cooking with Crisco. I clean the vat as normal and then use alcohol to clean it more thoroughly and allow that to dry and then lay the vat on some soft nose-blowing tissue paper on the table to protect the bottom and using fresh clean nitrile gloves touch, just touch, don’t gob, a bit of the crisco, just enough to make the tip of your gloved finger shiny and press the pad of your gloved finger against the inside of the fep film near the center and spread it thinly working outward to all the edged and up the sides of the metal vat greasing the pan but being careful to not get it on the outside or underside of the vat or FEP film. I just use a thin thin thin coat, so thin you can easily see through it and the greasing is done. I then use fresh gloves and place the vat in the machine.
They say that if you use a small amount of water with a small amount of dish washing liquid instead of alcohol to clean your vat your FEP film will remain more well lubricated. That’s probably true. I figure regular bar soap like the original scent Irish Spring would work even better in that regard as most bar soap contains some type of conditioner and some contains talcum powder.
Either way you can lubricate the FEP film again if you wash it with alcohol, but I would think that if you used too much crisco or you tried to place more in a vat that wasn’t perfectly clean it wouldn’t stick to the bottom and instead might separate and float around which would make it harder, not easier, to get a part to stick to the build plate as the resin would be contaminated with a lubricant.
So greasing the vat will help prevent the part from sticking to the FEP film, but it still may not stick to the build plate even if you are careful to grease the vat properly. But I overcame that problem. How I did it will remain a secret.
I’ll be adding more information about resin printing in the future, but I think it is HIGHLY irresponsible for youtube channels and amazon and the resin printer and resin manufacturers to advertise their products as being low odor when they are so amazingly dangerous.
These resin machines are NOT toys. These are not easy bake ovens or creepy crawler rubber makers for children (both toys my mother said she had that she loved) and they are not gummy candy makers. They are highly specialized machines for 3d modelers to create original models and machine parts and they used POISONOUS resin that creates POISONOUS fumes.
If you get this stuff on you it can form plastic under your skin and cause burns from the volatile chemicals themselves or from exposure to sunlight thereafter. These are super dangerous chemicals and the process of making resin prints much more like developing infrared camera film than anything else I can think of. You have to do it at night if you have windows and you have to have windows to vent the stuff effectively unless you build a special ventilation system with very effective organic volatile chemical filtration which in my opinion is ABSOLUTELY NECESSARY.
Children, animals, and women shouldn’t be anywhere near this stuff and they shouldn’t be near you when you are doing it. Neighbors can be poisoned by it. Even when venting it outside massive ventilation systems with charcoal filters are needed.
And the built in filters that some of the printers have don’t work because they are poorly designed, not sealed at all, and far too small even if they were done correctly. I’ll be explaining how I’ll overcome some of those problems in other articles about improving your printers.
But for now if you have a resin printer I’d suggest switching to the Matter Hackers Build Resin and as a temporary solution heavily and I mean heavily scratch your build plate with tough sand paper meant for cutting steel so as to deeply score it and I recommend washing the plate very very well in soapy water with a toothbrush and then with a garden hose on high pressure a few times to remove all the sanding debris before using it again. Or just use a little alcohol as I do to thin the resin a bit and you’ll be good to go. Those are the only tips I can reveal publicly since they are fairly obvious, but believe me there are mechanical secrets to making the stuff work every time and so I am thankful for the stuff. My printer can actually be used now whereas before it could not. Now I want all the colours because I am a pigment piggy.