
I recently used some of my paints to tackle a little guy I had in my collection for years. He’s an original Heart Breaker Hobbies & Games (HHG) Kev Adam’s Orc with Scimitar. It looks like rougher 2004 reproductions are still available through http://www.ralparthaeurope.co.uk/shop/heartbreaker-miniatures-28mm-c-115/kev-adams-orcs-c-115_116/2004-orc-wscimitar-p-1920.html but mine is a classic from 1994. I think I picked him up a local comic book shop along with some other minis they had sitting around for just a few dollars.
To complete this project I needed some fine detail brushes and a cheap brush for the glue, some acrylic paint from Vallejo, some pet reptile walnut shell bedding, some Elmer’s white glue, and super glue, and some mod podge, and I made good use of a claw type tool with magnifier.
While I did not photograph every step I photographed some of the process so I’ll show you how I got started and the final product and give you some tips along the way.
First let’s check out the model. Click pictures to enlarge them.
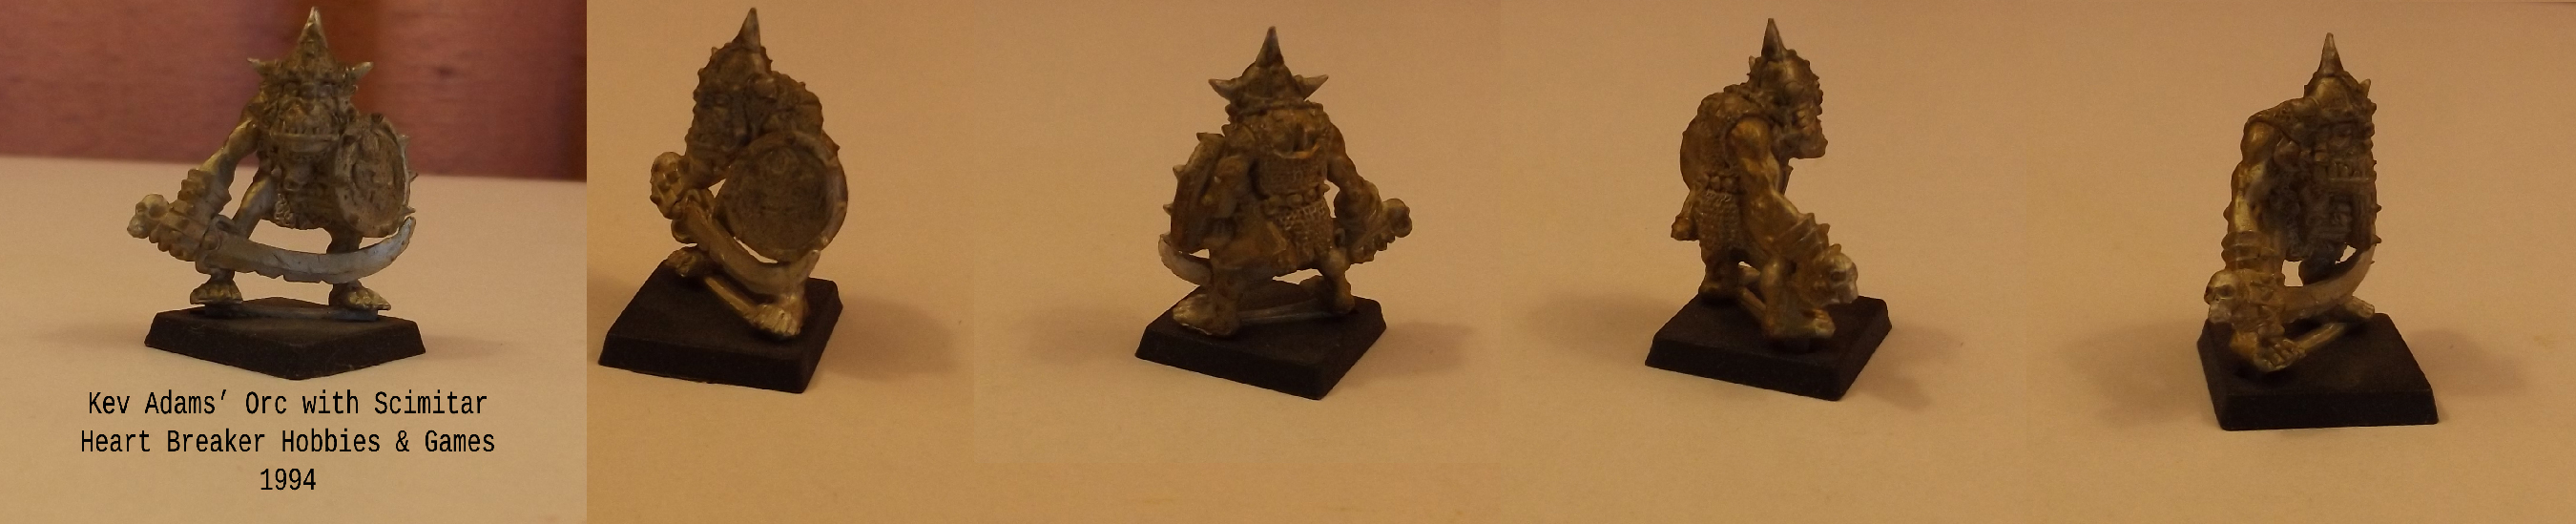
Kev Adams’ Orc with Scimitar Heart Breaker Hobbies & Games 1994
Above we have photos I took of the model placed in a strip format. This little guy is pretty detailed. He has horns, chainmaile, a skull on his armor, and a skull ring, a jeweled sword with skull pommel, and a shield with raised ensign.
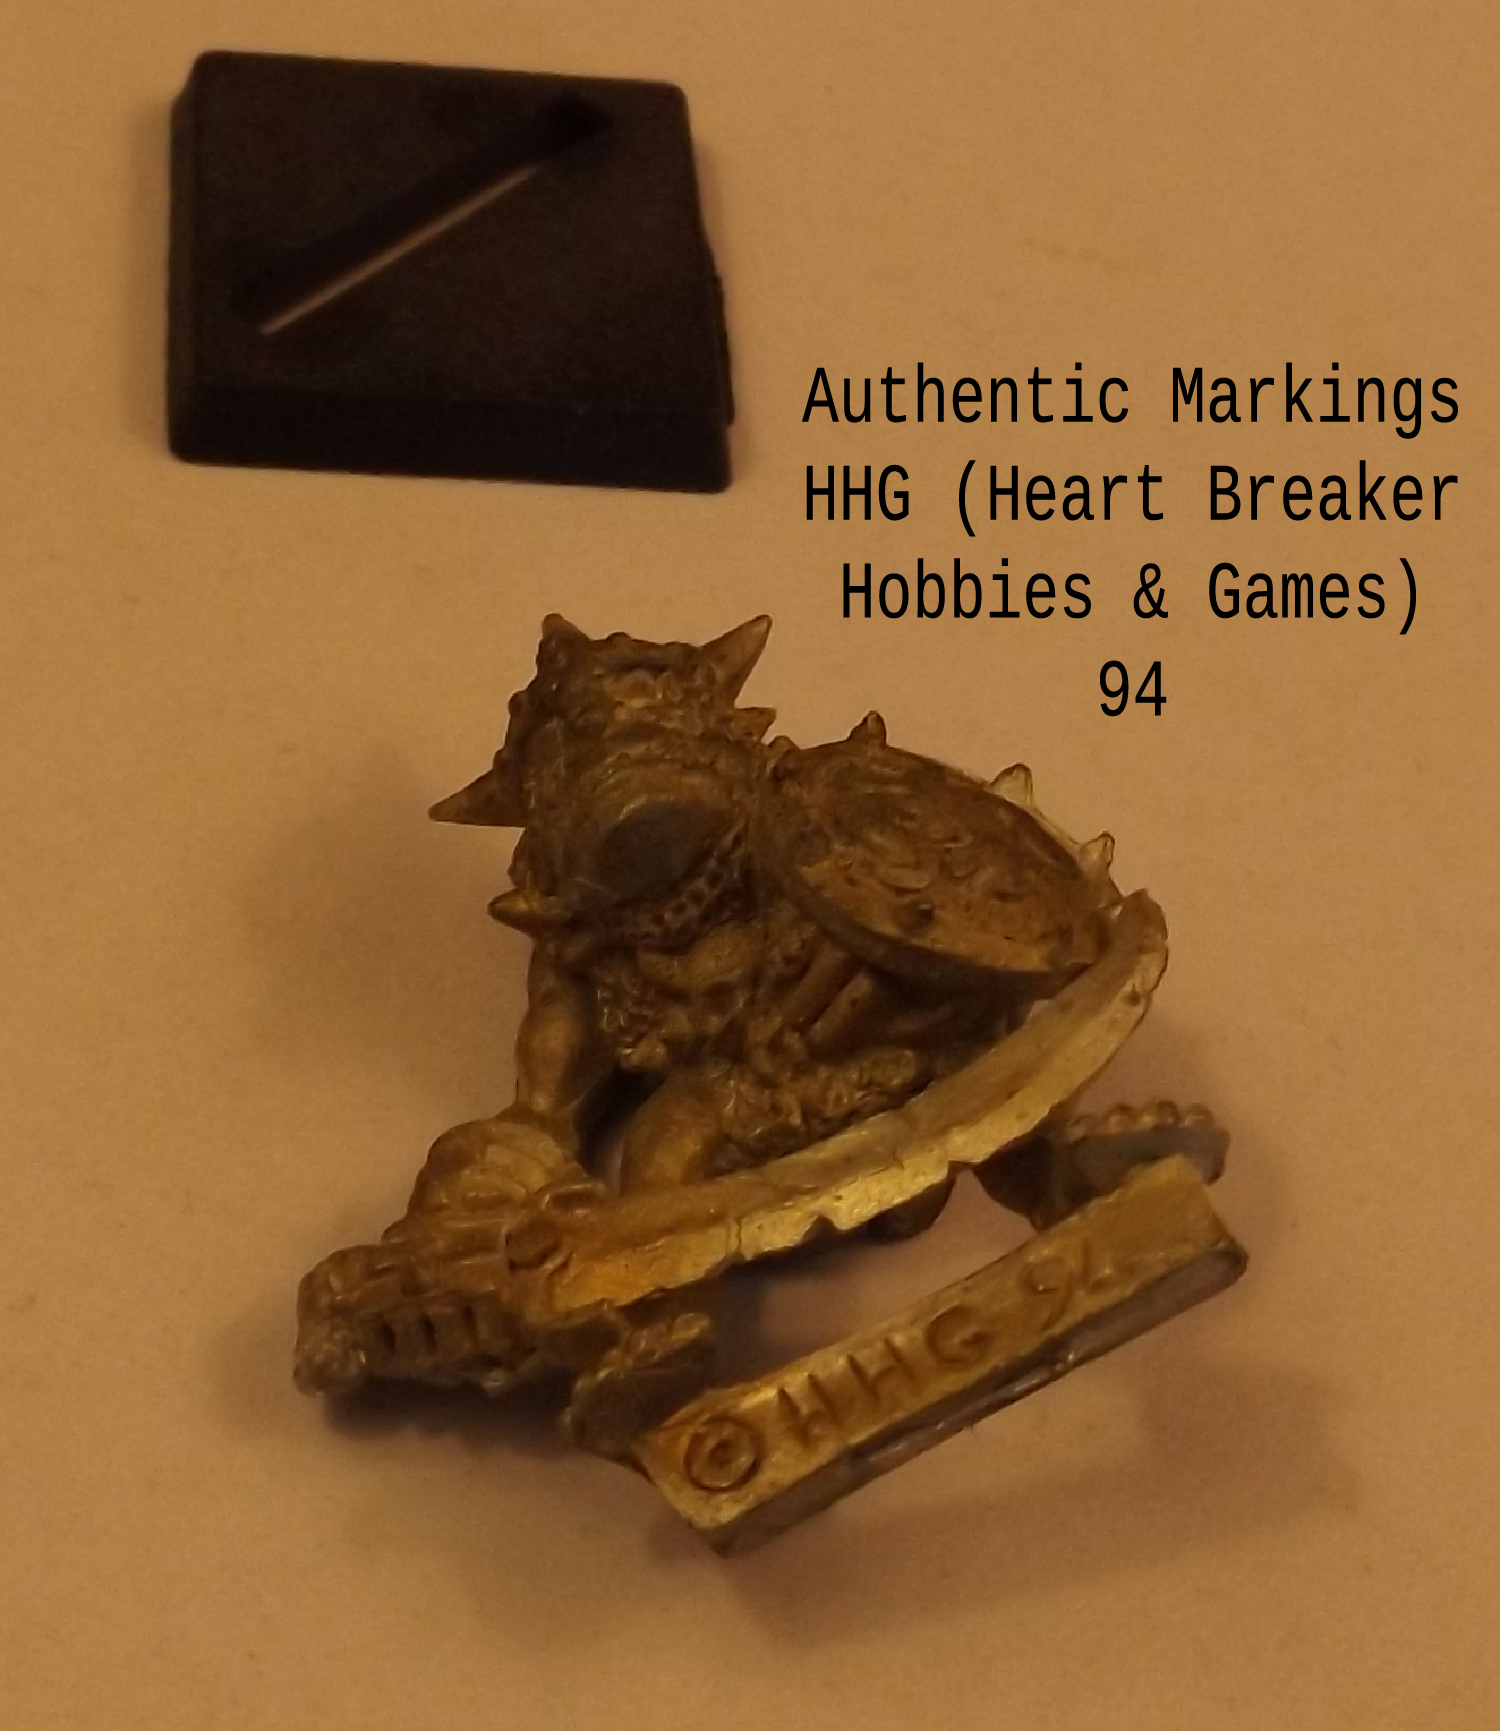
Authentic Markings HHG (Heart Breaker Hobbies & Games) 94
Above we have the little guy lying on his side with the markings on the base sprue more clearly seen. They say “HGG 94” which stands for Heart Breaker Hobbies & Games made in the year 1994.
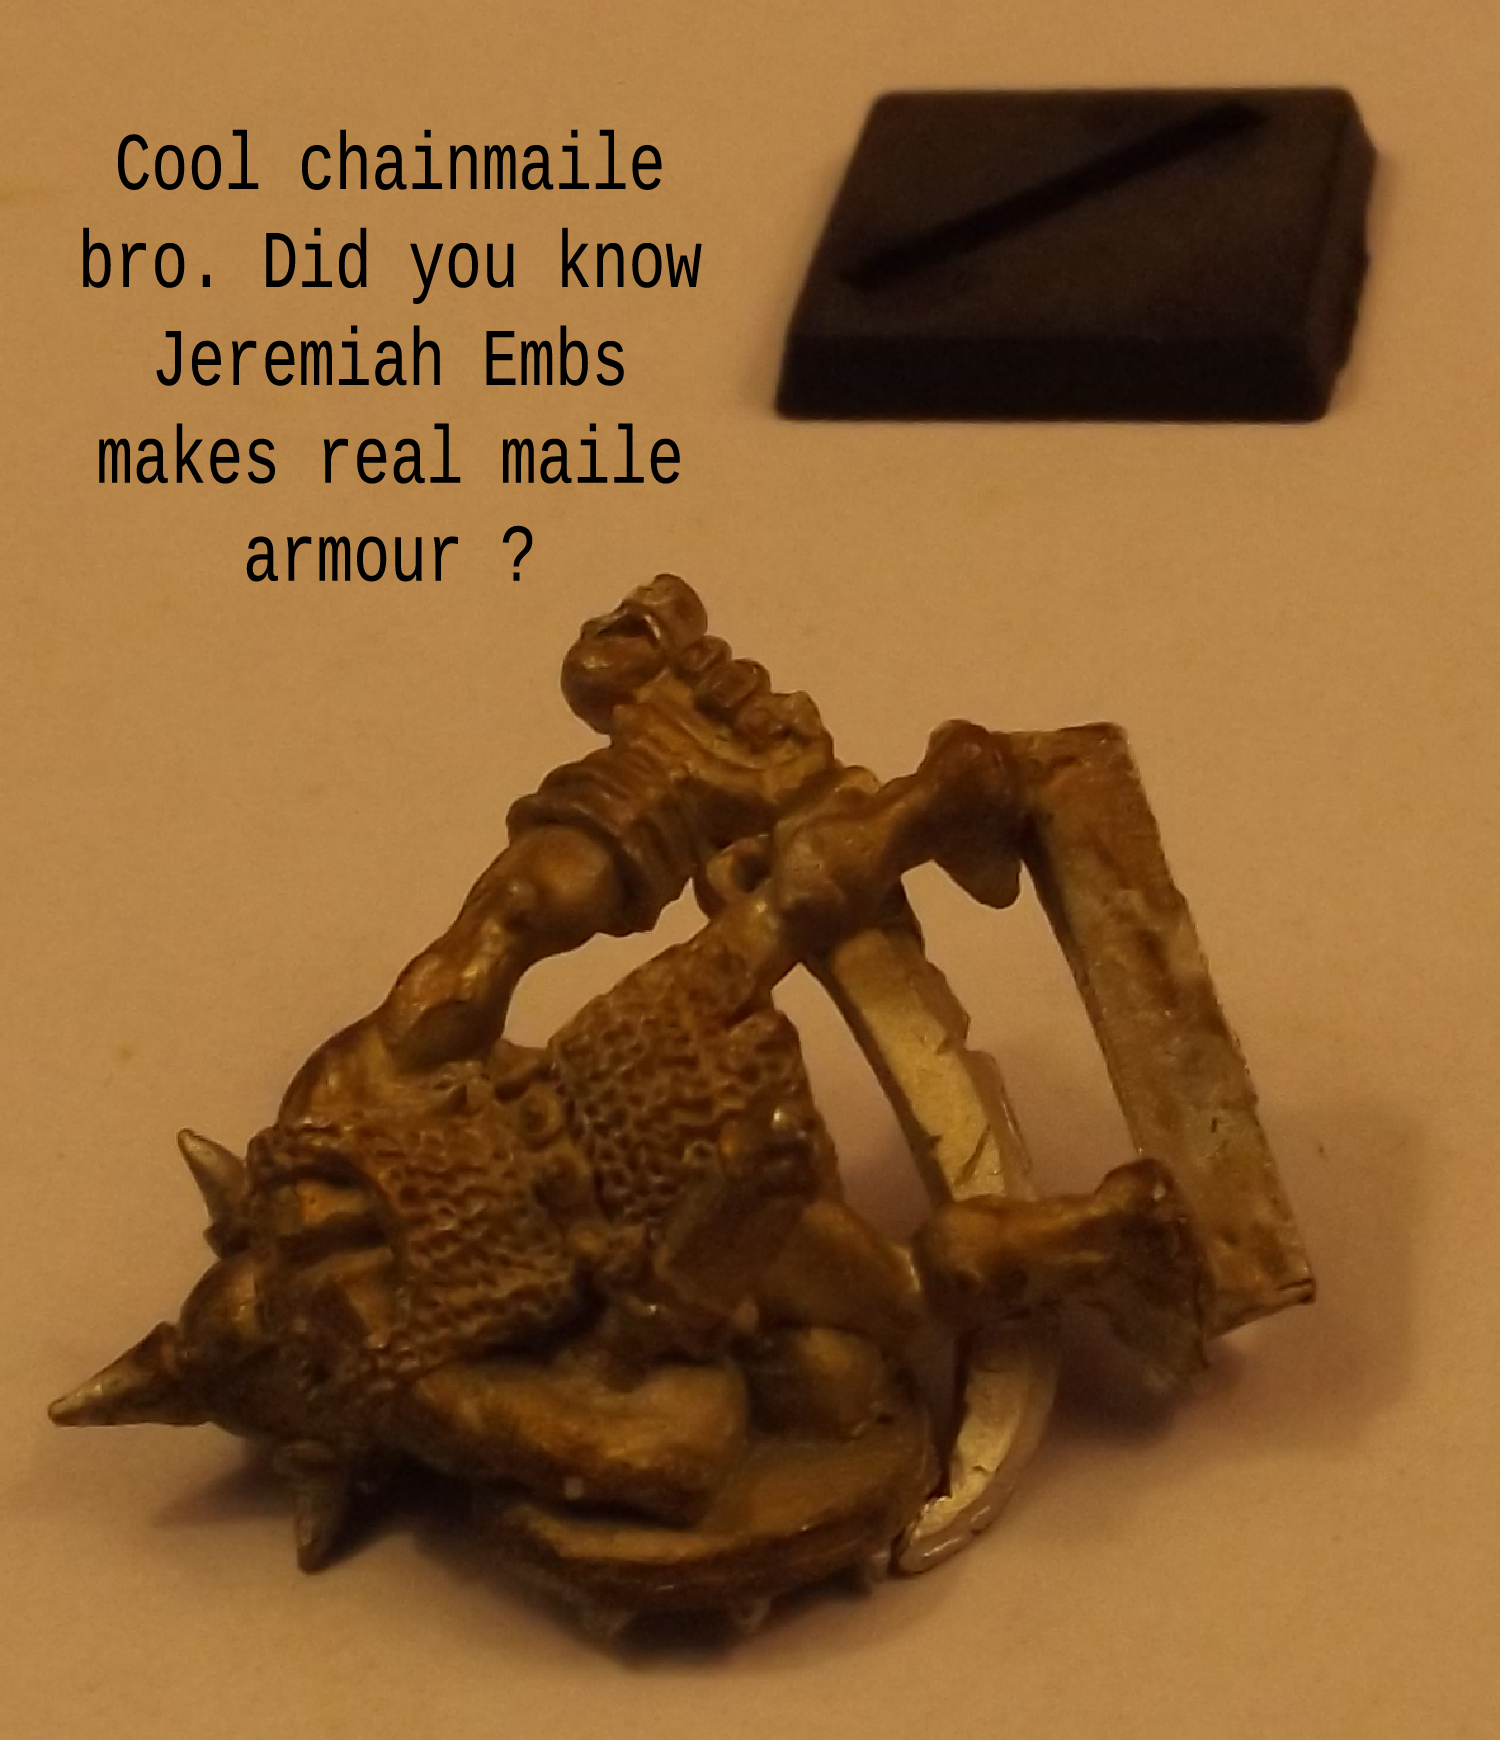
Cool chainmaile. Just like the kind I can make!
Above we can see the nice chainmaile the sculptor included on this model. I really like chainmaile on miniatures, partly because I can make real chainmaile, but part of the reason I learned to do that is because I like chainmaile on miniatures.
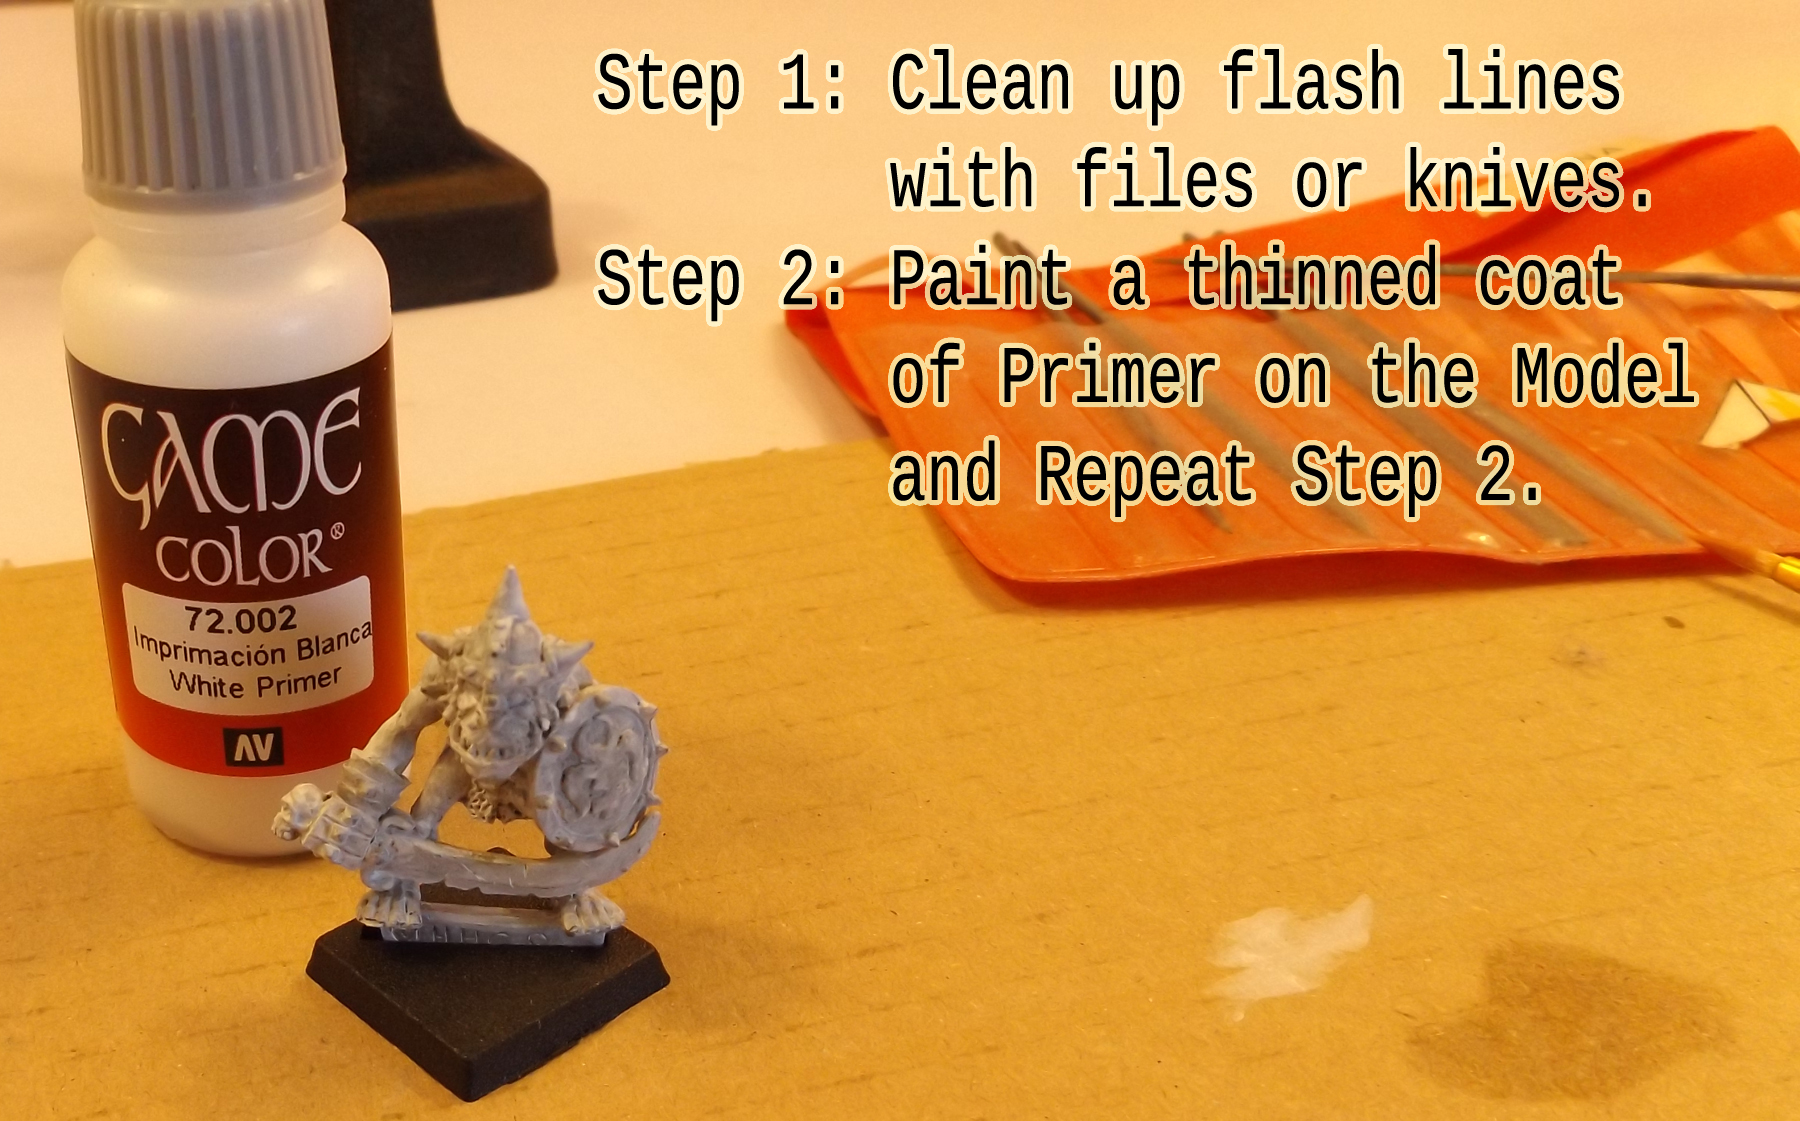
Clean up flash lines. Paint on Primer.
Above we see the first two steps being described. We have to remove the flash lines (moulde lines) left by the casting. Because this is a metal model a file or a hobby knife works fairly well, but a hobby knife will dull if you use the edge this way so use the back of the blade and just run it along the moulde lines to smoosh them down. It’s harder to do that with pewter than lead models since pewter is a harder metal. In other cases you can use a needle file if you are careful to place and run the file correctly so that it flattens only those lines and so that you don’t scratch any other piece with the sides or tip of the file as you use it. For plastic models the edge of a hobby knife is best. There is a special technique to holding the model and using the knife that will prevent you from cutting yourself. The secret is to push the model forward with your thumb of the same hand you are holding the knife with and rotate the model with your other hand in which the model is actually held. Maybe I’ll demonstrate sometime.
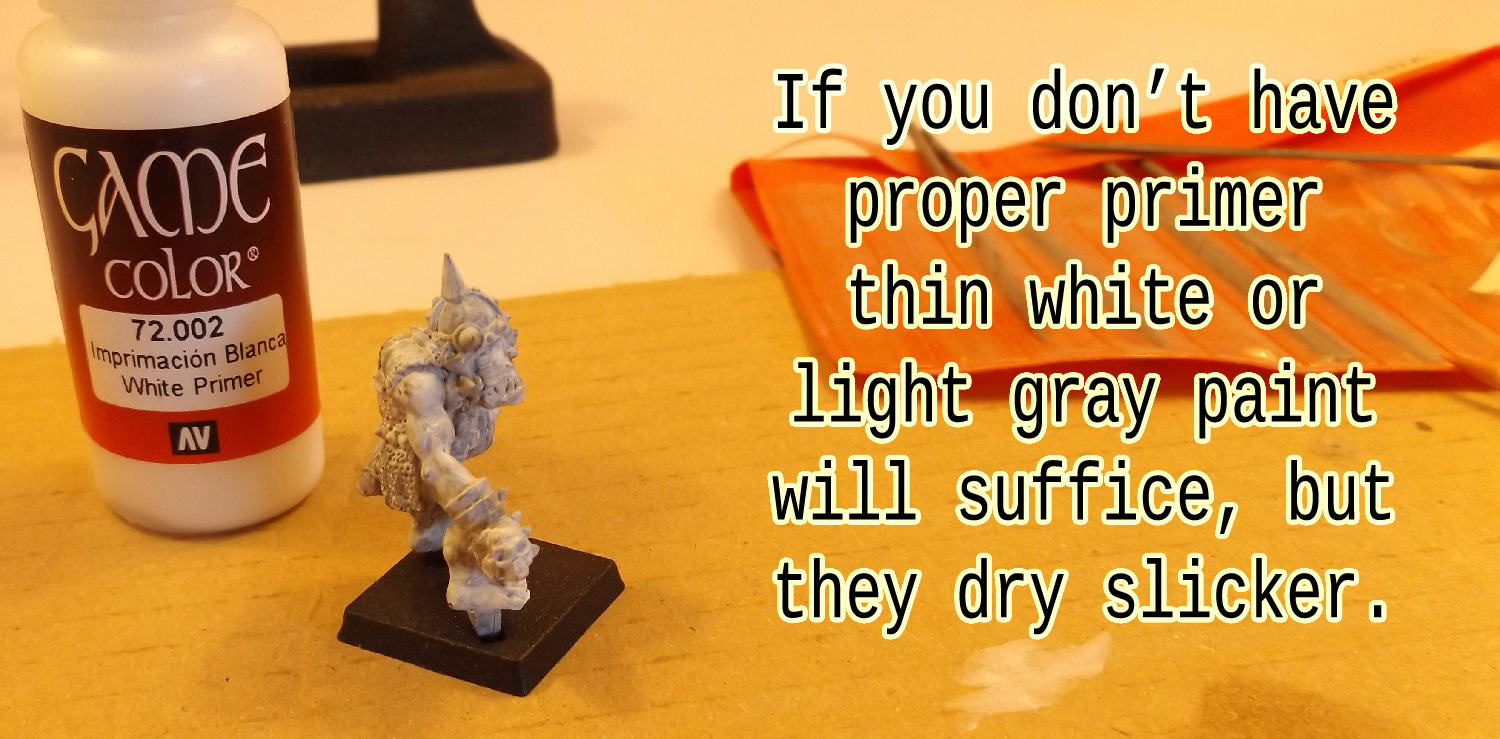
White or grey paint can substitute for proper primer, but is not ideal.
The next step is to prime the model so the paint will stick to it. Paint doesn’t stick to metal very well and some metals rust. Luckily lead and pewter don’t rust per se, but they do oxidize in their own way.
Anyway; because paint doesn’t stick well to metal a paint that is more like a chalky glue is applied first and just like gesso in canvas painting the primed layer is a bit absorbent and so will help the paint adhere to it.
For primer you can paint it directly onto your model with a brush or you can buy the spray-can kind.
Citadel calls their brush on primer “Imperial Primer” (for now – they change names more often than than Madonna does or Prince did), but it’s not available anymore online apparently. Who knows why. Those people are a joke and not reliable enough to be a trusted source for materials, besides being way too expensive. But it’s a DARK primer in any case so it’s no good in my opinion. But their spray is available in white and it’s called Corax White Spray and assuming it’s the same stuff as their old spray which I used it’s okay, but a bit on the chalky side. A very light coat will work fine though. But it costs $17 per can plus shipping but “Please note: This product cannot be shipped to Alaska, Hawaii, Puerto Rico, Military APO and FPO addresses, PO Boxes and any overseas addresses” and there are even more shipping restrictions than that. https://www.games-workshop.com/en-US/Corax-White-Spray-Global

Now through the years I’ve used both the brush on primers and the spray on and I prefer the brush ons for a few reasons.
One: No odor. This is pretty important if you live near anybody that has breathing problems or have such a problem yourself. Spray paint is pretty terrible. Two: You can easily control the runs. With spray primer you have to use very very light coats to prevent runs and while there is a technique to it I find it easier and better to get an even thin coat when I brush it on can see exactly what I am doing. Three: It’s easier to get into the grooves and up underneath the model with a brush. Four: There are no shipping restrictions and no lock and key garbage at the hobby shop to deal with when using brush on stuff. Five: It’s way cheaper. Spray is super expensive and the can usually dries out or clogs before you use it all. Six: If I want to make a primer that is slightly tinted I can do that easily with the brush on stuff. Seven: No overspray. To spray a miniature you have to put it in a cardboard box to contain the overspray or you’ll make a mess and then you can’t really get to the model while spraying it or you have to risk getting the paint on other things besides your model which may be outdoors where you are spraying. Eight: You don’t have to go outside. If you live in a place with extreme temperatures or high winds like I do you’ll appreciate not having to go outside to prime a model which is something you have to do when you use spray. Nine: Your model can dry inside so no dirt, dust, or leaves will get stuck to it and nobody will steal your minis! Ten: Your hands will stay a lot cleaner. Wow. Those are ten reasons to use brush on primer so take my advice and use brush on primer. The vallejo stuff works really well for me so use that. The vallejo Game Color number for it is 72.002. You used to be able to get it and other Vallejo paints at http://www.thewarstore.com which handled my orders pretty well when I got supplies from them last time. Unfortunately they had to close shop and their site redirects to nobleknight.com which has a decent selection of paints, but sometimes you can’t find exactly what you are looking for and they don’t carry my favorite brand, which is Coat D’Arms, but they carry P3 which is good second choice and Citadel, Vallejo, and a few other good paints. They don’t carry the game color primer, but they do carry the larger sized white surface primer which should work just fine, but it’s often out of stock. But usually amazon has it for around $20.00 in the 20 oz size.
Now if you are going to use a spray primer I recommend Games Workshop brand white primer. Like I said if it’s like the stuff I used to use it’s decent. It used to be called “Skull White” primer. I have a feeling the formulation has changed a bit since I had that stuff, but probably only for the better so it’s worth a try.
I tried their Chaos Black primer too back then and I didn’t like their black stuff. It’s too thick and I prefer white primer, but it was worth a try as I had a lot of dark figures to do then.
Back in the day the brush on primer from Games Workshop / Citadel was called “Smelly Primer”. I never used it and apparently the smell wasn’t all that bad, but they gave funny names to their paints, so it was probably more of a gimmick name than anything else.
The best primer I ever used was Ral Partha’s spray on primer, but sadly that company went out of business, but I used the one can I had for a good decade after that. Their sealer was also excellent. The primer was called Spray Partha Primer (TM) and sold for 3.95 for 6 ounces in 1990. http://www.ralpartha.com/index.php/downloads/catalogs/47-ral-partha-1990-catalog/file
Reaper also makes a white spray on primer, but I’ve seen someone complain about a quality control issue that seemed to pose a safety issue, but that may have a one time thing. Either way it’s available from amazon too and from nobleknight.
Now what colour primer should you use in any case? White. Always white. Stop white genocide and use white primer. Seriously though: I’ve tried other colours and they all stink. Just use white.
If you want to tint your primer with another color you can, but use caution and test it on a piece of plastic or something first. You want to avoid a slick surface and some paints dry very slick. It all depends on the medium and pigment used.
If you make your own paint the best additives for coloured primers are going to be chalky kinds pigments like your earth tones like yellow ochre, raw sienna, burnt sienna, indian red, venetian red, turkish red, english red, caput mortuum, etc. I would probably avoid mineral colors since they can be slick. Dye type colours added to your white primer won’t make much of a difference either way. Their tinting strength is strong and they don’t change the consistency of the paint much.
Now in a pinch if you don’t have primer you can use just regular white paint or gray paint and just try to avoid rubbing your model with your hands much until you are finished and can seal it, but regular white paint is often very slick when it dries so you’ll want to make it less slick somehow by adding a chalky secondary color into it if you just use regular white paint instead of a proper white primer.
I noticed the black vallejo paint is very slick so don’t use that to make a black or grey primer. Instead if you have a black pigment like imitation ivory black that’ll be a better bet. But in any case it’s best to just add an earth tone to the white paint to make a neutral colored primer. Vallejo of course not only makes the Game Color White Primer, but sells larger bottles of Surface Primer, which is probably a more economically version of the same thing, but I don’t if it is as finely ground so I use the game colour version when I can find it, but few places carry it so you might try this instead… https://www.amazon.com/Vallejo-White-Primer-Acrylic-Polyurethane/dp/B0063TQ7HW/
If you had to make you own primer keeping a little fine powdered chalk on hand and grinding it as fine as you can and adding just that to pure medium to make a white primer should work. You could add a touch of white paint to that and see how that goes. Most commercial white paint is made from zinc or titanium. Both can be pretty slick when dry so white primer generally has chalk of some kind in it. Calcium has been the basis of primers since at least the 1300s when Cennini wrote his dissertation. I have a feeling in a really bad pinch the yellow of an egg could be substituted for the medium too.
Obviously since you can buy acrylic medium from Vallejo and primer from them too I am only explaining these things in case you are in a pinch and can’t get supplies and so you understand some of the chemistry involved here.
Anyway; why do we use white? Well we can see the model better when it is white. And white is very reflective and since many colors are semi-transparent they look best on white which will impart a shine behind them making them appear brighter. In miniatures we often exaggerate contrast and this helps us do it but using white to add brightness to colours is a technique used in all kinds of painting.
Any dark color will just make the model appear dull. While that’s not terrible for portraying large flat surfaces of what would be unnatural materials like some metals it’s still not ideal even for those kinds of materials. And for flesh it’s a disaster.
Real flesh breathes and is transparent and naturally glows. You need a white undercoat for that. You can of course use a brush on primer that is different coloured for different parts of the model, but lets just keep things simple at this point and stick to white. I do it and it works fine for me when painting miniatures so take my advice as I’m a professional colourist and just use white brush on primer.
Now the primer does dry pretty fast and you don’t want it to dry on your brush, so pre-moisten your brush (I call this priming the brush) before dipping into a drop of the stuff and rinse your brush often, like every five to ten seconds and dab it on a paper towel to get rid of the excess water before picking up any more paint from your droplet.
Just keep doing that and apply the paint thinly, but with a good amount of moisture but not so much that it runs.
Do at least two coats. Three if you are having a real hard time with it, but remember the model doesn’t have to be pure white when you start and some streaks or blotches really won’t matter much since all the white will be covered with an opaque paint in the next stage. It just needs to be primed and that doesn’t require a real thick layer of priming. It just needs a competent one. Use an older brush for this step as it tears up your brushes a bit and get into those grooves.
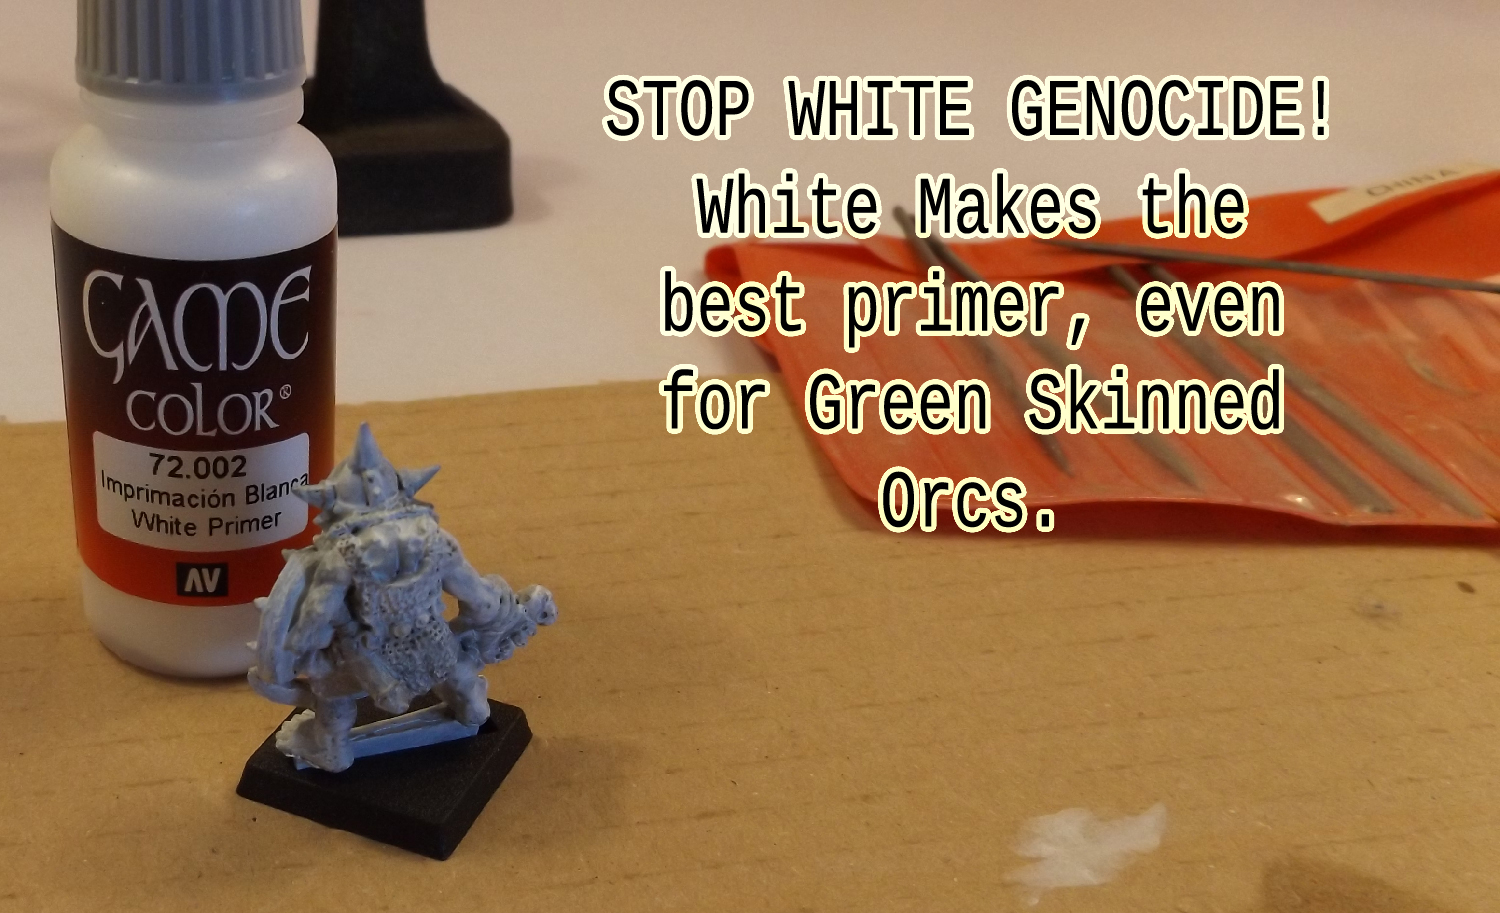
STOP WHITE GENOCIDE! White makes the best primer.
Now we are onto our next step. We need to paint the flesh.
We are doing an orc and most orcs are green so we need green and vallejo has a good green for us to use which is the same colour and named the same as in the old games workshop citadel paints. It’s called “goblin green”. It’s opaque and so can be compared to those greens we use in oil painting made from chromium oxide which is very opaque, and so while it’s not the best pigment to use for flesh since flesh is transparent it makes a good base color as it covers completely.
It’s important to know for technical reasons that most miniature paints are made not from large pigment particles ground finely but from very small ones created in a laboratory so they don’t clog up the brush or obscure details. Warmer green miniature paint is sometimes made from PG36 which is a yellow green version of phthalo-green whereas cooler shades are made from PG7 which is what makes hooker’s green paint that water-colorists use (read more here… https://janeblundellart.blogspot.com/2015/08/mixing-with-phthalo-green-blue-shade.html).
When doing humans it’s best to use a transparent colour at this stage letting the white show through and we might use a flesh colour or some kind of red or green when doing that, but for orcs? Goblin green is for sure colour to use and we don’t mind covering up the white since the character is evil and so shouldn’t have too light of a skin color. We want him to have a more solid presence than that. A creature with ethereal elf flesh is not the vibe we are going for.
If you are using a traditional artist’s palette you’d have a hard time here because viridian is cooler and much more transparent and viridian doesn’t cover well, but the type of green that we need is readily found in all acrylic paint collections so you can just run out and buy it. It’s just a medium green that is opaque and that’s very common.
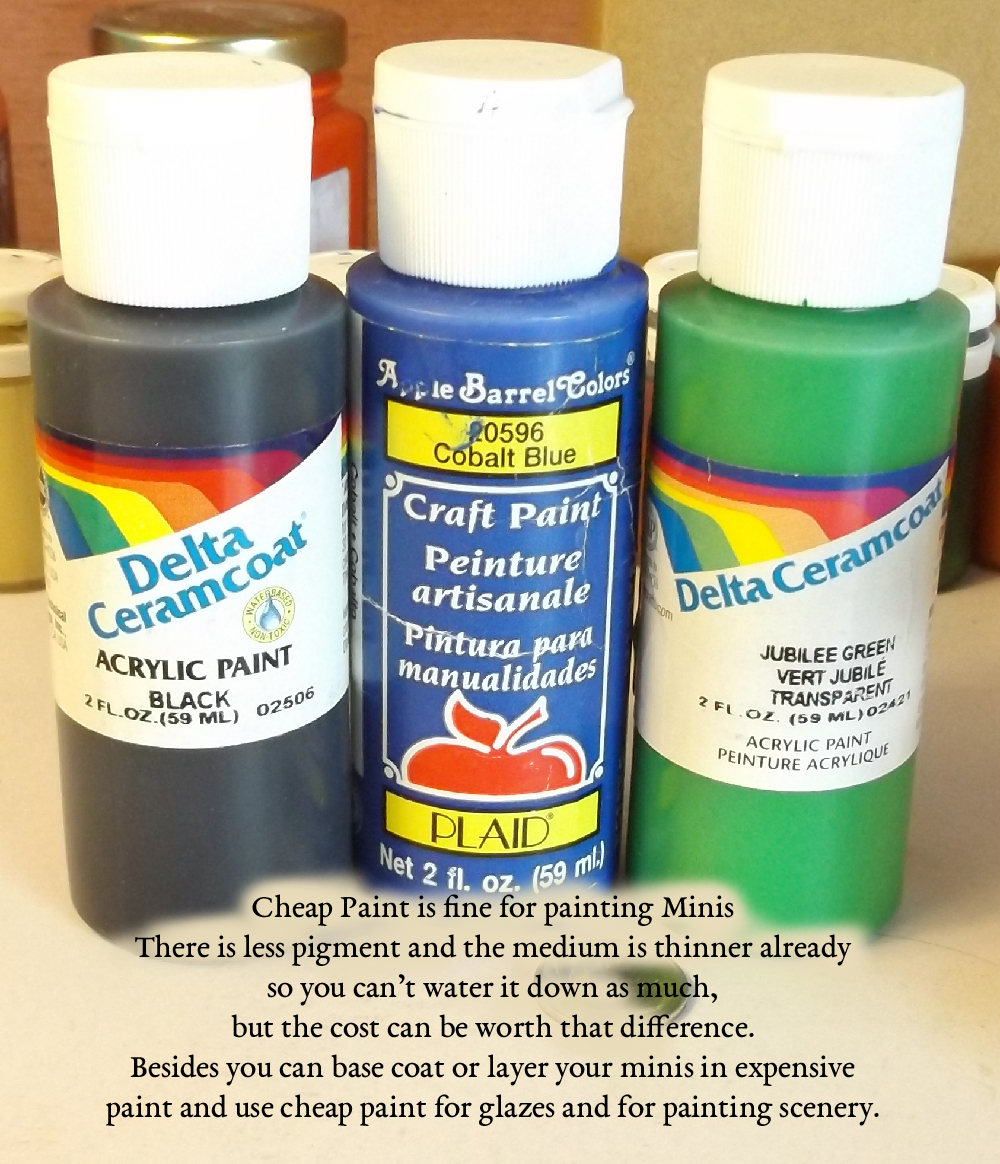
So if you don’t have official Goblin Green paint generic green acrylic paint will work just fine. Delta Ceramcoat calls a green similar to this “Jubilee Green” and you could of course use something like that. It’s really all the same stuff. If you wanted to make it more drab you could add a touch of brown, but without adding anything it would work just fine.
But vallejo paints are pretty nice and that’s what I have so that’s what I used. I’m just happy they had a color called “goblin green.” These colors make color selection a little easier for beginners, but cause confusion because from one company to another and from from era to another or even from one batch of paint to another the color can be quite a bit different.
I actually also have a LOT of original boxed set Citadel Colour Goblin Green still laying around too, but I didn’t want to get primitive on you. For this demonstration I wanted to use stuff you can still get and Vallejo still makes a really nice Goblin Green.
You might wonder if Citadel makes one and the answer is yes and no. At least not by name and not by exact shade. Citadel’s naming conventions are anything but conventional. Their Warboss Green is suggested as a replacement for Goblin Green in some charts, but it is a little different than goblin green used to be and considering they have 55 types of green paint if you include their effects and airbrush and spray paint lines it’s hard to say which is proper replacement. Warboss green appears a little too cool from what I can tell, but is close. Waaagh! Flesh is too cool and too dark, but Moot Green looks too warm. I think the correct match is probably warpstone glow if we want to match the goblin green from the later 1990s, and not the earliest goblin green which was more of an olive drab, but I don’t have any of citadel’s current line of greens from which to do a comparison to help you out.
But Coat D’arms Goblin Green is available. Their Bogey Green or Forest Green (which seem to be the same color) are also very close and any of those will work just fine. In fact whatever green you start with will be fine. Goblins are always green. But orcs are traditionally supposed to be brown since the classic citadel line included an orc brown, but orcs and goblins do come in different shades so don’t be too concerned about it. I just prefer using goblin green for orcs and the particular green isn’t all that important. Truth by known the real difference between goblins and orcs is that orcs are stronger and farther removed from nature so perhaps for an artistic reason I will make my next orc brown instead of green, but I have always preferred green orcs so I decided to do this one green.
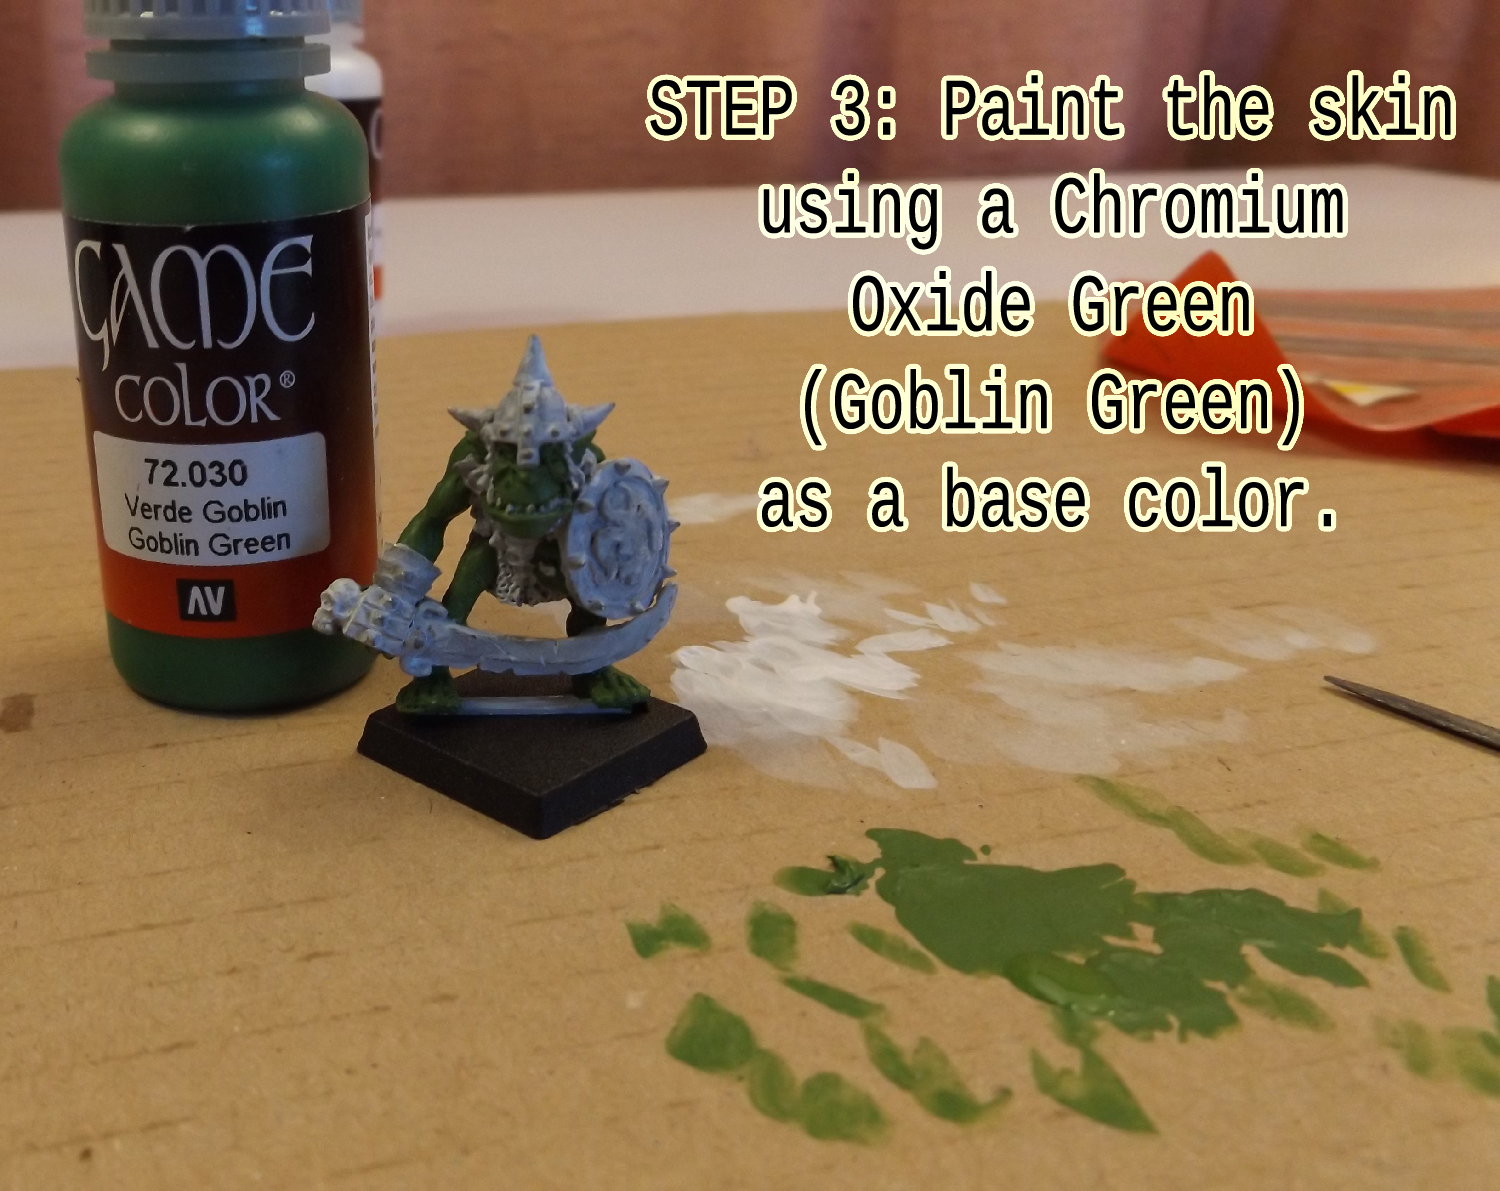
Paint the skin using something similar to a chromium oxide green which is opaque. In miniature painting we call this color a medium green, Goblin Green, or olive green if a bit muted. Use this paint as a base colour as it covers well and you won’t have to clog up any details with a lot of coats.
Paint the skin first. Use a medium green and take your time. This is actually one of the hardest parts of the painting so go slow and remember to prime your brush with water to help the paint flow and rinse your brush often. Dab off the excess. Pick up more paint from your droplet of paint you have applied on the cardboard underneath your model and brush out your brush to make a point again and go again. If you don’t have cardboard newspaper print will also work, but I like to start with a cleaner surface than newsprint that is also firm so it’s easy to move around and cardboard does the trick. Just remember you paint dries quickly on cardboard so just apply one drop at a time to your cardboard palette and put any newly added fresh paint on top of dried paint which will prevent the cardboard from absorbing the moisture as much the next time. A piece of tracing paper or parchment paper can also serve as a bit of a barrier between your paint and the cardboard. But for this little project I wasn’t worried about it at all.

Chromium oxide type greens are good as a base colour, but not great for washes. Use very little of it when doing washes because it is very opaque. The vallejo number for Goblin Green paint is 72.030. You can pick some up noble knight when it’s ACTUALLY IN STOCK. Or just buy the P3 or Reaper versions. Olive green is more or less the same color, but more muted so don’t worry if you have to substitute one for another.
https://www.nobleknight.com/P/2147559129/Goblin-Green
https://www.nobleknight.com/P/2147371079/Ordic-Olive
https://www.nobleknight.com/P/2147346156/Olive-Green
https://www.nobleknight.com/P/2147769087/Goblin-Green
Below we can see the progress I’ve made so far. The little guy is much easier to see now that he has a little color. He’s coming alive.
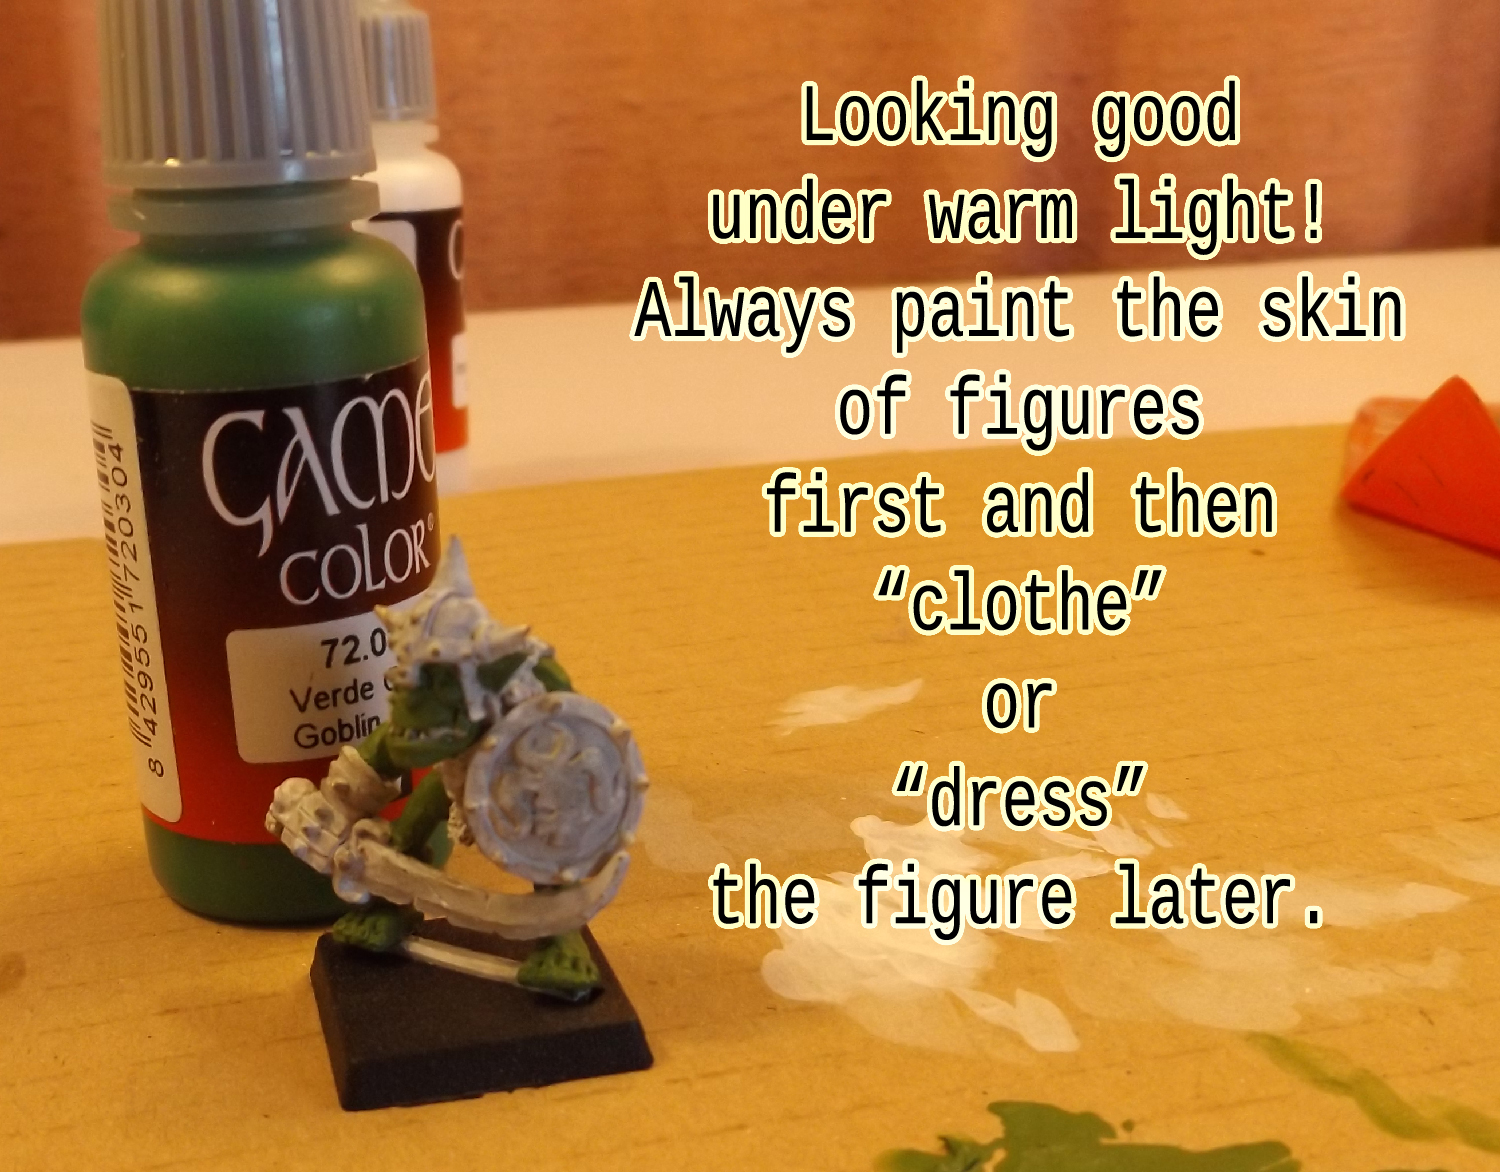
Paint the skin first, the clothes after. Very important rule.
Always paint the skin of your model first and then the clothes like you are dressing him moving towards the outer layers as you progress. Less trouble. Less mess. Easier to get into the corners. Basic rule. Don’t forget it.
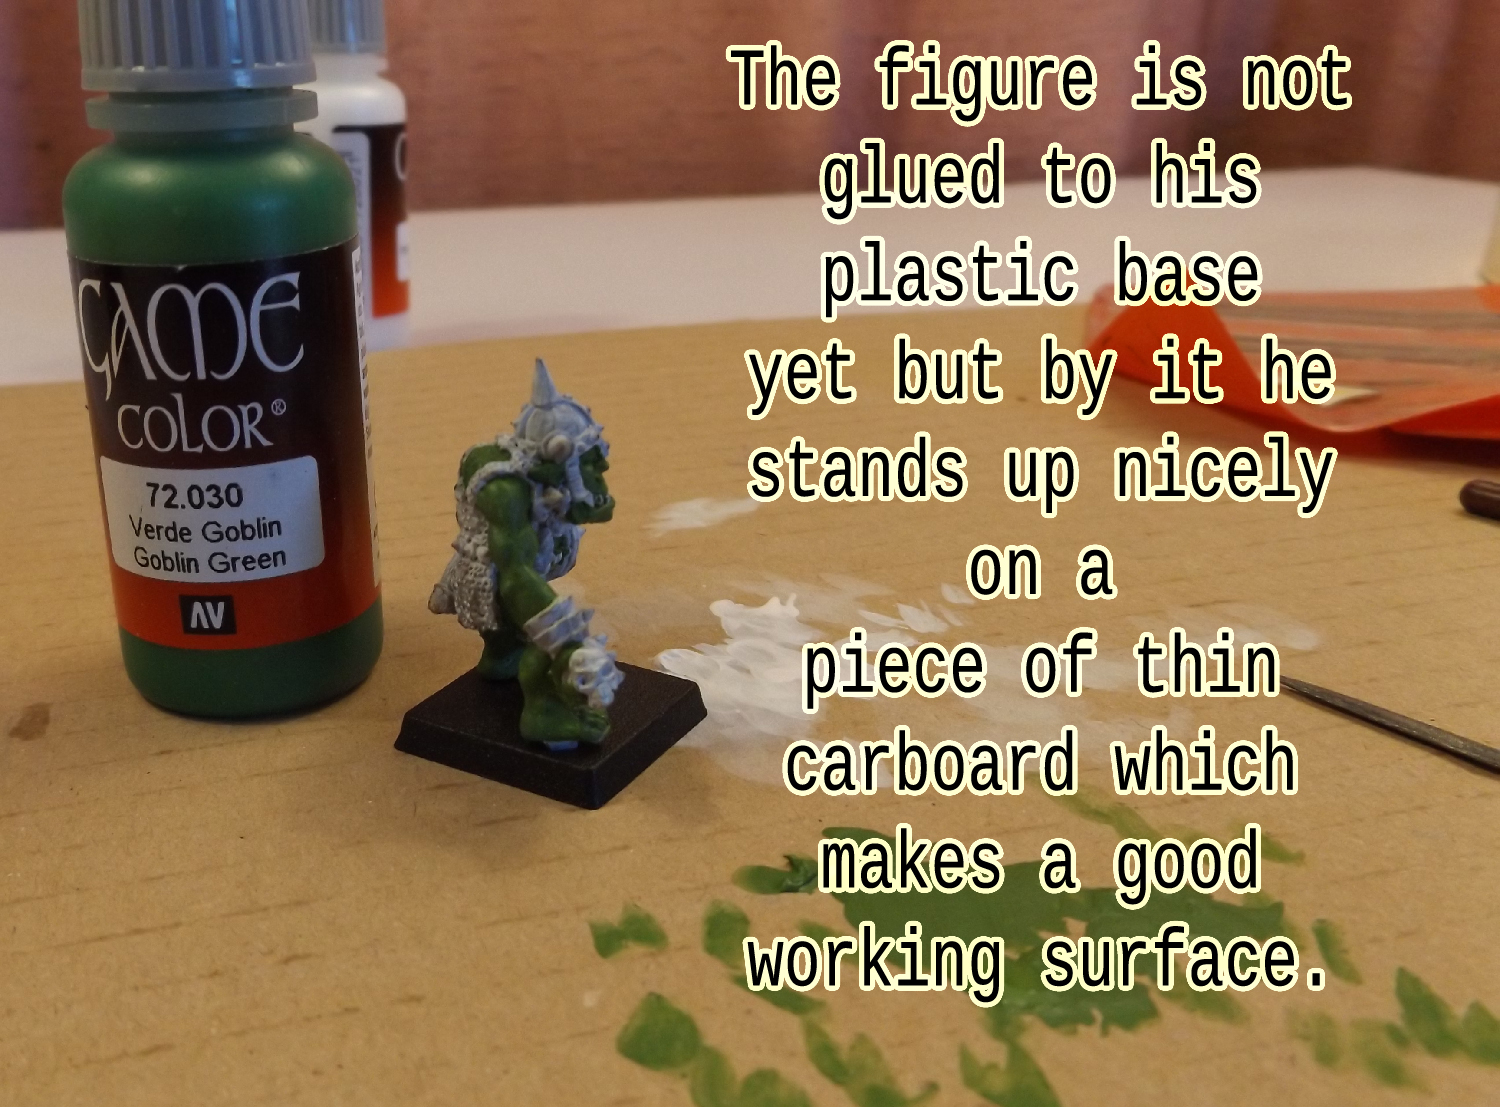
Don’t glue your figure to its base yet. But use the base to stand him up if you can.
Don’t glue your model onto its plastic base yet, but use it to keep the model upright if you can. Sometimes the base sprues on the model are thin so the model sits too loose in the base to do that (I had trouble with Lord of the Rings miniatures that way even though they are really nice models generally), but generally they fit well enough. My base sprue was a little bowed and would have made gluing a bit difficult without filler. But because of how I was basing it I knew it wasn’t going to matter. If you know you are going to need filler you can add cotton balls you’ve pulled apart or bits of Q-tips you’ve pulled apart mixed with some white-glue. Or you can use some fine sand mixed with white glue. Or you can use green stuff, which is a two part epoxy clay you can get online, but professionals like me know the true secret… baking soda mixed with super glue. That stuff is amazing! But don’t get it on other parts of your model or you’ll be sorry. The stuff dries rock hard. Also try not to glue your fingers together. Super glue is dangerous stuff. You may never be able to snap your fingers again!
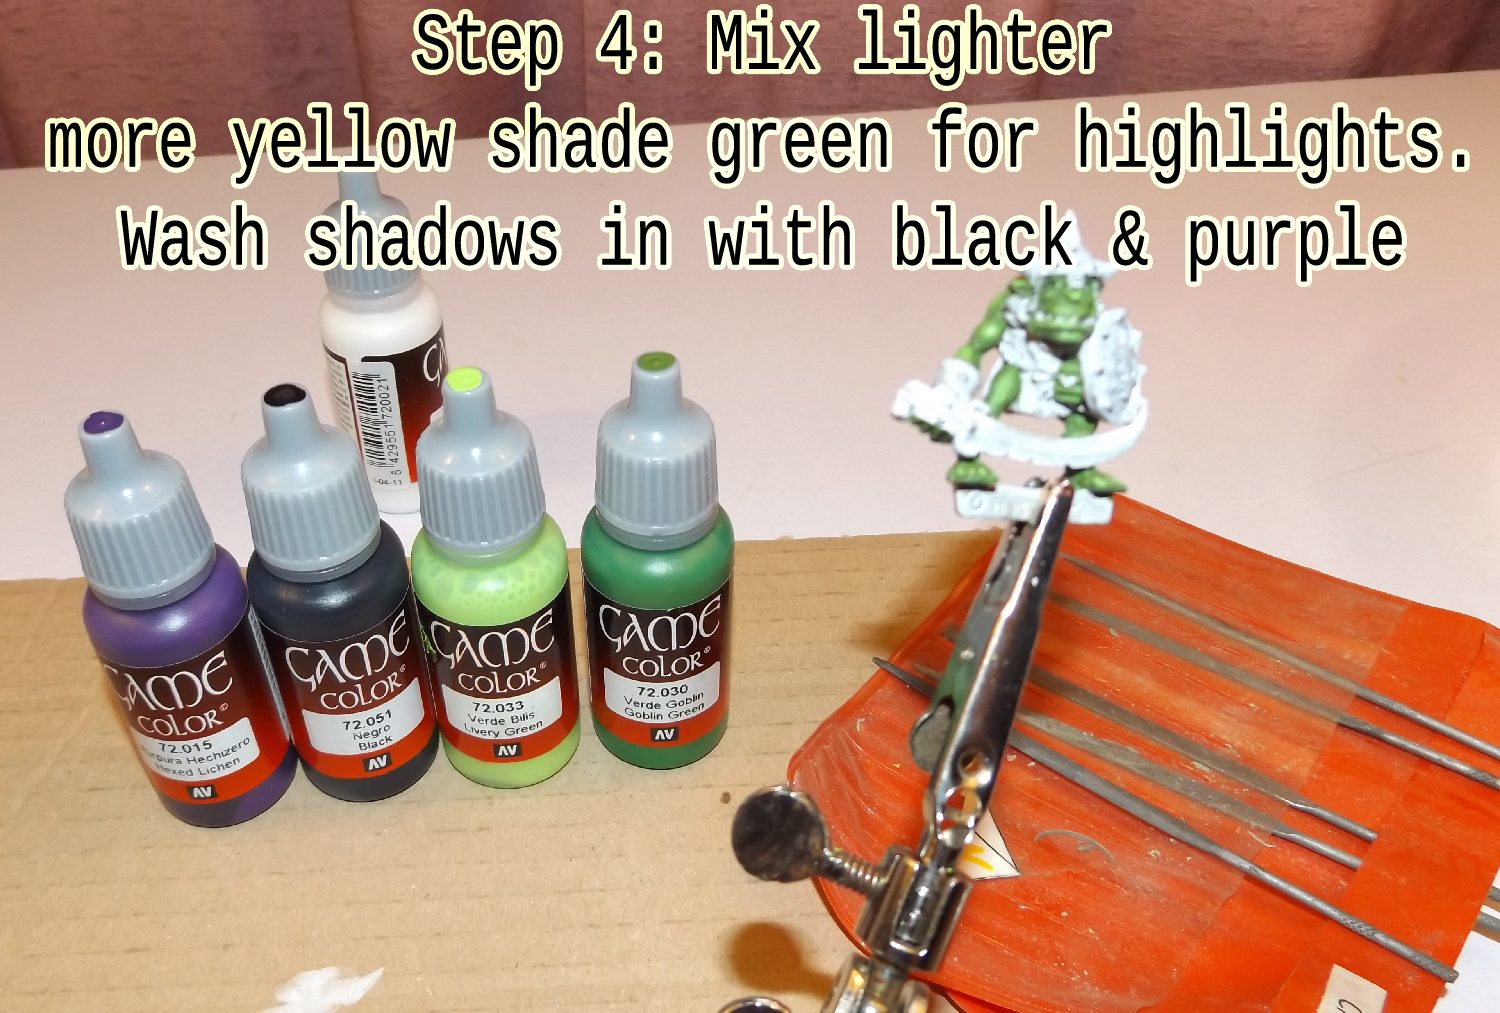
Mix a lighter more yellow shade of green for highlights and mix a touch of black and some purple into green for shadows.
Now we need to shade the green to give it an illusion of size and just to add some variation which makes the whole thing appear more realistic and less cartoonish. We’ll create two or three more variations of our green. One will be lighter and more yellow, the next will be darker and more purple making it cooler. And the last will just be darker and more black.
Let’s talk about the yellow-green: We can use a premade colour like Vallejo’s Livery Green 72.033 for the yellow green and add just a hint into our Goblin Green droplet or we can use any yellow paint and make a livery green and then add it into the goblin green for the same effect. I think the Livery Green is a great colour and I already have it so I used that, but any yellow would have sufficed but it would have taken an extra step mixing the yellow into the green to create something like livery green. If using a duller yellow like yellow ochre (called SpearStaff Brown in the old Citadel sets) you can just add it directly into the goblin green without making a more modest yellow green first as it won’t overpower the goblin green but if using pure yellow you probably want to mix a little grey into it to dull it a bit before trying to add it to olive green to make livery green. It’ll all depend on what type of yellow you have. I took the shortcut and used livery green which was the right colour already and I mixed that into my Goblin Green to make a medium yellow green.
To mix colors together use a toothpick or an old brush that you don’t mind roughing up. You can just rinse it out after, but mixing up paints with a brush it a little hard on them so I use cheap old brushes for this and not my good brushes.
Now once you make this medium yellow-green color put a little on your actual painting brush (not the mixing brush) after priming your brush with a little water and then brush out your brush on the cardboard until it’s just short of being dry. This removes the excess paint, but still leaves a good amount. Then you’ll apply the color to the raised areas of the orc’s muscles especially where they face the sky.
Remember less is more here. If the color is too transparent you might need to use a little more paint, but if it is runny it is too wet. It should be mostly dry but not so dry that it sticks to your brush and not to the model and somewhat moist, enough that it will leave the brush, but not so much that it is runny nor even opaque. We want to highlight, not cover the muscles. This is a basic dry brush technique as far as working with wet paint goes.
See you can’t really use chalks or powders on miniatures unless you use a spray varnish and that doesn’t always work out very well as the chalk seldom stays in place until after you’ve sprayed it and spraying it often blows the chalk away or dissolves the white chalk so it disappears. So this dry brush technique is the next best thing. It’s not as subtle as chalk, but it’s more permanent so just learn to love the imperfection of it. This is how it is done when working with acrylics.
Do all the raised areas on the nose, lips, cheekbones, all the finger joints, knees, calves, scapula, deltoids, biceps, forearms, etc., with this colour. Take your time. Remember here less is much better and keep that brush rinsed, but then dried on the paper towel, almost completely dry right when applying the paint but not quite.
Do just a bit then rinse again so the paint doesn’t completely dry on your brush and then blot on your paper towel again, get some more paint, and try it again. Again you want your paint to be ALMOST dry, but not quite. And it dries so fast you have to do it again and again before you see a result since only a small amount of paint is being transferred from your brush to the model each time. Use more or less of the livery green in your mix to get the effect just right.
Now you’ll need to do the shadows. Here we take the goblin green and add a bit of purple to it to make the color darker, more neutral, and more cool. The purple was Vallejo’s Hexed Lichen 72.015. https://www.nobleknight.com/P/2147585786/Hexed-Lichen
Normally to make green more cool we add blue, but by using purple we neutralize the color a bit more and don’t have to use as much black because purple is a little darker than medium blue and farther away from green on the color wheel than blue is. The blue would be basically adjacent to the green and so wouldn’t neutralize the color as much and wouldn’t be as dark as the hexed lichen which is a dark violet purple type color. To this we add black as needed using as little as possible since black dulls color too much to be desirable, but much be needed from time to time to darken or nuetralize paint a bit.
Now how to we use this color? Well the last step was dry brush, so this is going to be wet brush. We moisten the brush and instead of blotting it we keep it mostly wet, we might blot it a bit, but basically it’s got moisture in it when we pick up the paint and we don’t dry it out as much on the cardboard. We just apply the paint to the model basically wet. Not flooding the model, but allowing it to run into the grooves turning the model around in different ways as we work making the grooves we are trying to paint level with the earth (is the earth really flat after all?) and we hold it level like that so that the paint dries in the grooves. It doesn’t take long. Don’t worry, but holding the model in your hands with a tool or by the base sprue with or without a tool helps here so you can rapidly turn the model as you work. The paint will look darker at first than it is finally when it dries, but still work slowly and apply only a little paint at a time.
This technique is called washing. But technically washing is going over the whole surface instead of specifically into the grooves so technically what we are doing is called wet shading. But you can think of it as a controlled wash.
They make special paint to do this that is really ink, not paint, and because it’s always made from dye and not pigment it doesn’t clog the grooves up as much helping to preserve detail. It’s not necessary though. A lot of people are too reliant on things like inks and don’t ever learn to control their paint. Mastery is achievable through practice. Besides inks are a bit shiny and so aren’t great to use in recesses anyway. Classical artists know shadows should be as flat in shine as possible and highlights a bit glossy if possible so the light of the room catches the highlights and not the shadows forcing a more three-dimensional appearance to the art.
So while inks are available to us miniature paint works just fine for this and is cheaper and comes in a wider range of colours and is more easily mixed. But you could try some of the inks if you want to. I would recommended a brown ink and a black and a purple to start with if you want to add them to your collection, but again they are not necessary.
Now another tip is that by brushing your wet brush across a moistened bar of ivory soap before you pick up paint washing can be a little easier and the colours will dry more transparently. The paint is thinned this way and the liquid thickened which repels the paint pushing it into the corners. It’s a good way to push paint away from the center of a flat surface and out towards the rim of a shield for instance. Again it’s not necessary and I didn’t use that trick on this model, but it’s a technique worth learning. Using soap? Ya. Now THAT’S what you call a “wash” huh?
Now below you’ll see how a magnifying glass can really help you out. Any kind will do, but I have one that my mother had bought for my father decades ago (probably three and a half or so) and that I inherited when he died. At the time it was an expensive tool. Now apparently it can be had for less than five dollars.
I don’t know anything about the retailer. Just a chinese importer from what I can tell, but I included a link at the end of this article to one source I found for them. But these tools are available pretty much everywhere, but hobby shops charge more for them than online retailers, so I made sure to include at least one link where you could get one if you’d like to. Again I can not vouch for the source, but it gives you a place to start looking if you are trying to get something like mine. I have a feeling the later models are inferior, especially the glass, but look around until you find what you like if you are interested in something like it.
The tool is just a magnifying glass (a pretty nice one), that is attached to a jointed frame which has clamping clips also. It holds the miniature securely as you paint or check your work or let it dry. It takes a lot of hand eye coordination to work directly under the glass, but I can do it, but as my father said it is best for checking your work and finding the details you don’t want to miss. Plus it’s just cool. If you paint a lot of minis you might consider a headband attached magnification system. They aren’t too expensive either and are better to work directly under, but mine sometimes hurts my eyes and you need more light to use them as the lenses absorbs some of the light, but the advantage is that you can see out of both eyes with magnification as you work which is the principal problem with the single lens as shown. With a single lens retraining your depth perception is really hard and it gets in the way of the brush. In any case any magnifying lens, even a hand held one, will help A LOT.
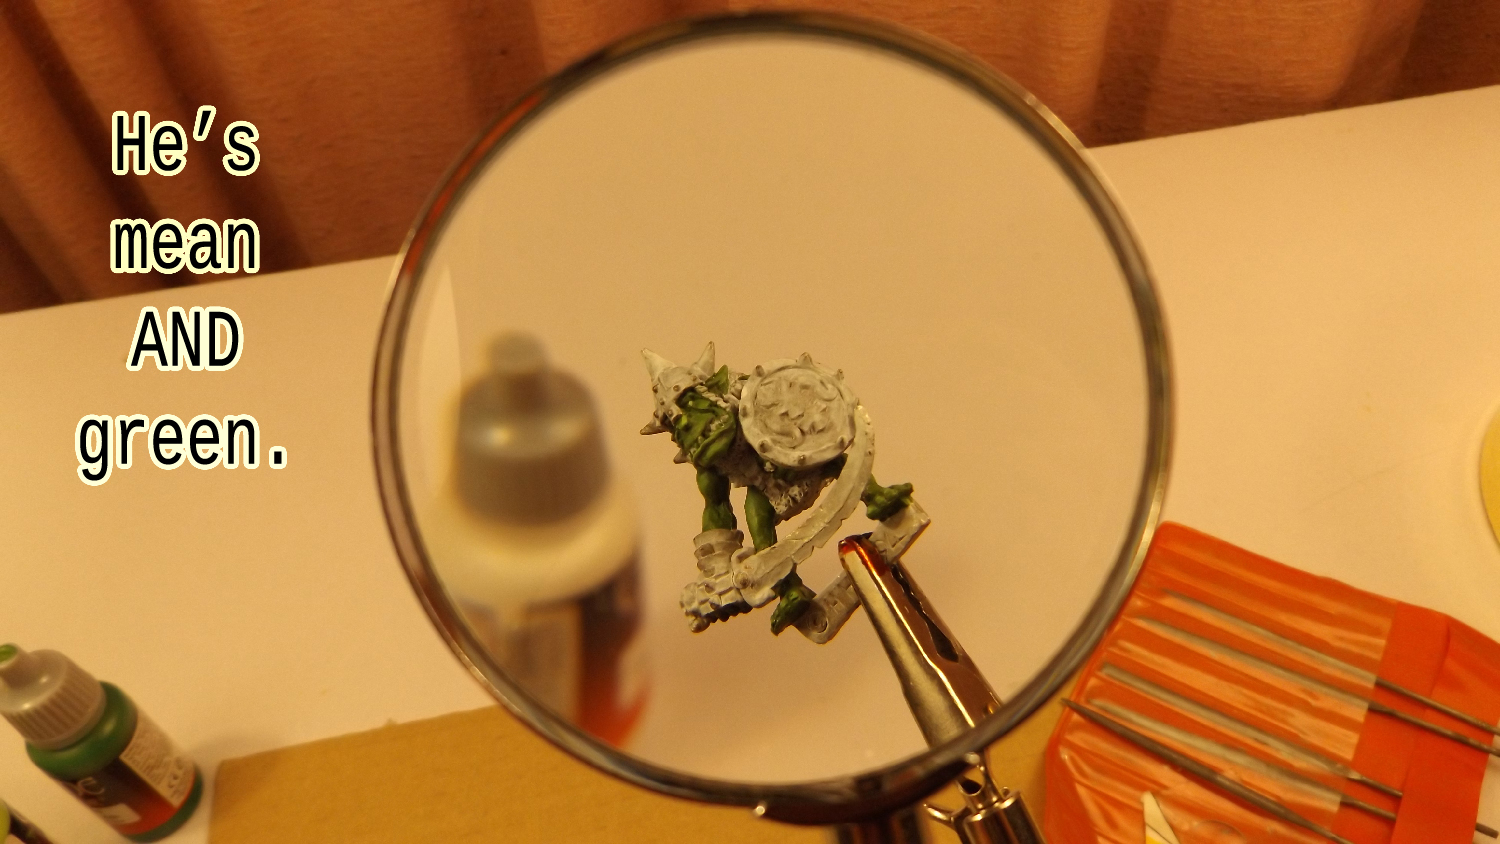
Mean and Green.

Use a magnifying glass to aid your eyes. Hold the figure with tools by the base-sprue.
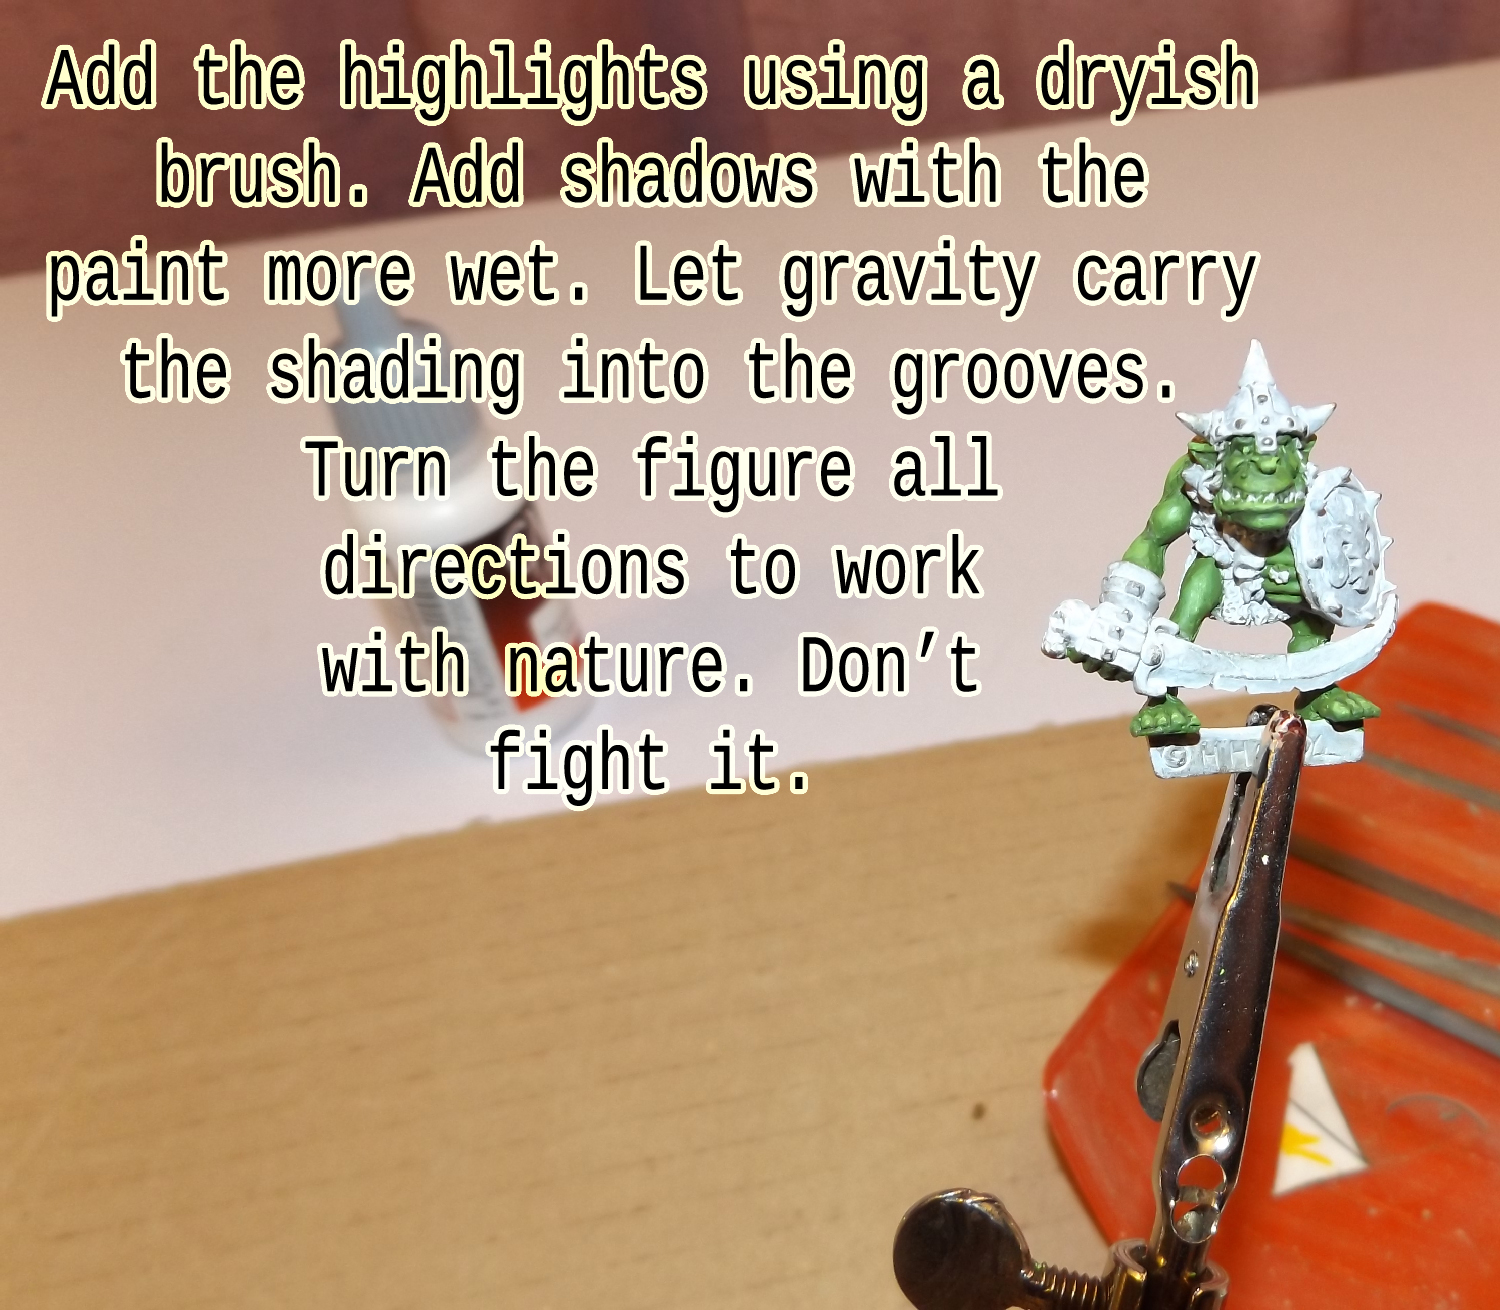
Use a mostly dry brush to apply the highlights, use a mostly wet brush to wash in shadows.
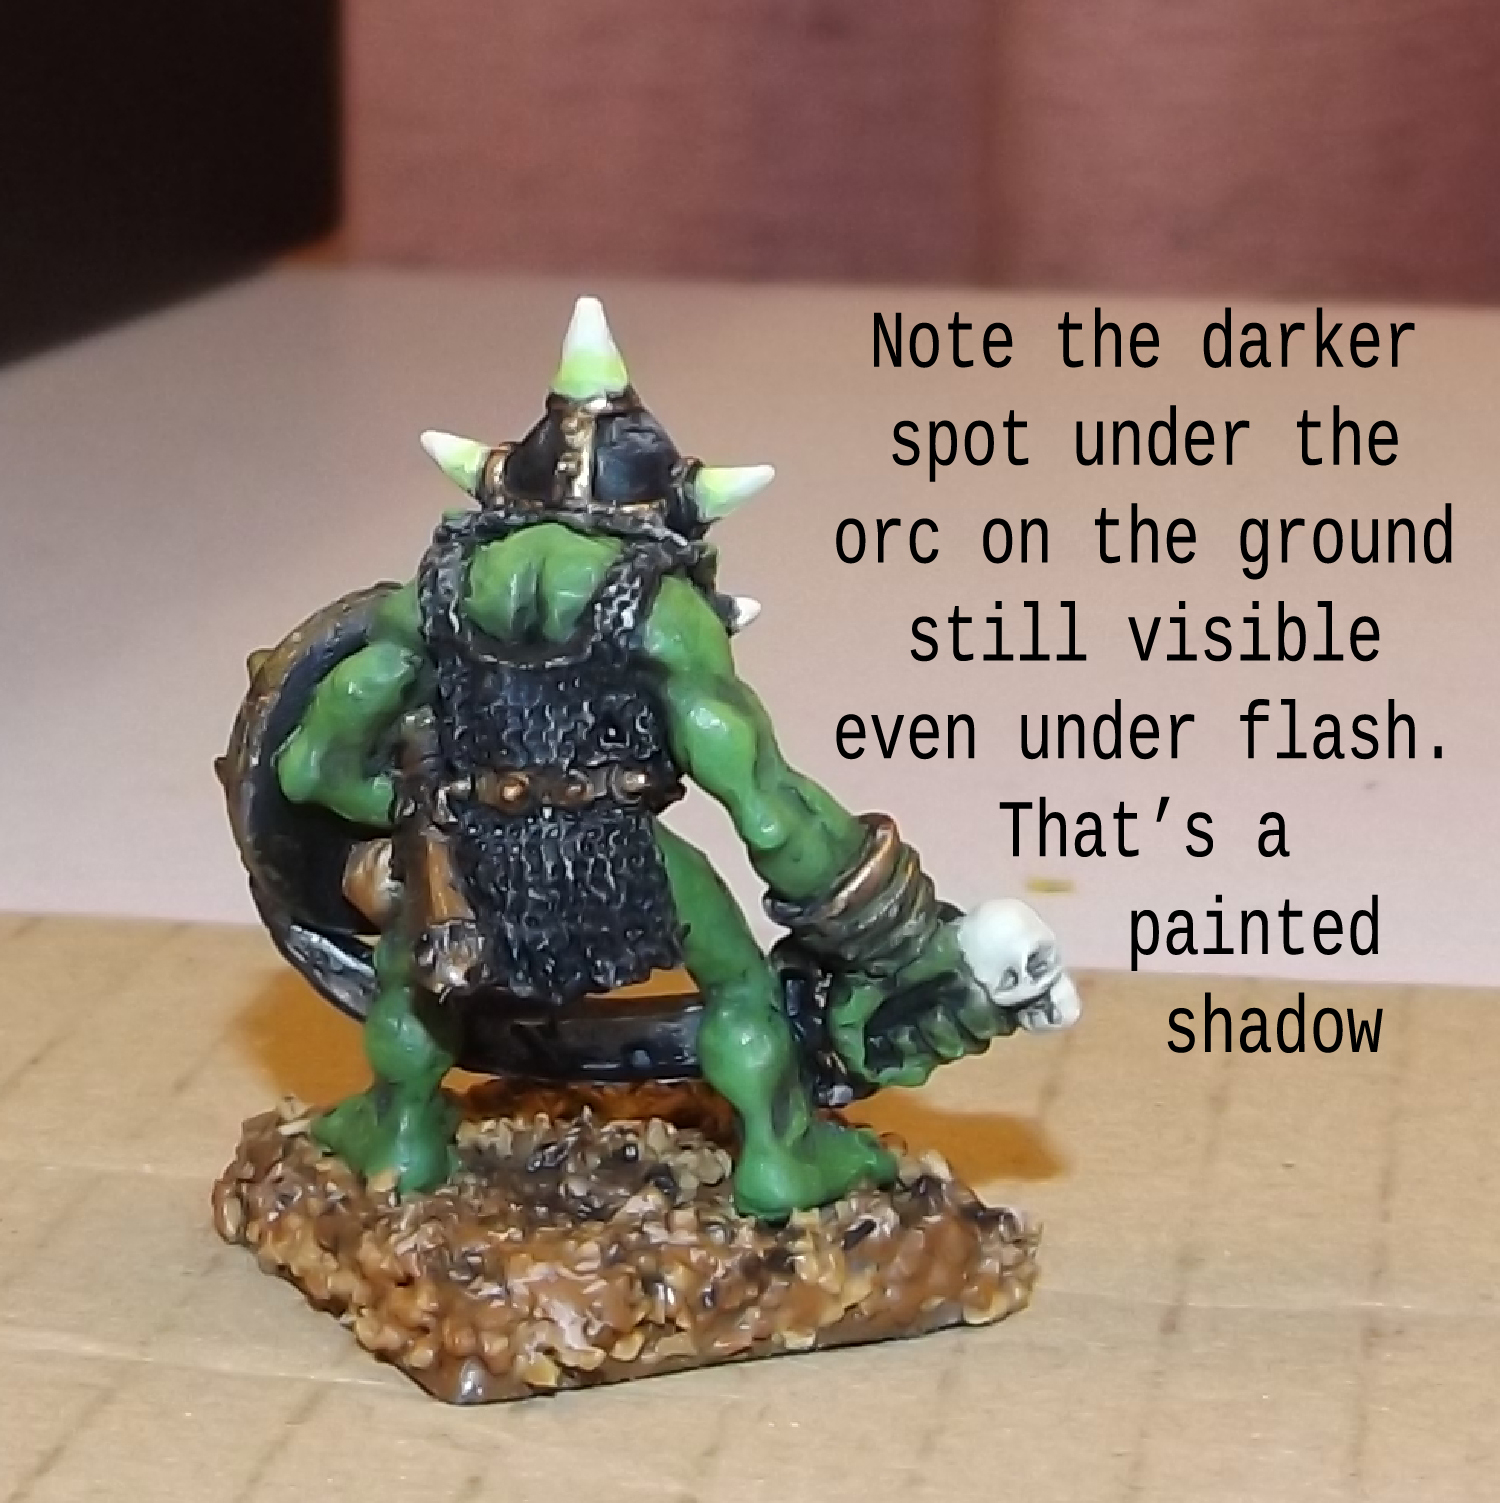
Below you can see the more yellowish greens are added to the raised areas especially those that face the sky and the darker purplish greens added to the grooved areas and underneath the model. The third colour mix is just the darker mix with a tad bit of black added to it. And that goes in between the toes and in the eye sockets and underneath the rim of the clothes. Basically anywhere they is a heavy shadow. That helps separate the details from each other.
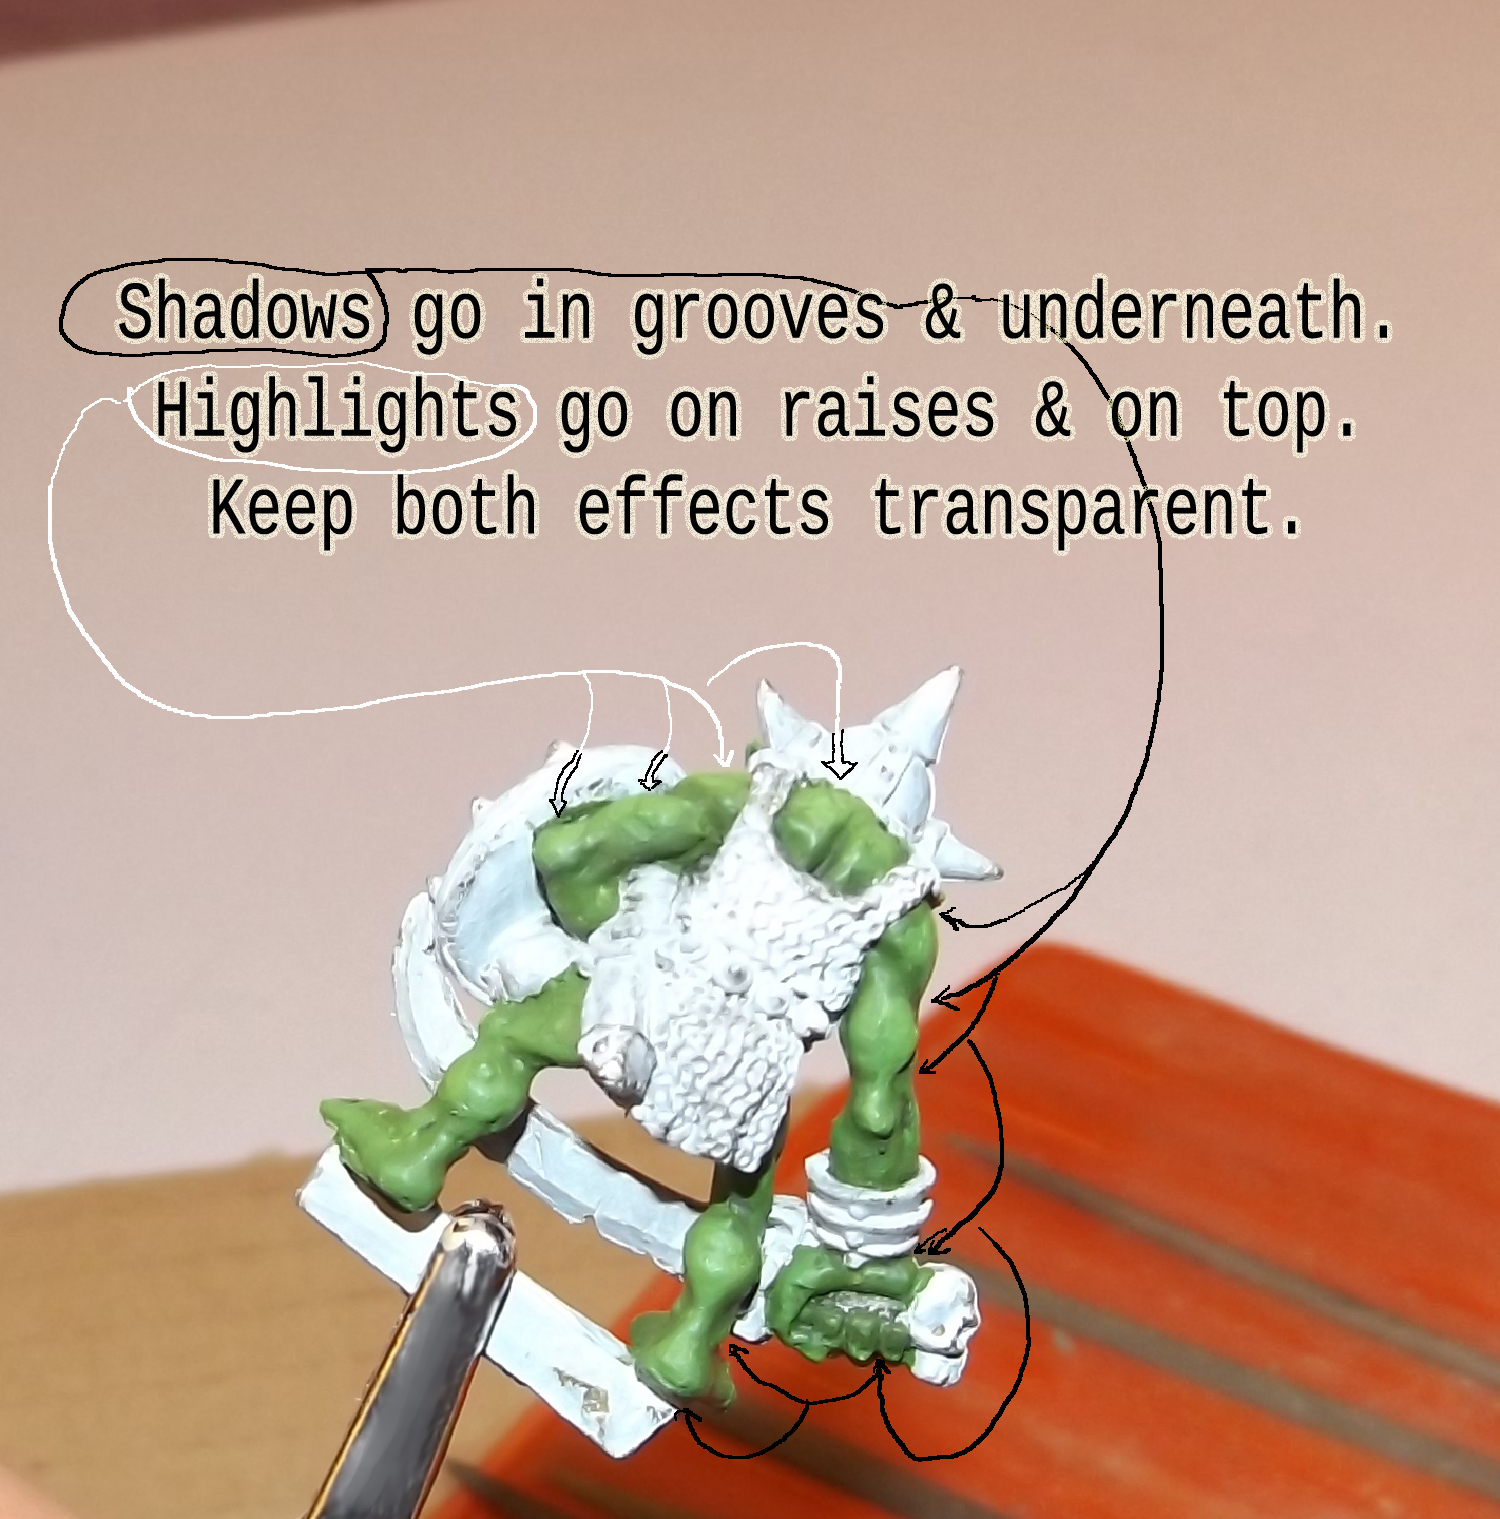
Shadows go in grooves and underneath the figure. Highlights go on raised areas and on top.
Now I didn’t photograph painting the clothing, but it was basically the same throughout. I applied a base color, did my highlight and then my shadows. And then any special effects. The metal was painted black first. Then rimmed (painting just the edges of the object) with a light gray and then painted with a dry brush of a metallic paint and then the black washed over that again. In the case of the chainmaile I left it black as medieval chainmaile was raw iron and left coal black and not polished unless it rusted and had to be rolled in a barrel to be cleaned. So I just left it black and I rubbed it ever so slightly with my thumb to bring out the natural shine of the metal figure underneath which is something cool you can do with metal figures which you can’t do with plastic figures.
With plastic figures it’s often better to paint armor with a very thin metallic paint entirely first and then wash in black to fill the grooves, but this technique is inferior as it clogs more detail. Best is: Black first, then dry brush metallic paint touching the raised areas ONLY, then rewash with the black. For the bronze areas I did black first, then bronze dry brush covering more than usual. Then black washes for shadows getting very dark in the grooves. Then I washed it with goblin green to soften the shadows a bit again and do a verdigris effect. Goblin green is good at this because it’s opaque and covers the black well where needed, but the black is just strong enough to show through here and there. The horns and skulls were white mixed with a touch of Vallejo 72.098 Elfic flesh (known to artists as naples yellow) and then around the base of the horns I added Livery Green.
The did the scabbard in Beasty Brown (described elsewhere) and rimmed the edges to make them stand out, did some shading, but kept it simple.
The jewel on the sword was done with Bloody Red Vallejo 72.010, then purple was painted to add an internal shadow like a transparent jewel would have. Then a highlight of white (Vallejo Dead White 72.001) with a touch of Bloody Red was used to make a single pointed highlight. When this was dry I used an enamel that I have for oil painting called Gamblin Galkyd to glaze the jewel to give a shine, but I was very very careful to not get any on any other part, so this was something advanced I wouldn’t recommend to beginners and wasn’t really necessary. Any gloss medium would have worked just as well also, but the only medium I had was flat medium. Oil paint with a little linseed oil would have also worked as it dries a bit shiny by contrast to acrylics, but the galkyd was ideal as it is thick and made a little bubble that stayed in place until it dried, however I did keep the model level until it did, which took a few hours. Now the only thing to talk about is the base.
First I glued the little guy in place using regular Elmer’s white glue using just a couple of drops from underneath the base and letting him dry in laying down sideways rotating the model every so often. This glue isn’t strong enough to hold him, but helped seal off the gap between the sprue and the base so I could use superglue for the next step. Once dry I filled the base with a few coats of super glue allowing the layers to dry completely before each successive one. Eventually the hole in the base was filled with a hard mostly immovable mass. For an extra hard filler you can mix baking soda with super glue, but it dries very fast, but man is it ever strong. I didn’t use that here.
For the next step I painted the base with Beasty Brown (a similar color was called Bestial Brown in the Citadel sets – it’s just Burnt Umber) and let that dry. Now for the magic.
Below you can see what I used for the base material.
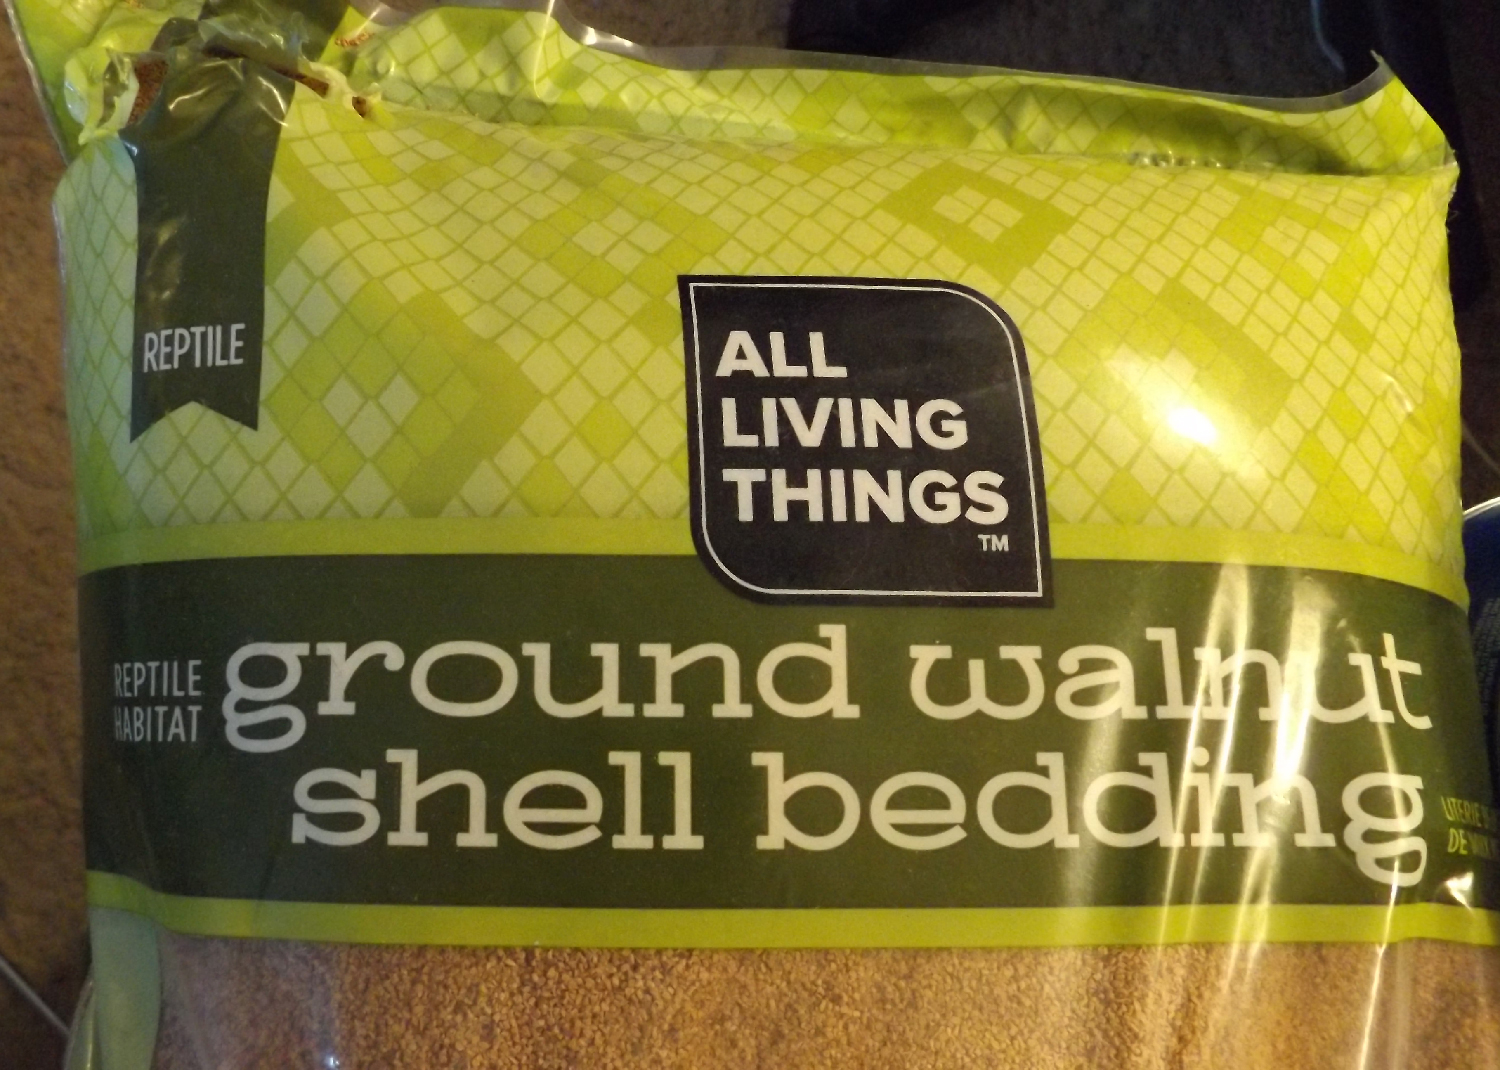
Walnut Shell Bedding makes good fake ground material for minis.
This is Reptile Habitat Ground Walnut Shell Bedding. Wow that’s a mouthful. Basically it’s ground up walnut shells. It’s absorbent, but a bit rough so it keeps reptiles dry and clean. This stuff is great for pet baby tortoises, lizards, and orcs. You can get it at pet supply shops, a huge bag. Obviously you don’t need much so if you have a friend that has a reptile maybe they could give you a little bit for miniatures. If not you can actually use regular sand from outside, just make sure it’s had time to dry in the sun. Little rocks and sticks and stuff are fine. They add character. You can also use air hardening clay to texture your base. They also make a synthetic grass for miniatures called flocking which is really an industrial waste product, but is applied the same way with glue. I have some I’ve used on other models and I like it, but I wanted to go a different direction this time and try something new.
How did I do it? I just used a cheap brush to paint on a thin layer of Elmer’s glue to the base and ran it through a little cup I had cut down and filled with this stuff. The stuff stuck to the glue and after a little playing around with it and redoing a few parts I got a fairly even coat that I was happy with, but touched up here and there with little spots of glue and walnut shells.
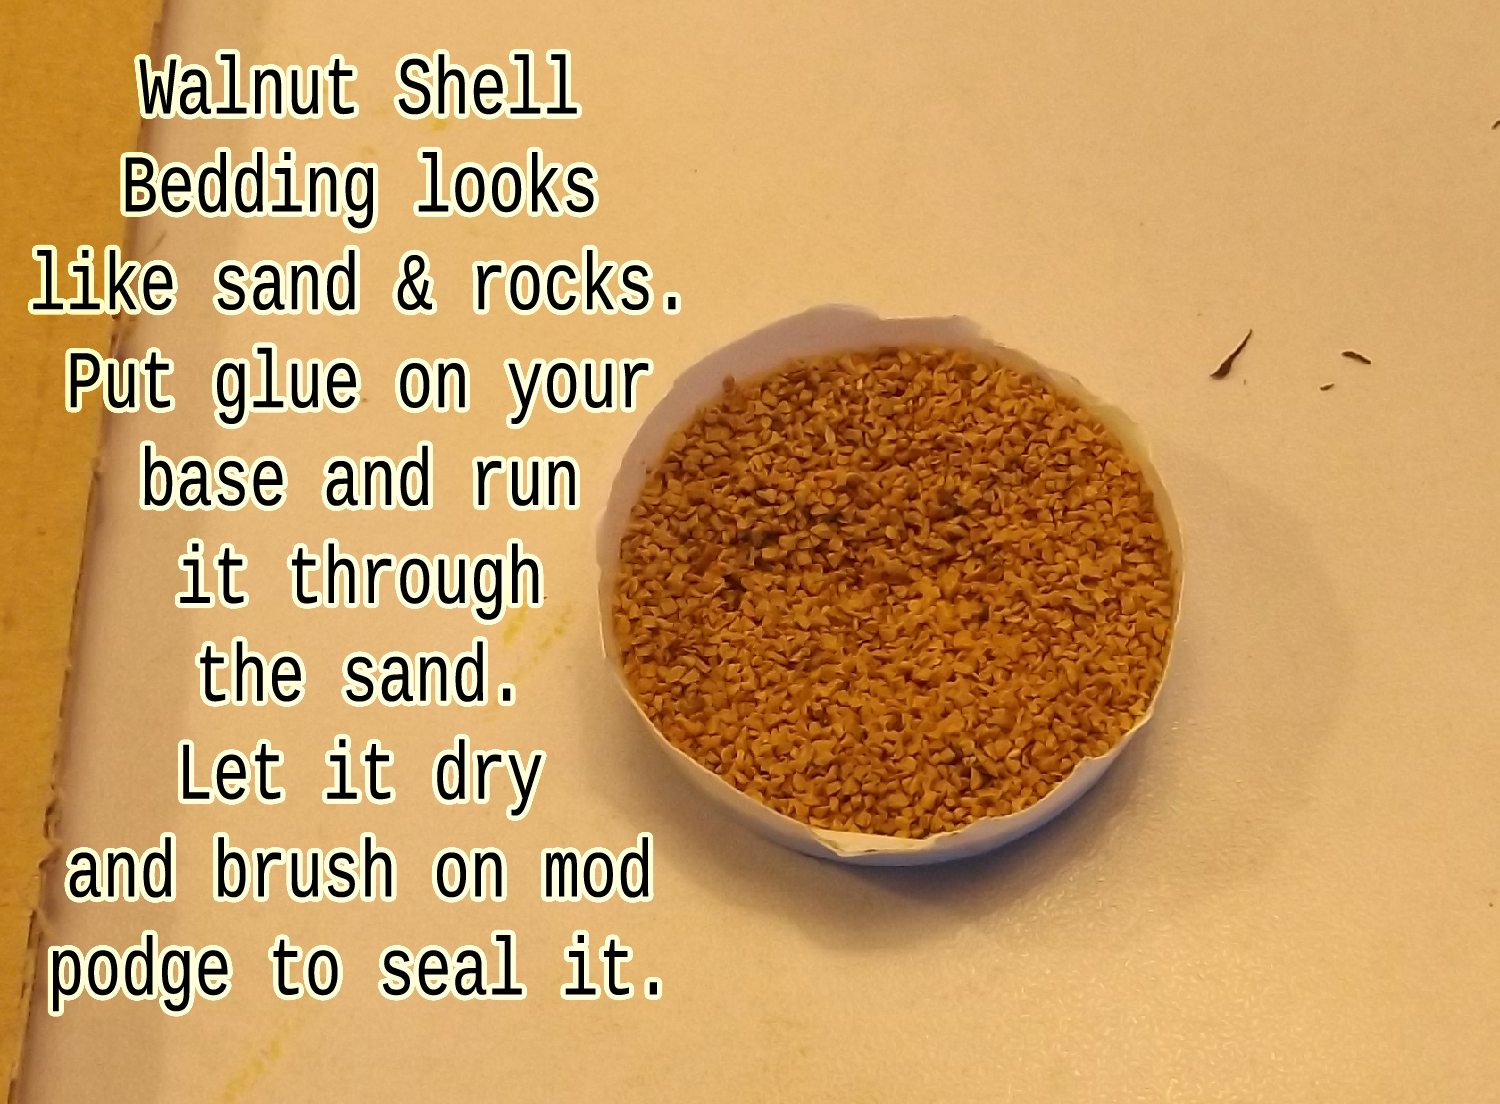
Put some Walnut Shell Bedding in a cup. Use some glue and presto! Miniature ground cover.
Now after I got a good texture on my base I let it dry (I should have let it dry longer as I ran into some trouble because I didn’t, but it worked out) I then used lightly thinned Matte Mod Podge glue that I brushed on gently to seal and fix the walnut shells in place. They take a long time to dry because they are absorbent and you should use at least two coats. Now after it was dry I painted it with Beasty Brown, Elfic Flesh (Vallejo 72.098) for highlights, and Vallejo Black 72.051 for the darkest shadows. I might have used a little goblin green too, but I can’t remember for sure, but basically I wanted to tone to be brownish, not greenish so I don’t think I did.
Anyway. After all this was dry my model was done. And I know you are anxious to see it, but one more thing. To seal a figure we’ve painted we need a varnish of some sort. Spray varnishes/sealers are available, but the same problems persist with them as with other sprays and if fact some varnishes can eat away paint and dull some colors, especially if you use chalks. So what I recommend is very unconventional. I recommend using Vallejo’s Matte Medium (70.540) and reducing it with a little water and brushing it on. At first it will look milky and you’ll think you’ve ruined you model, but it dries clear and so if you just do a little at a time and make sure you’ve gotten into all the grooves and gone over the whole model it’ll seal your model pretty well. Do two coats. And you’re done. And now if you want to use one of the commercial matte varnishes available from Testor’s like DullCote or Armory Spray, Army Painter Anti-shine Matte Varnish, Games Workshop’s Citadel Purity Seal Spray Matte Varnish, etc., you can do that over what you’ve brushed on with more confidence you colours will not be damaged. Still use them lightly. Reaper makes a specific brush on sealer, but I’ve never used it, but it’s worth a try instead of a spray. But I just used the Vallejo’s Matte Medium and that’ll work fine with me since I’m not going to be playing with my model so it won’t see heavy use.
And so without further ado… the Orc with Scimitar! Painted and finished by Jeremiah Embs…

He’s done. A grotesque even Leonardo could be proud of.

Close Shot – Orc is ready to rumble and tumble!
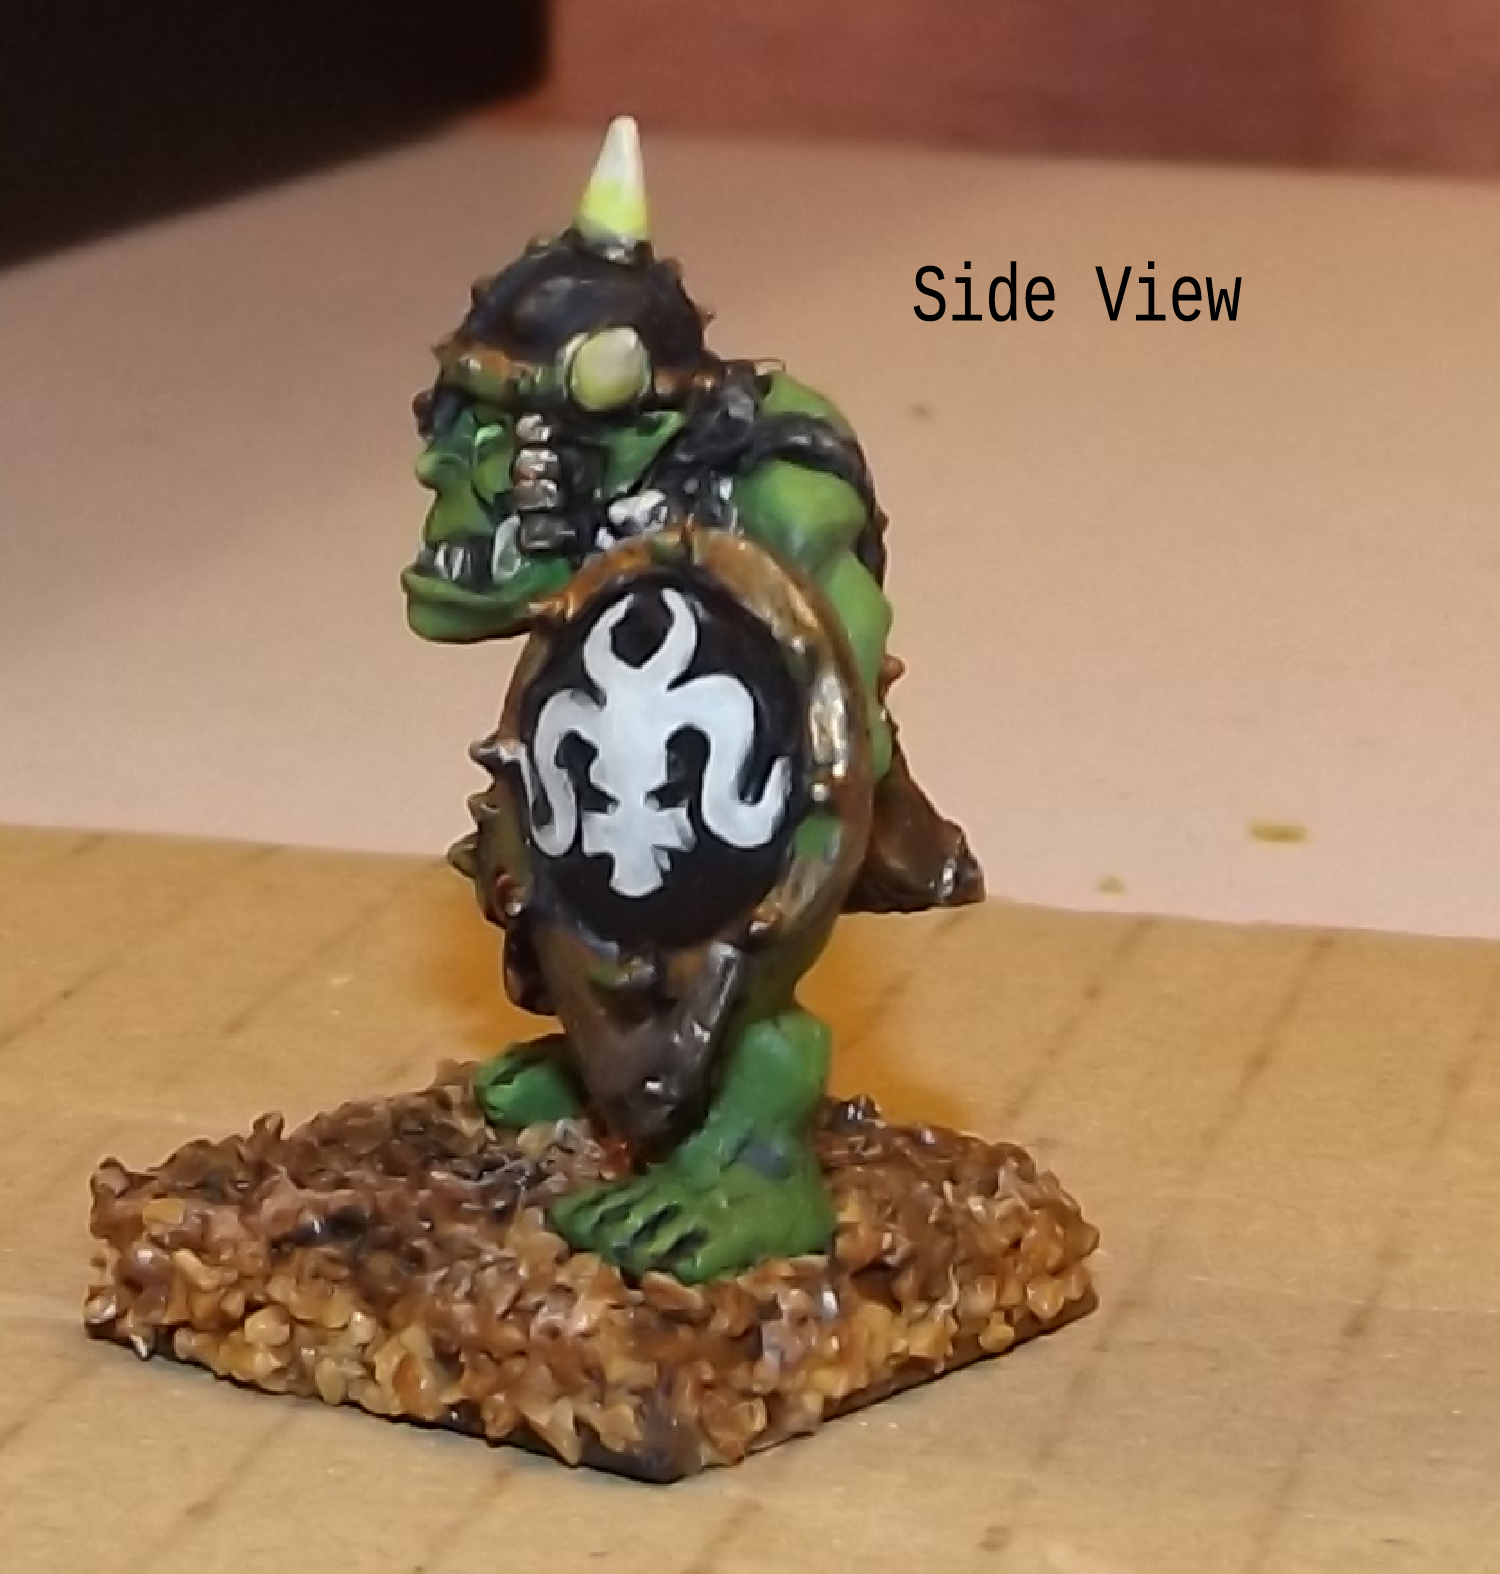
Shield needs a little touchup, but he’s doing okay.


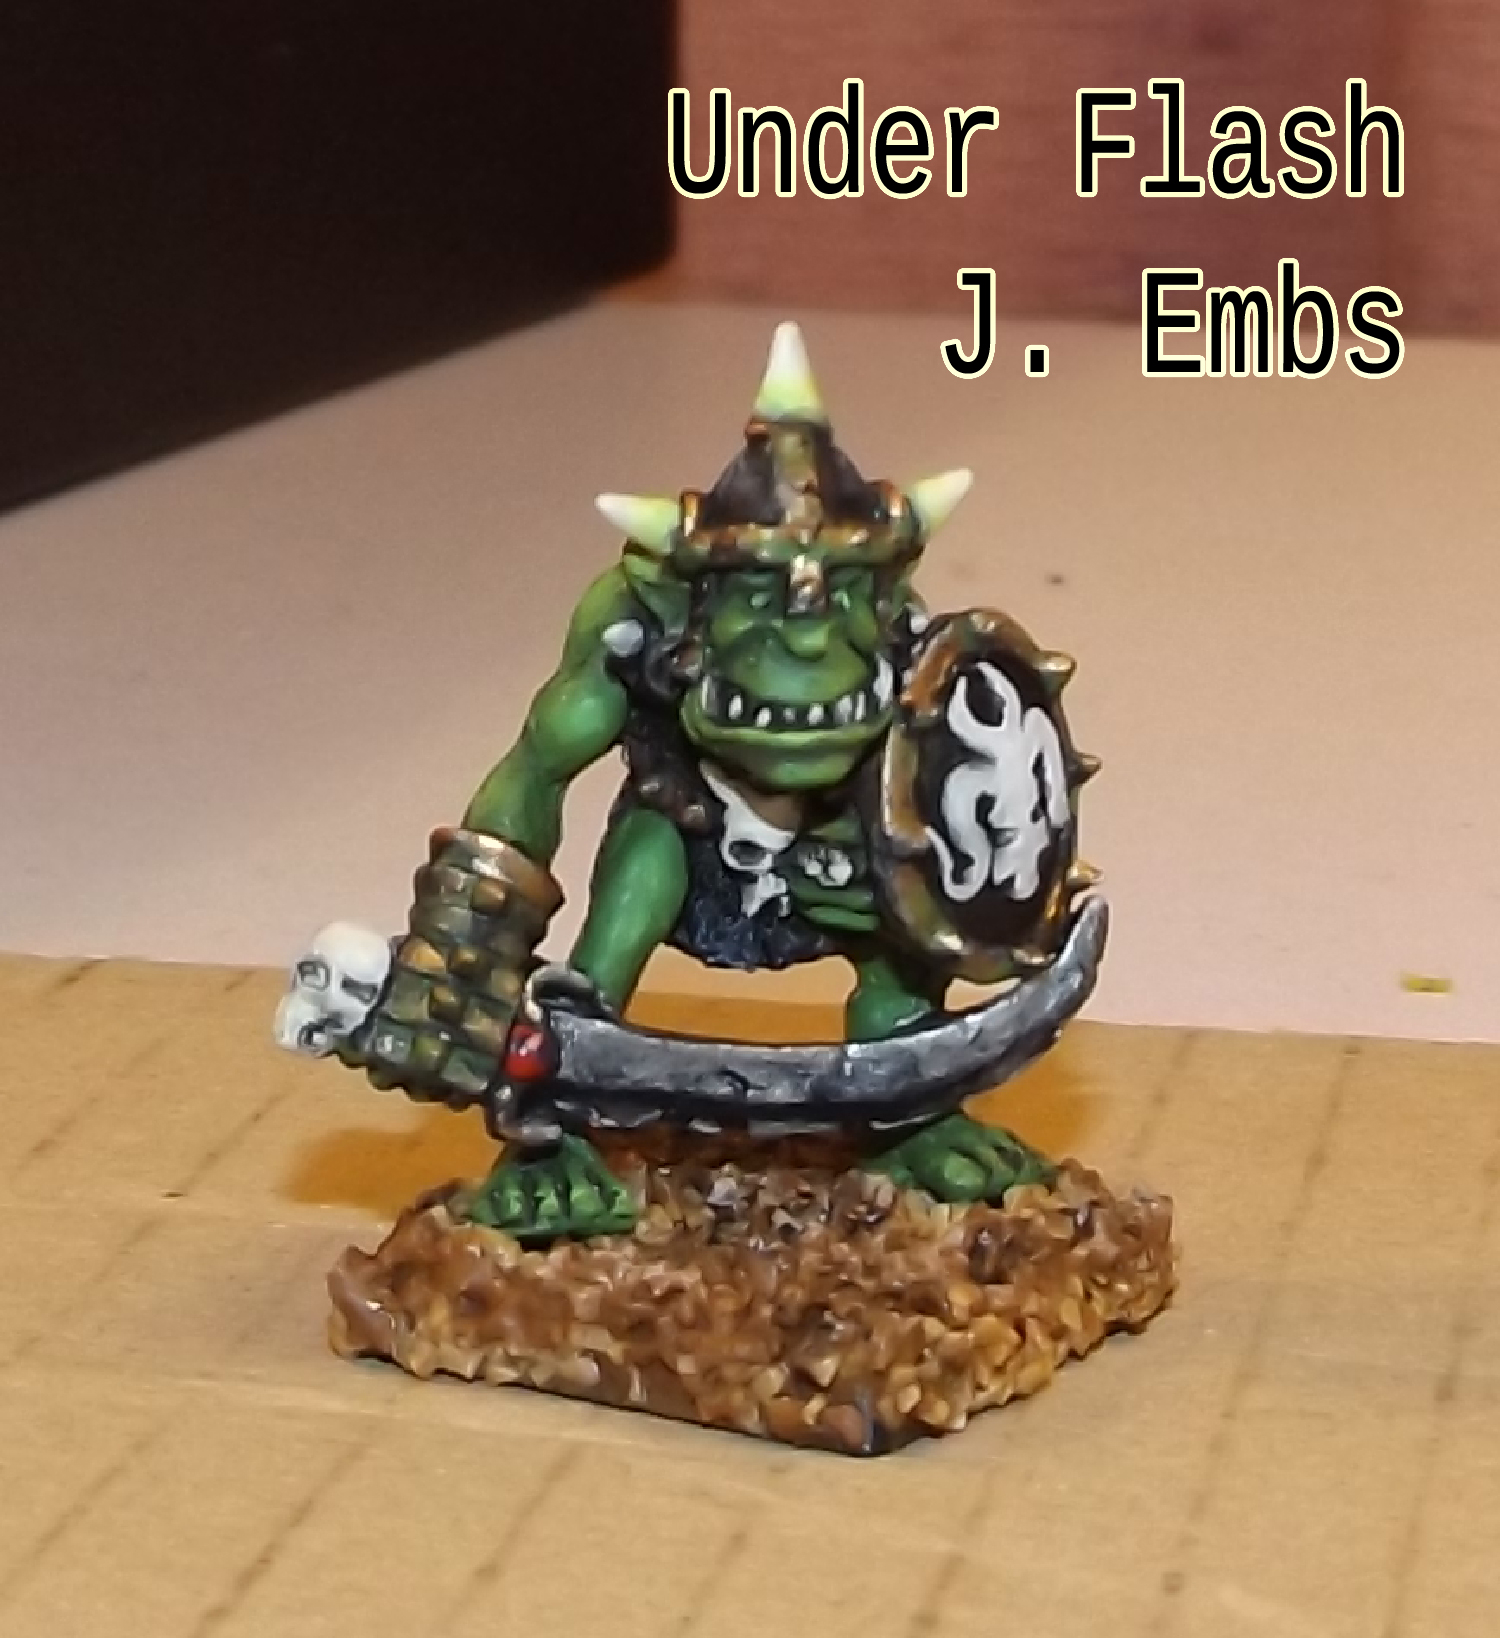
 He needs a little touchup here and there, but he’s done. Hope you enjoyed this article people. It took almost as long to write as to paint the orc.

http://www.edmwi.com/hobby-tool-helping-hands-w.-magnifying-lense-clamp
Above is the kind of thing I use to help me see my minis.